EasyManua.ls Logo

Groen SMARTSTEAM GSSP-BL-3G - User Manual

Groen SMARTSTEAM GSSP-BL-3G
9 pages
Print Icon
To Next Page IconTo Next Page
Loading...
OPERATOR MANUAL
IMPORTANT INFORMATION, KEEP FOR OPERATOR
THIS MANUAL MUST BE RETAINED FOR FUTURE REFERENCE. READ,
UNDERSTAND AND FOLLOW THE INSTRUCTIONS AND WARNINGS
CONTAINED IN THIS MANUAL.
FOR YOUR SAFETY Do not store or use gasoline or other ammable
vapors and liquids in the vicinity of this or any other appliance.
WARNING Improper installation, adjustment, alteration, service or
maintenance can cause property damage, injury or death. Read the
installation, operating and maintenance instructions thoroughly before
installing or servicing this equipment.
NOTIFY CARRIER OF DAMAGE AT ONCE It is the responsibility of the
consignee to inspect the container upon receipt of same and to determine
the possibility of any damage, including concealed damage. Unied
Brands suggests that if you are suspicious of damage to make a notation
on the delivery receipt. It will be the responsibility of the consignee to le
a claim with the carrier. We recommend that you do so at once.
Manufacture Service/Questions 888-994-7636.
PART NUMBER 178961, REV. B (04/22)
This manual provides information for:
SMARTSTEAM® PRO
BOILERLESS STEAMER, DOMESTIC
GSSP-BL-3G/3GS/5G/5GS/10GS &
(2)GSSP-BL-3GS/5GS/10GS
EQUIPMENT DESCRIPTION
The GSSP-BL steamers are equipped with electronic controls. Steamer function
is controlled by touch screen display and LED lighted on/off push button.
The drain system on all models includes condensate spray, which cools drain
water.
REFERENCES
CSA INTERNATIONAL
8501 East Pleasant Valley Road
Cleveland, Ohio 44131
NATIONAL FIRE PROTECTION ASSOCIATION
1 Batterymarch Park
Quincy, Massachusetts 02169-7471
NFPA/54 National Fuel Gas Code
NFPA/70 National Electrical Code
NSF INTERNATIONAL
789 N. Dixboro Rd., P.O. Box 130140
Ann Arbor, Michigan 48105-9723
888-994-7636, fax 888-864-7636
uniedbrands.net
The information in this document is Condential and shall not be disclosed to any third party without the express written
consent of Unied Brands. Information contained in this document is known to be current and accurate at the time of printing/
creation. Unied Brands recommends referencing our product line websites, uniedbrands.net, for the most updated product
information and specications. © 2022 Unied Brands. All Rights Reserved.
STEAMER TYPE
WEIGHT PANS PER CAPACITY PER TYPE
LBS KGS 12 x 20 x 2-1/2 12 x 20 x 4 13 x 18 18 x 26
GSSP-BL-3G Counter Top 240 109 3 2 0 0
GSSP-BL-3GS Single With Stand 315 143 3 2 0 0
(2)GSSP-BL-3GS Double Stack With Stand 475 215 6 4 0 0
GSSP-BL-5G Counter Top 272 123 5 3 0 0
GSSP-BL-5GS Single With Stand 480 217 5 3 0 0
(2)GSSP-BL-5GS Double Stack With Stand 556 252 10 6 0 0
GSSP-BL-10GS Single With Stand 452 205 10 6 20 10
(2)GSSP-BL-10GS Double Stack With Stand 764 347 20 12 40 20
Your Groen GSSP-BL Boilerless Steamer is designed to give years of service. It
has a mirrored stainless steel cavity (steaming chamber) and an atmospheric
steam generating reservoir. A powerful side-mounted convection fan circulates
the steam in the cavity to increase heating efciency, steaming speed, and
uniformity.
Each cavity holds up to three, ve or ten steam table pans (12 x 20 x 21/2 deep).
An 18-gauge stainless steel case encloses the cavity, the steam generating
reservoir and the control compartment that houses electrical components. Door
hinges are eld-reversible (the door may be set to open from the left or right).
Question and Answer IconNeed help?

Do you have a question about the Groen SMARTSTEAM GSSP-BL-3G and is the answer not in the manual?

Overview

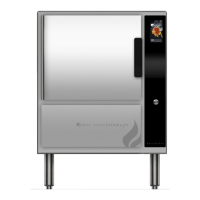
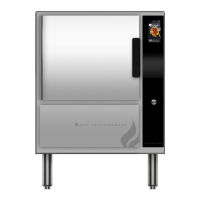
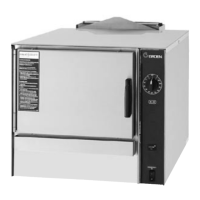
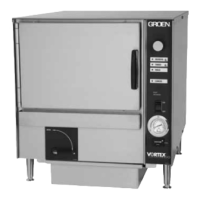
The Groen SmartSteam® Pro Boilerless Steamer is a commercial kitchen appliance designed for efficient and uniform steaming of food, suitable for domestic use. It features a mirrored stainless steel cavity, also known as the steaming chamber, and an atmospheric steam generating reservoir. A powerful side-mounted convection fan circulates steam within the cavity, enhancing heating efficiency, steaming speed, and overall uniformity of cooking.

Function Description

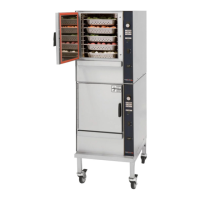
The steamer operates with electronic controls, managed through a touch screen display and an LED-lighted on/off push button. Each cavity of the steamer is designed to hold up to three, five, or ten standard steam table pans (12 x 20 x 2.5 inches deep), depending on the model. The unit is enclosed in an 18-gauge stainless steel case, which houses the cavity, steam generating reservoir, and the electrical components in the control compartment. The door hinges are field-reversible, allowing the door to be configured to open from either the left or right side, providing flexibility in kitchen layout. All models include a drain system equipped with a condensate spray, which cools the drain water before it exits the unit.

The steamer offers three primary operating modes: TIMED, MANUAL, and HOLD.

  • TIMED Mode: This mode allows users to set specific steaming durations using a keypad, with a maximum input of 12 hours. Additional steaming time can be added quickly during operation. If the door is opened, the timer pauses, provided the "Compensating Timer" setting is turned on. When the timed countdown reaches zero, the screen background changes to orange, an alarm sounds, and the unit automatically transitions into HOLD mode.
  • MANUAL Mode: In this mode, the steamer operates in an infinite steam mode without a timer, providing continuous steaming until manually stopped.
  • HOLD Mode: This mode maintains a cavity temperature between 145°F and 165°F (63°C and 74°C). It can be accessed directly from the home screen or automatically after a TIMED mode has expired. This feature is useful for keeping food warm after cooking.

Additionally, the steamer includes a "Pan Timers" feature, which allows users to set individual timers for specific pans. These timers are independent of the main steaming mode and help manage the cooking time for multiple food items simultaneously.

Usage Features

Before initial use, the steamer requires proper installation by qualified personnel familiar with gas, electricity, and plumbing, in accordance with applicable codes. Minimum clearances must be maintained around the unit: 2 inches on the right and left sides, and 6 inches at the rear. It is crucial not to block the rear vents or install the unit within 2 inches of a heat source. The unit must be leveled front to back and pitched slightly to the front to ensure proper drainage.

For gas supply connection, the unit requires a specific NPT pipe size and operates within defined BTU and operating pressure ranges, depending on the model and gas type (Natural Gas or LP). All gas joints must be checked for leaks using a thick soap solution or other suitable leak detector.

Water connection requires a check valve to prevent backflow, with water pressure between 30 and 60 PSI. If pressure exceeds 60 PSI, a pressure regulator is necessary. The unit features a dual water connection with a 3/4-inch female NH connector.

The drain system requires a free air gap between the end of the hose and the building drain to prevent pressure buildup in the cavity, which could cause the door gasket to leak. The drain line must have a constant downward pitch of at least 1/4 inch per foot. Plastic pipes are not recommended for the drain due to boiling water temperatures.

For counter-mounted units, if the 4-inch legs are not used, all four edges of the steamer's bottom must be sealed with RTV to the counter, which should be made of a noncombustible material. Stacked units are factory-assembled and delivered with necessary water and drain connections for a single point connection.

The steamer includes a self-diagnostic process upon startup. After installation, the installer needs to record the startup date in the controls. The unit also has a main power disconnect switch located on the rear back panel.

Maintenance Features

Daily cleaning is essential to maintain performance and prolong the life of the Boilerless Steamer. Before cleaning, the unit must be turned off, allowed to cool completely, and disconnected from the power supply. Water and cleaning solutions should be kept away from controls and electrical components. Hosing or steam cleaning any part of the unit is prohibited.

Exterior Cleaning: A warm solution of mild detergent should be used with a moist cloth to clean the outside surfaces. Stubborn material can be removed with a fiber brush or plastic/rubber scraper. Stainless steel surfaces can be polished with a recognized stainless steel cleaner, scrubbing with the grain.

Interior Cleaning:

  1. After cooling, the steam lid is removed by grasping its tabs and sliding it forward.
  2. The left pan rack and right fan shroud/rack assembly are removed by lifting them up and pulling away from the cavity wall.
  3. These three parts (steam lid, pan racks, fan shroud) can be cleaned in a dishwasher.
  4. The steamer cavity is wiped down with a mild detergent to remove food soils and scale particles. Probes should be cleaned carefully. A thin layer of tightly bound scale is normal, but excessive scale requires deliming.
  5. Cup and overflow drains are cleaned using a specific cleaning brush (part number 175977). The brush is inserted into the drains and pushed through to clear any blockages.
  6. The drain strainer is removed and cleaned to remove debris.
  7. After cleaning, all removed components are replaced.

Deliming: The steamer control monitors water level probes for cleanliness and will display an advanced cleaning warning if probe cleaning is required. This warning provides an 8-hour countdown before the unit automatically shuts down, allowing the operator to complete cooking processes. The deliming process involves adding a specified amount of approved deliming solution to the water reservoir after removing the steam lid, fan shroud, and pan racks. The unit then runs a 60-90 minute deliming cycle.

Door Gasket Maintenance: If steam or condensate leaks around the door, the door gasket should be checked for cracks or splits. The door latch pin can be adjusted by loosening the lock nut, turning the pin 1/4 turn clockwise, and retightening the lock nut. This adjustment helps ensure the door fits tightly.

General Cleaning Guidelines:

  • Only mild cleaning agents should be used.
  • Avoid cleaning agents containing sulfamic acid, chlorides (including hydrochloric acid), or more than 30% phosphoric acid.
  • Do not use degreasers containing potassium hydroxide or sodium hydroxide, or those that are alkaline.
  • Metal sponges, scrapers, wire brushes, or steel wool should not be used on stainless steel surfaces, as they can cause scratches, making cleaning difficult and promoting bacterial growth or corrosion.
  • Hands or tools should not be placed into the steaming chamber until the fan has stopped turning.
  • The removable right side panel must be in its proper location for unit operation.

The use of replacement parts other than those supplied by Groen or its authorized distributor will void all warranties and may cause injury or equipment damage. For service, only Groen Authorized Service Agents should perform the work.

Groen SMARTSTEAM GSSP-BL-3G Specifications

General IconGeneral
ManufacturerGroen
ModelSMARTSTEAM GSSP-BL-3G
CategoryKitchen Appliances
TypeSteam Cooker
Gas TypeNatural Gas
MaterialStainless Steel

Related product manuals