5 / 12
12
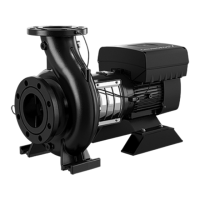
2. Dismantling and assembly
2.1 General information
Follow these instructions if it is necessary to dismantle the pump, either because it is clogged or damaged.
Position numbers of parts (digits) refer to section 6. Exploded view; position numbers of service tools (letters) refer to
section 4. Service tools.
Before dismantling
• Disconnect the electricity supply to the motor.
• Close the isolating valves, if fitted, to avoid draining the system.
• Remove the electric cable in accordance with local regulations.
Before assembly
• Order the necessary service kits.
• Clean and check all parts.
• Replace defective parts by new parts.
• Always replace gaskets and O-rings when the pump is serviced.
During assembly
• Lubricate and tighten screws and nuts to correct torque. See section 5. Tightening torques and lubricants.
2.2 Dismantling
1. Remove the nuts (pos. 36) from the pump housing (pos. 6).
2. Remove the pump housing. It may be necessary to use a plastic hammer (pos. I) or a pinch bar (pos. F) for
separating the pump housing from the motor stool (pos. 1a) or cover (pos. 77).
3. Remove the O-ring (pos. 72a) from the motor stool/cover.
4. Hold the impeller with a strap wrench (pos. D), and slacken the impeller nut (pos. 67). Remove the impeller
nut, spring washer (pos. 66a) and washer (pos. 66) from the shaft.
5. Remove the impeller (pos. 49) using a puller.
6. Remove the key (pos. 11) from the shaft (pos. 51).
7. Remove the spacer rings, if any, between impeller and shaft seal (pos. 105).
8. Shaft seal, types MG13 and HJ92:
• Pull off the rotating shaft seal part using two screwdrivers.
Shaft seal, type M7N:
• First, pull off the spring retainer using two screwdrivers. Next, remove the seal ring with O-ring using two
screwdrivers.
9. Pump with separate motor stool (pos. 1a) and clamped cover (pos. 77):
• Remove the cover.
Pump with separate motor stool (pos. 1a) and screw-fixed cover (pos. 77):
• Remove the screws holding cover and motor stool together, and pull off the cover.
Pump with integrated motor stool/cover (pos. 2):
• Remove the coupling guards (pos. 7) and the screws/nuts holding the motor stool (pos. 28 and 36a) and motor
together. Remove the motor stool (pos. 2). It may be necessary to loosen the motor stool from the motor with a
plastic hammer.
10.Remove the stationary shaft seal part by pushing it from the back.
11. Slacken the screws (pos. 9) fixing the pump shaft (pos. 51) on the motor shaft.
12.Remove the pump shaft. It may be necessary to loosen it with a pinch bar or similar tool.

 Loading...