24
10. Start-up
10.1 General information
10.2 Priming
Closed systems or open systems where the liquid level is
above the pump inlet
1. Close the discharge isolating valve and slowly open the
isolating valve in the suction pipe. Both the pump and the
suction pipe should be completely filled with liquid.
2. Slacken the priming plug in order to vent the pump. Once
liquid runs out, tighten the priming plug.
Suction operation with non-return valve
The suction pipe and the pump must be filled with liquid and
vented before the pump is started.
1. Close the discharge isolating valve and slowly open the
isolating valve in the suction pipe.
2. Remove the priming plug (M).
3. Pour liquid through the hole until the suction pipe and the
pump are completely filled with liquid.
4. Fit the priming plug (M).
The suction pipe may be filled and vented via the priming plug.
See fig. 24. Alternatively a priming device with funnel can be
installed before the pump.
Open systems where the liquid level is below the pump inlet
1. If an isolating valve is fitted on the suction side of the pump,
the valve must be fully open.
2. Close the discharge isolating valve and tighten the priming
and drain plugs.
3. Connect a manual venting pump instead of a priming device
(funnel).
4. A slide valve should be installed between the venting pump
and the centrifugal pump in order to protect the venting pump
against excessive pressure.
5. Once the slide valve at the manual venting pump has been
opened, vent the suction pipe using short, rapid pump strokes
until the liquid runs out on the discharge side.
6. Close the valve at the venting pump.
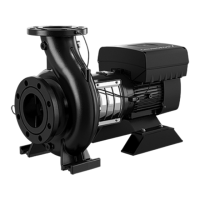
Fig. 24 Drain and priming plug
10.3 Checking the direction of rotation
The correct direction of rotation is shown by arrows on the pump
housing. Seen from the pump end, the direction of rotation must
be counter-clockwise. See fig. 24.
10.4 Start-up
Before starting the pump, completely open the isolating valve on
the suction side of the pump and leave the isolating valve on the
discharge side almost closed.
Start the pump.
Vent the pump during starting by loosening the air vent screw in
the pump head/cover until a steady stream of liquid runs out of
the vent hole.
When the pipework has been filled with liquid, slowly open the
isolating valve on the discharge side until it is completely open.
Check the overload by measuring the motor current consumption
and comparing the value with the nominal current stated on the
motor nameplate. In case of overload, throttle the valve on the
discharge side until the motor is no longer overloaded.
It is advisable always to measure the motor current consumption
during starting.
10.5 Start/stop
Do not start the pump until it has been filled with
liquid and vented.
Warning
When pumping drinking water, the pump should
be flushed through with clean water before start-
up in order to remove any foreign matters such
as preservatives, test liquid or grease.
Warning
Pay attention to the orientation of the priming
hole to ensure that the escaping water does not
cause personal injury or damage to the motor or
other components.
In hot-water installations, special attention
should be paid to the risk of personal injury
caused by scalding hot water.
E: Drain plug
M: Priming plug
TM03 3935 1206
Warning
The pump must be filled with liquid when
checking the direction of rotation.
Warning
Pay attention to the orientation of the vent hole to
ensure that the escaping water does not cause
personal injury or damage to the motor or other
components.
In hot-water installations, special attention
should be paid to the risk of personal injury
caused by scalding hot water.
Warning
If the motor is fitted with a motor with an output
selected on the basis of a specific maximum flow
rate, the motor may be overloaded if the
differential pressure is lower than anticipated.
At the moment of start, the input current of the
pump motor is up to six times higher than the
full-load current stated on the motor nameplate.
Frame size
Maximum number of starts/hour
Number of poles
246
56 - 71 100 250 350
80 - 100 60 140 160
112 - 132 30 60 80
160 - 180 15 30 50
200 - 225 8 15 30
250 - 315 4 8 12

 Loading...