7
5.1 General notes on use
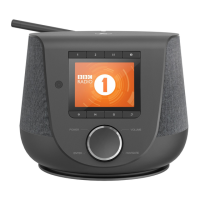
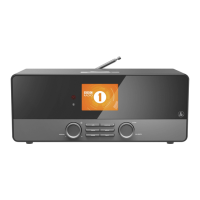
5.1.1 Switch On/Off/Standby
• Press [POWER/VOLUME/ENTER/NAVIGATE] (11)
to switch on the radio.
• Press and hold [POWER/VOLUME/ENTER/NAVIGATE]
(11) for 3 seconds to switch the radio off (standby).
• To completely switch off the device, disconnect it from
the power supply.
5.1.2 Navigation and controls
• After pressing a shortcut button, navigate through
the menu items using.
• Select the individual menu items by turning [POWER/
VOLUME/ENTER/NAVIGATE] (11).
• Conrm the selection by pressing [POWER/VOLUME/
ENTER/NAVIGATE] (11).
5.1.3 Volume adjustment/mute
• Turn the volume up (right) or down (left) by turning
[POWER/VOLUME/ENTER/NAVIGATE] (11)
accordingly.
• Press [
] on the remote control to mute the radio.
• Press [
] again on the remote control to reset the
volume to the value before it was muted.
5.2 Connecting and starting up
Warning
• Only operate the product from a socket that has been
approved for the device. The socket must be installed
close to the product and must be easily accessible.
• Disconnect the product from the power supply using
the On/Off switch – if this is not available, unplug
the power cord from the socket.
• If using a multi-socket power strip, make sure that
the total power consumption of all connected
devices does not exceed the power strip's maximum
throughput rating.
• If you will not be using the product for a prolonged
period, disconnect it from mains power.
• Connect the power supply to the mains connection (12)
on the back of the radio.
• Connect the network cable to a properly installed
and easily accessible network socket.
• Wait until the radio has initialised fully.
• Press [POWER/VOLUME/ENTER/NAVIGATE] (11)
to switch on the radio.
Note – switching on for the rst time
• The Setup Wizard starts up automatically when
the device is turned on for the rst time.
• The default used language is English.
• You can skip the Wizard and start it up again later
in German.
Once the product has been connected to mains power,
initialisation takes place. The radio starts up.
To assist you with the rst-time setup of the radio,
a Setup Wizard is provided.
5.3 General notes on use
Notes on use
• These operating instructions always relate to operation
using the controls on the device. Functions that are
only usable by app or remote control are explained
separately.
• For information on the buttons on the remote control
and their functions (
≙
) that correspond to the control
buttons on the device, please see the Controls and
displays.
• [OK] and the navigation button ► on the remote
control correspond to pressing [POWER/VOLUME/
ENTER/NAVIGATE] (11).
• The navigation button ◄ on the remote control
corresponds to [
] (10) on the front of the radio.
• The navigation buttons ▲/ ▼ correspond to turning
[POWER/VOLUME/ENTER/NAVIGATE] (11) to the
left and right on the front of the radio.
• When a selection among menu items is to be made
(such as YES or NO), the one currently selected has
a light-coloured background ll.
• In menus offering a variety of different options
(such as Equalizer, Update, and so on), the currently
selected option is marked with #.
Navigation and controls
• Select the individual menu items by turning [POWER/
VOLUME/ENTER/NAVIGATE] (11).
• Conrm the selection by pressing [POWER/VOLUME/
ENTER/NAVIGATE] (11).
• After pressing a shortcut button, navigate amongst the
menu items using [VOLUME/ENTER/NAVIGATE] (11).
Entering passwords, search terms, and so on.
• Use [POWER/VOLUME/ENTER/NAVIGATE] (11) to
select each individual number and/or letter and conrm
the selection by pressing [POWER/VOLUME/ENTER/
NAVIGATE] (11).