English
www.jbl.com
07
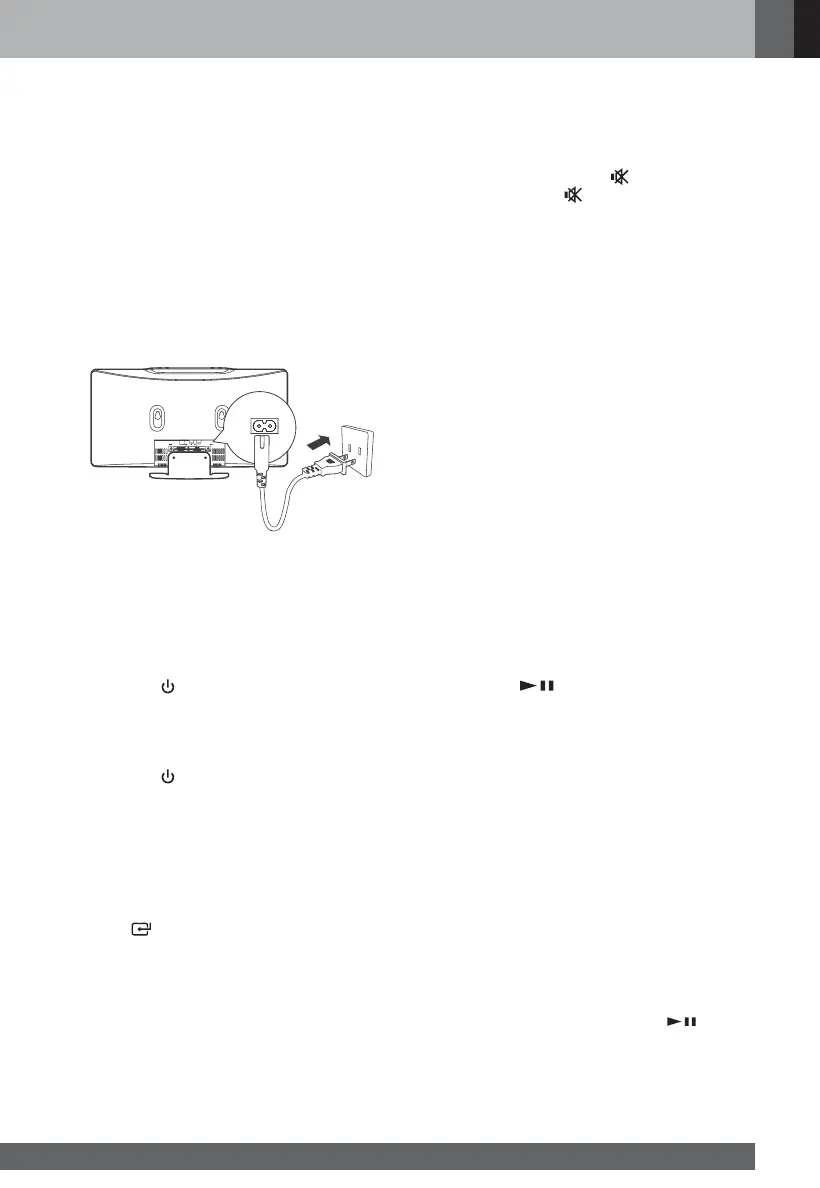
Connecting to Power Supply
Warning:
There might be risk in product damage! Make sure
that the actual voltage is consistent with that printed
on the voltage sticker posted at the back or the bot-
tom of the product. Before connecting the product to
the power supply, make sure that all other connec-
tions have been completed.
• Unplugging or cutting off the power supply may
cause all settings to be deleted. In that case,
reset all settings as desired.
- Plug one end of the power cord into the AC~
Connector of the host and another end to the
power socket.
Basic Operation
Power-on/-off
Connect the product to the power supply to access to
all functions of the product.
• Press the
button on the host or the remote
control to start up.
- When the power is back on, the product will
automatically switch to the play mode you
selected last time.
• Press the
button on the host or the remote
control to enter the standby mode.
Note:
In case of long-time nonuse of the product, unplug
the power cord from the power socket.
Function Selection
Press the button repeatedly on the host or the
corresponding buttons on the remote control to select
between CD, USB, FM, BT(Bluetooth) and LINE IN
functions, the corresponding information of which will
be shown on the display.
Note:
• If there is no audio input to the host (radio input
excluded) for more than 15 minutes, the product
will switch to the standby mode automatically.
• To save energy, cut off the power supply and
shut the product down when not using it.
Adjusting Volume
• When playing, press the VOL+/- button on the
remote control or the host to turn up or turn
down the volume.
• When playing, press the
button to turn off the
sound and press
button again or the VOL+/-
button to turn on the sound.
Sound Effect
When playing, press the EQ button on the remote
control to select between following preset sound
effects: POP, CLASS, JAZZ, ROCK and FLAT.
Bass Boost
Press the BASS button on the remote control to turn
on or off the bass boost function.
Adjusting Display Brightness
Press the DIMMER button on the remote control to
select display brightness.
Synchronizing Clock
1 Under the standby mode, press the MENU
button on the remote control until the product
enters into the clock synchronization mode.
2 Press the
S
/
T
button on the remote control to
select the clock synchronization mode:
- RDS: The host clock synchronizes with the RDS
time.
- OFF: Shut off the clock synchronization function
for manual time adjustment.
3 Press the
button on the host or the remote
control to confirm.
Setting Clock
1 Under the standby mode, press the CLOCK
button on the remote control until the hour
indicator is flashing.
2 Press the
S
/
T
button to set the hour and the
CLOCK button to confirm, the minute indicator is
flashing.
3 Press the
S
/
T
button to set the minute and the
CLOCK button to confirm, the time setting starts
from 0 second.
Note:
• The time interval between two setting steps
made shall be no longer than 15 seconds,
otherwise, the product will exit the time setting.
• When setting the clock, press the
button
at the top of the host or on the remote control to
select the display mode either in 12 hours or 24
hours.
• Press the CLOCK button and the current time
shows on the host. A moment later, the host will
automatically jump back to the former display.

 Loading...