7 – English
Using the same method, attach the remaining clips on
eachsideofthebagtotheframerailtosecure.
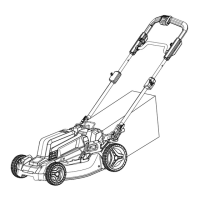
INSTALLING THE GRASS CATCHER (FOR REAR
BAGGING OPERATION)
See Figures 6 - 7.
NOTE: Whenusing the grass catcher, do not install the
mulchingplug.
Removestartkeyandbatterypack.
Liftthereardischargedoor.
Lift the grass catcher by its handle and place under
the rear discharge door so that the hooks on the grass
catcherareseatedontotheslotsonthemowerhousing.
Releasethereardischargedoor.
Reinstallstartkeyandbatterypackwhenyouareready
tomow.
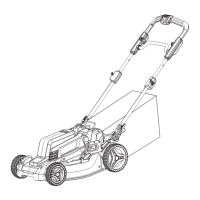
INSTALLING THE MULCHING PLUG
(FOR MULCHING OPERATION)
See Figure 8.
NOTE: Whenusingthemulchingplug,donotinstallthe
grasscatcher.
Removestartkeyandbatterypack.
ASSEMBLY
Liftandholdthereardischargedoor.
Grasp the mulching plug by its handle and insert it at a
slightangle,asshown.
Pushthemulchingplugsecurelyintoplace.
Lowerthereardischargedoor.
Reinstallstartkeyandbatterypackwhenyouareready
tomow.
SETTING BLADE HEIGHT
See Figure 9.
When shipped, the blade on the mower is set to a low-
cuttingposition.Beforeusingthemowerforthefirsttime,
raise the cutting position to the height best suited for your
lawn.Theaveragelawnshouldbebetween1-1/2in.to2in.
duringcoolmonthsandbetween2in.and3-1/4in.during
hotmonths.
To adjust the blade height:
Removestartkeyandbatterypack.
To raise the blade height, grasp the height adjustment
leverandmoveittowardthebackofthemower.
To lower the blade height, grasp the height adjustment
leverandmoveittowardthefrontofthemower.
Reinstallstartkeyandbatterypackwhenyouareready
tomow.
OPERATION
WARNING:
Do not allow familiarity with products to make you care-
less.Rememberthatacarelessfractionofasecondis
sufficienttoinflictseriousinjury.
WARNING:
Alwaysweareyeprotectionwithsideshieldsmarkedto
complywithANSIZ87.1.Failuretodosocouldresultin
objects being thrown into your eyes resulting in possible
seriousinjury.
WARNING:
Do not use any attachments or accessories not recom-
mendedbythemanufacturerofthisproduct.Theuse
of attachments or accessories not recommended can
resultinseriouspersonalinjury.
WARNING:
Always inspect mower for missing or damaged parts
andbladefordamage,uneven,orexcessivewearprior
touse.Useofthemowerwithdamagedormissingparts
canresultinseriouspersonalinjury.
WARNING:
Alwaysremovebatterypacksandstartkeyfromyourtool
when you are assembling parts, making adjustments,
cleaning,orwhennotinuse.Followingtheseinstructions
willpreventaccidentalstartingthatcouldcauseserious
personalinjury.
WARNING:
Before each use, inspect the entire product for damaged,
missing, or loose parts such as screws, nuts, bolts, caps,
etc.Tightensecurelyallfastenersandcapsanddonot
operate this product until all missing or damaged parts
are replaced. Please contact customer service or an
authorizedservicecenterforassistance.
APPLICATIONS
You may use this product for the purpose listed below:
Mowing your lawn
WARNING:
Withtheexceptionofusingtheself-propelledfeatureto
relocatethemowertothemowingsite,alwaysremove
batterypacksandstartkeywhenmovingortransporting
themowertoavoidaccidentalstartingthatcouldresult
inseriouspersonalinjury.