Phase 3 bay cabinet (2-3kW) & three phase
MEcHaNIcaL INStaLLatIoN
The charger can be wall or floor mounted. If wall mounted
make sure that the surface is free of vibrations and the char-
ger is mounted in a vertical position; if floor mounted make
sure that the surfaces are free of vibration, water, humidity.
You must avoid areas where the chargers may be splashed
with water.
Thechargermustbeheldby2or4xingssuitableforthetype
of support. The drilling pattern varies according to the model
of charger (please refer to the technical data sheet).
ELEctrIcaL coNNEctIoN
To the mains supply
You may only connect to the 1-phase 230Vac or 3-phase
400Vac mains supply (depending on the type of the charger)
by means of a standard socket and an appropriate circuit
breaker (not supplied). The current consumption is shown on
thecharger’sinformationplate.
To the battery
Polaritymustbeobserved.Anyreversalofpolaritywillblow
the output fuse, prevent charging and cause DF2 fault code to
bedisplayed.PleaserefertotheFaultmessagescodes.
Connection to battery
The charger must be connected to the battery by the cables
supplied:
• TheREDcable:tothebattery’sPOSITIVEterminal.
• TheBLACKcable:tothebattery’sNEGATIVEterminal.
Initiating charging
1. Connect the battery. If Default setting (autostart ON) then
the charge will start automatically else press the Start/
Stop button.
The display will show 3 different screens alternating
Completion of charging
1. The LCD screen will give you the message of availability
(AVAIL)
The battery is charged and ready to use.
2. STOP the charge and disconnect the battery.
To stop the charge press the Stop/Start button.
Never disconnect the battery during charge without stopping
the charging process.
This could lead to dangerous sparks or to charger damage.
3. Completion of charging with equalization
Manualequalizationonlyconcernsventedlead/acidbatteries.
It will be initiated manually or automatically by switch. All
othertechnologieswillhaveanautomaticpresetequalization
time.
To force manual equalization keep pressed the equalization
button (right button) and contemporary click the On/Off (only
chargingprolesforooded).Ifautomaticthenthescreenwill
also show the following message:
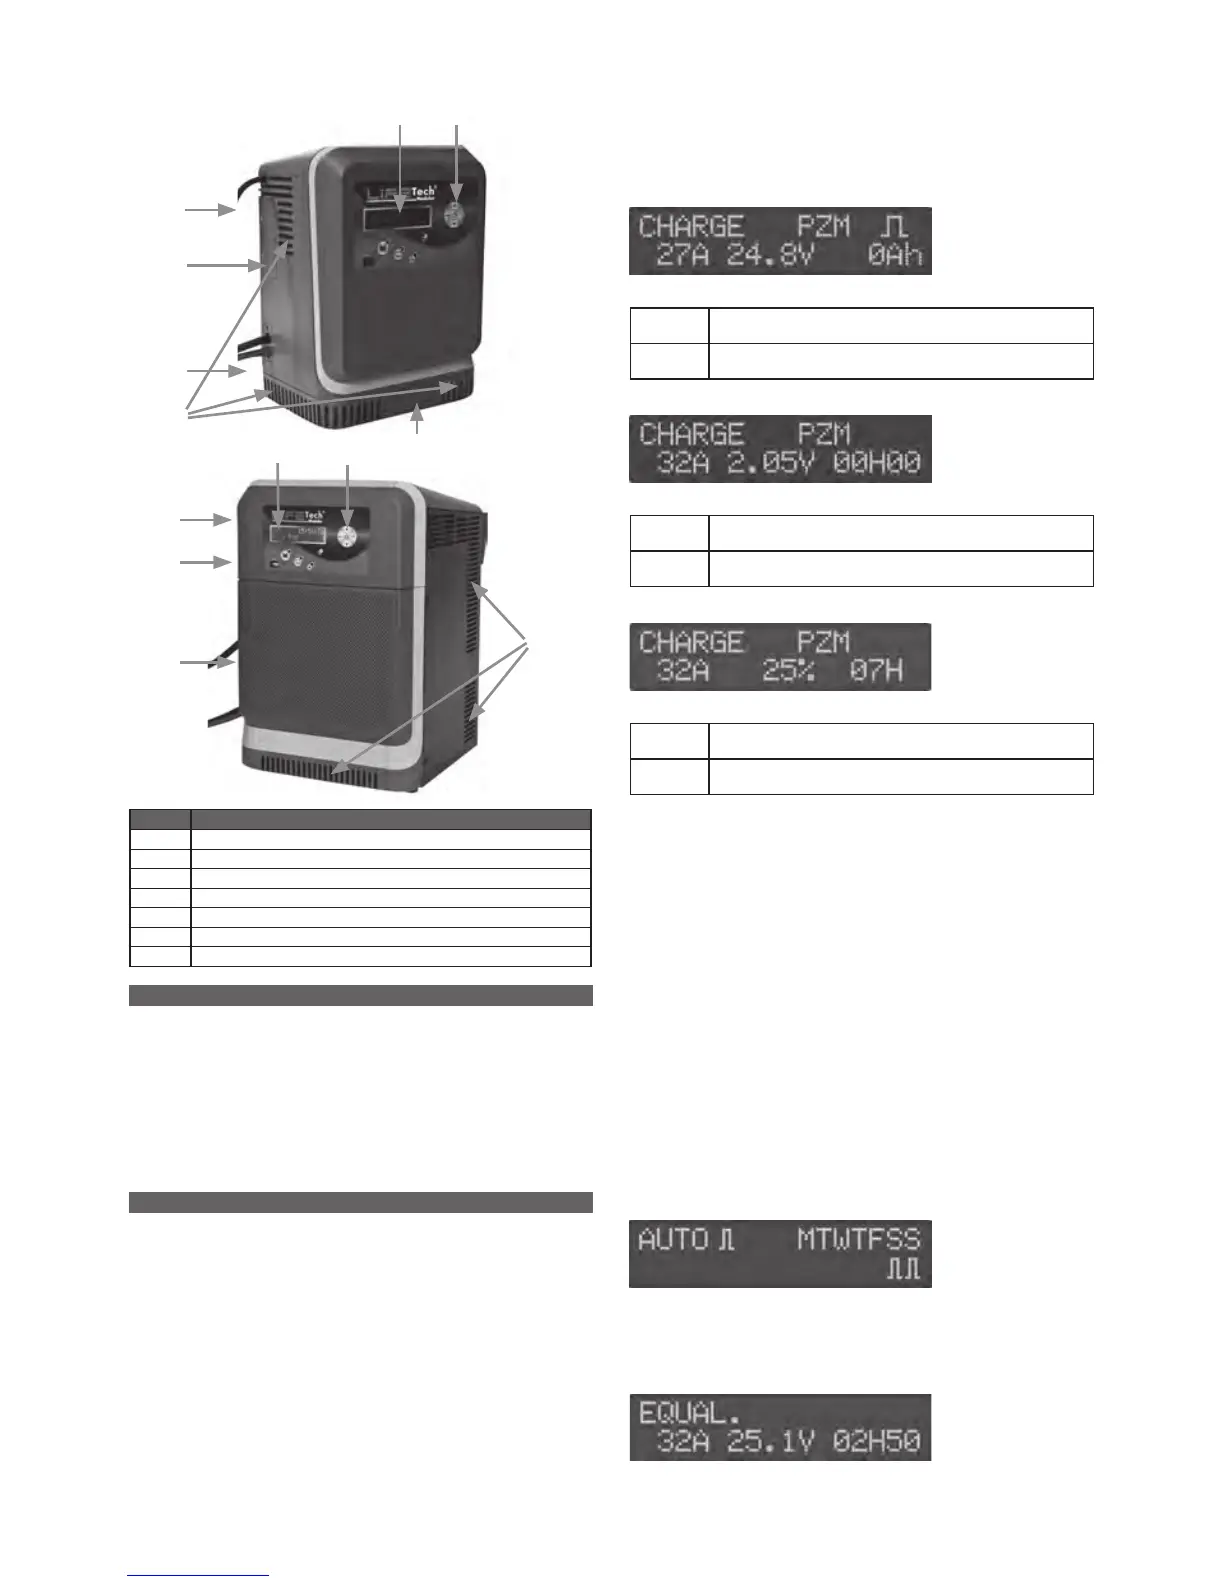
Ref Function
1 ACinputcable
2 DCoutputcable,only
3 Option port
4 Ventilation openings
5 LCDpanel
6 Navigation buttons
7 Cableholder(onlyonsinglephase)
1
3
2
5
6
4
Line1 Chargemode/chargingprole/
equalsymbol(ifselected)ornoblockingfault
Line 2 Chargingcurrent/totalvoltage/Ah+
Screen 1:
Line1 Chargemode/chargingprole/
equalsymbol(ifselected)ornoblockingfault
Line 2 Chargingcurrent/voltage/cell/chargingtime
Screen 2:
Line1 Chargemode/chargingprole/
equalsymbol(ifselected)ornoblockingfault
Line 2 Chargingcurrent/%stateofcharge/
estimated remaining time
Screen 3:
• Equalizationmodeauto
• Daysoftheweek(thesymbolbelowindicateswhenthe
equailzationisprogramed(e.g.SaturdayandSunday)
• Duringequalization
• Line1.modeequal
• Current/totalvoltage/remainingtime
1
3
2
5 6
4
7

 Loading...