1-'age
82
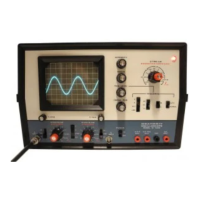
CALIBRATION
In
this
section
,
you
will
set
the
circuit
board
and
front
panel
controls of
your
Oscilloscope
for
proper
opera-
tion
. To
do
this,
you
will
need
a
high
input
impe-
dance
voltmeter
and
a
sine-square
wave
generator
.
Perform
the
adjustments
exactly as
instructed
and
DO
NOT
connect
the
line
cord
to
an
AC
outlet
until
you
are
instructed
to
do
so.
Refer to Pictorial 5-1 (Illustration Booklet, Page 23) for
the
following steps.
Set
the
front
panel
controls as follows:
(- )
Y1
POS: Center of
rotation
.
(- ) Both AC-GND-DC: GND.
( ) Both
VOLTS/CM: 0.02.
( _ ) Both VARIABLE:
Full
clockwise.
(.
~_)
Y1-Y2-CHOP-ALT: Y1.
( - )
Y2
POS: Center of
rotation
.
(,-
) POWER: OFF.
( ) INTENSITY:
Full
clockwise.
C ) FOCUS: Center of rotation.
(- ) TRIG LEVEL: Center of rotation.
(_ ) HORIZ POS: Center of rotation.
( - ) TIME/CM: 200
JLS.
(
~
) SWEEP V AR/HORIZ GAIN:
Full
clockwise.
Y1-Y2-EXT-LINE: Y1.
AC-DC-TV: AC.
(
~
l
+/-:
+.
( ) AUTO-NORMAL: AUTO.
(- ) Refer to Detail 6-1A
and
push
the
alignment
tool
blade
into
the
end
of
the
plastic
nut
starter.
Always
use
this
tool to
adjust
the
trimmer
capacitors
and
controls in
the
following steps.
( , )
Set
all
the
circuit
board
controls to
their
centers
of rotation.
( )
On
the
vertical
circuit
board
,
turn
all
the
trim-
mer
capacitors clockwise
until
the
y are snug.
Then
turn
them
counterclockwise
1/2 turn.
CAUTION: AC
and
DC
voltages
in
some
areas of the
Oscilloscope
may
exceed 1300 volts. Be
ver
y careful
when
you
make
the
following
adjustments
. Make sure
the
Oscilloscope is setting
on
a
nonmetallic
surface
and
is
not
within
reach
of a
water
pipe
or
other
ground
conductor.
The
"Dangerous Voltage
Areas"
are
shown
on
Page
26
in
the
Illustration
Booklet.
( )
Connect
the
Oscilloscope
line
cord
to
an
AC
outlet.
NOTE:
If
you
do
not
get
the
proper
results
in
the
following
steps
, recheck
the
steps
to make
sure
you
have
adjusted
the
correct controls.
If
you still
do
not
get
the
indicated
results,
turn
the
Oscilloscope off
and
refer
to
the
"
In
Case of Difficulty"
section
on
Page 97.