18
Filling the HEATMOR™ Outdoor Furnace Initially with Water
Before lling your HEATMOR™ furnace with water, all plumbing connections at the back of the HEATMOR™
furnace, all electrical hookups, and all heating appliances should be installed and tested for possible leaks.
HEATMOR™ suggests the use of brass ttings when installing the unit.
If you have any questions regarding installation of the furnace or any aspect of installation, contact your local
dealer.
Note: Never start a fire inside the firebox until the water jacket is full of water, and sand has been added to the
base to the correct level.
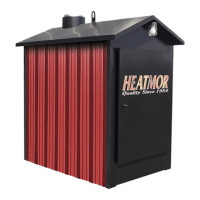
1) Close the bladder gate valve located at the front of the
HEATMOR™ furnace. This valve will ensure no water
can enter the bladder.
2) Close the bottom supply line valve at the back of the HEATMOR™.
3) Open the top return line valve at the back of the HEATMOR™.
4) Remove the weighted ball on the roof of the stove from the relief vent
pipe.
5) Connect the water source to the return line leading to the
HEATMOR™. Use a garden hose to add the water to the return line.
6) Turn on the source of water.
7) The pressured water will now ow through and remove the air out
of the return line as the water ows into the HEATMOR™.
8) Continue adding water until water ows out the relief vent pipe, onto the
roof of the HEATMOR™.
9) Turn off the source of water.
The HEATMOR™ is now full of water and the return line is also full of water and air free,
BUT the supply line leading from the HEATMOR™ to the building to be heated is still full of air.
10) Close the top return line valve at the back of the HEATMOR™.
11) Remove the garden hose that was used to deliver the source of water from the top return line,
BUT leave the garden hose valve open.
12) Open the bottom supply line at the back of the HEATMOR™ (bottom). The pressure of the water in
the HEATMOR™ will now force water from the HEATMOR™ through the supply line back into
the building to be heated. This water will soon discharge from where the garden hose
was connected. When there is a steady stream of water owing, the air will be removed from
that supply line. Usually it requires the removal of approximately ve gallons of water to ensure the line
is air-free.
NOTE: The circulator pumps cannot “push” much air through a system. They are designed to move
water not air.
13) Start the circulating pump. Remember to properly bleed air from the pump.
Rear of Furnace