EasyManua.ls Logo

Henny Penny Evolution Elite EEE-142 - User Manual

Henny Penny Evolution Elite EEE-142
77 pages
Print Icon
To Next Page IconTo Next Page
Loading...
OPERATOR’S
MANUAL
REGISTER WARRANTY ONLINE AT WWW.HENNYPENNY.COM
EVOLUTION ELITE™ (Electric)
MODEL
EEE-141
EEE-142
EEE-143
EEE-144
REDUCED OIL CAPACITY OPEN FRYER

Table of Contents

Questions and Answers

  • E
    Elizabeth LloydAug 20, 2025
    What does Henny Penny Fryer control error code “E-4” mean and how to fix it?
    • D
      Diane VazquezAug 20, 2025
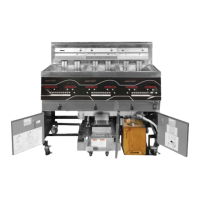
      Error code E-4 indicates that the control board is overheating. Turn the switch to the OFF position, then back to ON. If the display continues to show “E-4”, check the louvers on each side of the unit for any obstructions.
  • S
    Seth FloresAug 22, 2025
    What does Henny Penny Evolution Elite EEE-142 control error code “E-5” mean?
    • J
      josephmichelleAug 22, 2025
      Error code E-5 indicates that the oil is overheating. Turn the switch to the OFF position, then back to ON. If the display continues to show “E-5”, the heating circuits and temperature probe should be checked.
  • H
    hmorrowAug 25, 2025
    What does Henny Penny Evolution Elite EEE-142 control error code “E-10” mean and how to fix it?
    • A
      Anthony GibsonAug 25, 2025
      Error code E-10 indicates an open high limit circuit. Allow the unit to cool down for 15-20 minutes, then reset the high limit using the high limit tool inside the left-hand door, gently pushing it into the hole in the heating element hinge. If the high limit doesn't reset, it needs to be replaced.
  • A
    Ashley VillaAug 26, 2025
    What does Henny Penny Evolution Elite EEE-142 control error code “E-6A” mean?
    • G
      George MolinaAug 26, 2025
      Error code E-6A indicates the temperature probe is open. Turn the switch to the OFF position, then back to ON. If the display continues to show “E-6A”, the temperature probe should be checked.
  • B
    Brenda MooreAug 28, 2025
    What does Henny Penny Evolution Elite EEE-142 control error code “E-6B” mean?
    • C
      cory59Aug 28, 2025
      Error code E-6B indicates the temperature probe is shorted. Turn the switch to the OFF position, then back to ON. If the display continues to show “E-6B”, the temperature probe should be checked.
  • D
    Daniel CurtisAug 30, 2025
    What to do if my Henny Penny Evolution Elite EEE-142 Fryer oil will not drain from vat?
    • D
      davidpaulAug 30, 2025
      If the oil won't drain from the vat, the drain valve might be clogged with crumbs, or the drain trough could be clogged. Open the valve and force a cleaning brush through the drain. Also, remove the right side panel, take out the plug from the end of the trough, and clean the trough.
  • S
    Stephanie TaylorAug 31, 2025
    What does Henny Penny Fryer control error code “E-15” mean?
    • C
      Chloe CruzSep 1, 2025
      Error code E-15 relates to the drain switch. Ensure the drain knob is completely pushed in. If the error persists, have the drain switch checked.
  • J
    Jessica Lowe MDSep 2, 2025
    What does Henny Penny Fryer control error code “E-31” mean?
    • B
      Brian MeyerSep 2, 2025
      Error code E-31 indicates that the elements are up. Lower the elements back into the vat.
  • C
    craigdeanSep 4, 2025
    What does Henny Penny Evolution Elite EEE-142 Fryer control error code “E-18-A” “E-18-B” “E-18-C” mean?
    • G
      Gina ThompsonSep 4, 2025
      Error codes E-18-A, E-18-B, and E-18-C indicate issues with the level sensors. E-18-A means the left level sensor is open, E-18-B means the right level sensor is open, and E-18-C means both level sensors are open. Turn the switch to the OFF position, then back to ON. If the display still indicates a failed sensor, have the connections checked at the control board. Have the sensor checked and replaced if necessary.
  • E
    Eddie SmithSep 6, 2025
    Why is my Henny Penny Evolution Elite EEE-142 POWER switch ON but fryer completely inoperative?
    • J
      Jason AndrewsSep 6, 2025
      The fryer might not be working due to an open circuit. Ensure the fryer is properly plugged in and check the breaker or fuse at the supply box. For some international locations, there might be breakers in the fryer that have tripped open. If so, open the left door and reset the breaker on the fryer.

Summary

Section 1: Introduction and Safety

1-1. Introduction

General overview of the Henny Penny open fryer's purpose and design.

1-2. Features

Lists key features of the Henny Penny open fryer.

1-3. Proper Care

Emphasizes the importance of care and maintenance for the open fryer.

Section 1: Assistance and Safety

1-4. Assistance

Provides contact information for obtaining assistance or support.

1-5. Safety Information

Details safety features and general safety information for operating the fryer.

Section 1: Safety Symbols

Safety Symbols Explained

Explains various safety symbols used in the manual and on the equipment.

Section 2: Installation

2-1. Introduction

Introduces the section on installation and unpacking instructions.

2-2. Unpacking

Step-by-step instructions for unpacking the Henny Penny Evolution Elite fryer.

Section 2: Location and Leveling

2-3. Selecting Fryer Location

Guidance on choosing the optimal location for the fryer for operation and convenience.

2-4. Leveling the Fryer

Instructions on how to properly level the fryer for correct operation.

Section 2: Ventilation and Electrical

2-5. Ventilation of Fryer

Requirements and recommendations for fryer ventilation systems.

2-6. Electrical Requirements

Details electrical specifications and safety precautions for the fryer.

Section 2: Electrical Connections

Cable Restraint and Grounding

Instructions on cable restraint, grounding, and electrical connections.

Section 2: Dimensions

2-7. Dimensions

Provides physical dimensions and clearance information for the fryer.

Section 3: Operation - Components

3-1. Operating Components

Identifies and explains the various operating components of the fryer.

Section 3: Operation - Component Functions

Operating Component Functions Part 1

Explains the function of specific numbered components on the fryer control panel.

Section 3: Operation - Component Functions Continued

Operating Component Functions Part 2

Further explains the function of specific numbered components on the fryer control panel.

Section 3: Operation - Fryer Parts

Figure 3-5 Component Descriptions

Details the components shown in Figure 3-5 (Filter Drain Pan, Basket Rest, etc.).

Section 3: Operation - Setup

3-2. Set-Up Mode

Guides users through the initial setup and configuration of the fryer controls.

Section 3: Operation - Oil Management

3-3. Filling or Adding Oil

Instructions for filling the fryer vat with oil, including bulk supply options.

Section 3: Operation - Daily Procedures

3-4. Morning Start-Up Procedures

Steps for preparing the fryer for operation at the start of the day.

Section 3: Operation - Basic Functions

3-5. Basic Operation

Explains the standard procedure for cooking with the fryer.

3-6. Idle Mode

Describes how to activate and use the Idle Mode to save energy.

Section 3: Operation - Oil Control

3-7. Oil Guardian (Auto Top-Off)

Details the automatic oil level monitoring and replenishment system.

3-8. Product Setpoint Adjustment

How to adjust setpoint temperatures for specific products.

Section 3: Operation - Maintenance

3-9. Replacing the JIB

Instructions for replacing the Jug-in-a-Box (JIB).

Section 3: Operation - Model EEE-141

3-10. Model EEE-141 Oil Reservoir

Procedures for filling and removing the oil reservoir for the EEE-141 model.

Section 3: Operation - Manual Filtering

3-11.A Filter - Manual

Step-by-step guide for performing manual daily filtering of the oil.

Section 3: Operation - Manual Filtering Steps

Manual Filter Operation Steps

Details the sequence of operations for manual oil filtering.

Section 3: Operation - Smart Touch Filtering

3-11.B Filter - Smart Touch

Instructions for running an automatic oil filtering procedure.

Section 3: Operation - Daily Filtering

3-12.A Manual Daily Filtering

Procedure for a more thorough daily cleaning and filtering of the vat.

Section 3: Operation - Manual Filtering Steps

Manual Daily Filtering Steps

Detailed steps for cleaning and filtering the vat manually.

Section 3: Operation - Manual Filtering Continued

Manual Daily Filtering (Continued)

Further steps for manual daily filtering, including rinsing and polishing.

Section 3: Operation - Smart Touch Daily Filtering

3-12.B Smart Touch Daily Filtering

Instructions for performing daily filtering using the automatic Smart Touch system.

Section 3: Operation - Smart Touch Daily Filtering Steps

Smart Touch Daily Filtering Steps

Detailed steps for automatic daily oil filtering.

Section 3: Operation - Oil Discarding

3-13.A Manual Discarding Oil

Procedure for manually discarding oil using the optional oil discard shuttle.

Section 3: Operation - Auto Oil Discarding

3-13.A Auto Discarding Oil

Procedure for automatically discarding oil using the optional oil discard shuttle.

Section 3: Operation - Front Dispose System

3-14. Discarding Oil with Front Dispose System

Instructions for discarding oil using the optional front dispose system.

Section 3: Operation - Front Dispose System Steps

Front Dispose System Operation

Details the operation of the front dispose system for oil.

Section 3: Operation - Bulk Oil Disposal

3-15. Discarding Oil with Bulk Dispose System

Procedure for discarding oil via an optional bulk oil dispose system.

Section 3: Operation - Bulk Oil Disposal Steps

Bulk Oil Dispose System Steps

Step-by-step guide for using the bulk oil dispose system.

Section 3: Operation - Filter Pad Maintenance

3-16. Changing the Filter Pad

Instructions for replacing the filter pad in the fryer.

Section 3: Operation - Filter Pad Replacement

Filter Pad Replacement Steps

Detailed steps for removing and replacing the filter pad.

Section 3: Operation - Basket Rest and Clean-Out

3-17. Basket Rest Removal and Cleaning

Guide to removing and cleaning the fryer's basket rest.

3-18.A Clean-Out Mode - Manual

Instructions for performing a manual clean-out of the fryer vat.

Section 3: Operation - Manual Clean-Out

Manual Clean-Out Procedure Part 1

Steps for initiating and performing the manual clean-out.

Section 3: Operation - Manual Clean-Out Steps

Manual Clean-Out Procedure Part 2

Further steps for manual vat cleaning, including rinsing.

Section 3: Operation - Manual Clean-Out Continued

Manual Clean-Out Procedure Part 3

Final steps for manual cleaning, drying, and preparation.

3-18.B Clean-Out Mode - Smart Touch

Instructions for performing a clean-out using the Smart Touch system.

Section 3: Operation - Smart Touch Clean-Out

Smart Touch Clean-Out Procedure Part 1

Steps for initiating and performing the Smart Touch clean-out.

Section 3: Operation - Smart Touch Clean-Out Steps

Smart Touch Clean-Out Procedure Part 2

Further steps for Smart Touch cleaning, including rinsing.

Section 3: Operation - Smart Touch Clean-Out Continued

Smart Touch Clean-Out Procedure Part 3

Final steps for Smart Touch cleaning, drying, and preparation.

3-19. Check;Replace Filter Drain Pan O-Rings

Guidance on inspecting and replacing O-rings for the filter drain pan.

Section 3: Operation - Filter Statistics

3-19. Filter Drain Pan O-Ring Procedure

Detailed steps for checking and replacing filter drain pan O-rings.

3-20. Filter Button Stats

Information on checking filter status and usage statistics.

Section 3: Operation - Information and Maintenance

3-21. Info Button Stats

Explains how to view oil temperature and set-point information.

3-22. Preventive Maintenance Schedule

Outlines a schedule of recommended maintenance procedures for the fryer.

Section 4: Information Mode

4-1. Information Mode Details

Details on accessing and navigating various information modes.

Section 4: Information Mode Details

Last Load Data

Explains how to view data from the last cooked product cycle.

Section 4: Information Mode Details

Daily Stats

Information on fryer operational statistics for the past 7 days.

Section 4: Information Mode Details

Oil Stats

Details about current oil status and average of last 4 batches.

Section 4: Information Mode Details

Review Usage and USB Support

Accessing usage data and using the USB port for reports.

Section 5: Product Program Mode

5-1. Modifying Product Settings

Guide to changing product names, times, temperatures, and other settings.

Section 5: Product Program Mode Details

Product Settings: Names, Times, Temps, IDs, Alarms

Details on modifying product names, cooking times, temperatures, IDs, and alarms.

Section 5: Product Program Mode Details

Product Settings: Filter Tracking, Load Compensation

Configuration of filter tracking and load compensation settings.

Section 6: Level 2 Programming

6-1. Special Program Mode

Overview of accessing and using the Special Program Mode for detailed settings.

Section 6: Special Program Mode

Special Program Mode: Temp Format, Language, System Init

Settings for temperature units, language, and system initialization.

Section 6: Special Program Mode

Special Program Mode: Audio, Melt Cycle, Idle Mode

Configuration of audio settings, melt cycle, and idle mode.

Section 6: Special Program Mode

Special Program Mode: Filter Tracking (MIXED)

Setting up filter tracking for mixed products.

Section 6: Special Program Mode

Special Program Mode: Filter Tracking (GLOBAL)

Setting up filter tracking for global settings.

Section 6: Special Program Mode

Special Program Mode: Polish Time, Filter Pad Reminder, Clean-Out

Configuration of polish time, filter pad reminders, and clean-out settings.

Section 6: Special Program Mode

Special Program Mode: Baskets, Cooking Indicator, 2 nd Language

Settings for number of baskets, cooking indicator, and second language.

Section 6: Special Program Mode

Special Program Mode: Autolift, Bulk Oil, Disposal, Serial Number

Settings for autolift, bulk oil supply, disposal, and serial number logging.

Section 6: Special Program Mode

Special Program Mode: Program Code, Usage Code, Dispose Code

Changing program codes, usage codes, and dispose codes.

Section 6: Special Program Mode

Special Program Mode: Fill Time, Exit Fill, Skip Skim, 2-Stage Wash

Settings for fill time, user exit fill, skip skim, and 2-stage wash.

6-2. Do Not Disturb Mode

How to program time periods to inhibit filter reminders.

Section 6: Clock and Advanced Modes

6-3. Clock Set

Instructions for setting the date, time, and daylight saving time.

6-4. Advanced Diagnostic Modes

Overview of advanced diagnostic and program modes.

Section 7: Troubleshooting

7-1. Troubleshooting Guide

A table listing common problems, their causes, and corrections.

Section 7: Troubleshooting Continued

Troubleshooting Guide Continued

Additional common problems and their solutions for the fryer.

Section 7: Error Codes

7-2. Error Codes

Lists error codes displayed by the fryer and their causes/corrections.

Section 7: Error Codes Continued

Error Codes Continued

Further details on error codes, their causes, and corrective actions.

Henny Penny Evolution Elite EEE-142 Specifications

General IconGeneral
BrandHenny Penny
ModelEvolution Elite EEE-142
CategoryFryer
LanguageEnglish

Related product manuals