This document is the Owner's Manual & Safety Instructions for the HERCULES 12 1/2" Portable Thickness Planer, Model HE091. It provides essential information for safe operation, maintenance, and troubleshooting of the device.
Function Description
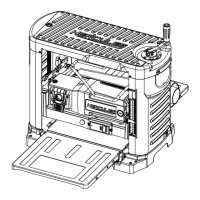
The HERCULES 12 1/2" Portable Thickness Planer is designed to plane natural, dry woodstock to a desired thickness. It features a cutterhead (not visible in the functional description diagram) that removes material from the workpiece. The planer includes an infeed table and an outfeed table to support the workpiece as it passes through the machine. A depth adjustment handle allows the user to control the cutting depth, with a depth adjustment scale and a turret depth stop for precise thickness settings. A depth gage provides an alternative method for setting the depth of cut. The machine is equipped with a power switch for operation and a head lock handle to secure the cutterhead. For dust management, it includes a dust chute that can be connected to a dust collection system. Carrying handles are provided for portability.
Important Technical Specifications
The planer operates on a 120VAC / 60Hz / 15A electrical rating. Its motor speed is 21000 RPM (No Load Revolutions per Minute). The maximum cutting depth is 1/8" for workpieces 3" wide or less, and 3/64" for workpieces 12" wide. It can handle a maximum cutting width of 12-1/2" and a maximum stock thickness of 6". The dust port diameter is 4" and 2-1/2".
Usage Features
- Safety First: The manual emphasizes reading all safety warnings and instructions to prevent electric shock, fire, and serious injury. It highlights the importance of keeping guards in place, removing adjusting keys and wrenches before operation, maintaining a clean work area, and not using the tool in dangerous environments (damp/wet locations, rain). Children and visitors should be kept at a safe distance.
- Extension Cords: Proper extension cord usage is crucial. Table A provides recommended minimum wire gauges for extension cords based on nameplate amperes and cord length (e.g., for 0-6 amperes, an 18-gauge cord for 25' and a 14-gauge cord for 150'). An undersized cord can lead to voltage drop, power loss, and overheating.
- Personal Protective Equipment (PPE): Users are instructed to wear proper apparel, avoiding loose clothing, neckties, rings, bracelets, or other jewelry that could get caught in moving parts. Nonslip footwear and protective hair covering are recommended. Safety glasses are mandatory, and a face or dust mask should be used for dusty operations.
- Workpiece Preparation: Before planing, all foreign objects (nails, metal fragments) must be removed from the workpiece. The planer is designed for natural, dry woodstock and should not be used for non-wood materials. Workpieces must be within specific dimensions: not shorter than 15", narrower than 3/4", wider than 12-1/2", or less than 1/8" thick. Wood that is twisted, warped, knotted, or bowed should not be planed. If one side of the workpiece is uneven, it should be planed flat side down first. If both sides are uneven, a jointer should be used to flatten one side before planing.
- Operation Steps:
- Ensure the dust collection system is in place and the power switch is off.
- Plug in the planer.
- Place the workpiece on the planer table.
- Lower the cutterhead by turning the depth adjustment handle counterclockwise until it just touches the workpiece.
- Align the indicator ring with the "ZERO" mark under the depth adjustment handle.
- Push the head lock handle down.
- Remove the workpiece and turn the depth adjustment handle counterclockwise to set the desired material removal. One full turn removes 1/16" of material. Do not remove more than 1/8" of material at one time.
- Long workpieces should be supported on both ends with stands.
- The turret depth stop can be used for pre-set thicknesses (e.g., 3/8", 1/2", 3/4"). The depth gauge offers an alternative method for setting the depth of cut.
- Turn on the planer by pressing the green power button.
- Once the cutterhead reaches full speed, slowly guide the workpiece into the planer until the infeed roller takes control. The workpiece will auto-feed; do not push it once it starts autofeeding.
- Retrieve the workpiece from the outfeed side.
- Blade Replacement: Blades are double-edged and very sharp, requiring heavy-duty leather work gloves during handling. All three knives must be changed at once to prevent imbalance. The process involves turning off and unplugging the planer, removing the dust chute and blade guard, pushing the cutterhead release switch to rotate the cutterhead, using the T-wrench to remove screws and the gib, removing/rotating/replacing the blade, replacing the gib and screws, and finally reassembling the blade guard and dust chute.
- Correcting Snipe: Snipe, a deeper cut at the ends of the board, can be corrected by slightly elevating the infeed and outfeed table ends and placing a sacrificial board at each end of the workpiece. The board should be run in at a 15-30° angle, lifting both ends slightly while inserting. If snipe cannot be avoided, mill the lumber a few inches longer and cut out the sacrificial material.
Maintenance Features
- Pre-Use Inspection: Before each use, inspect the tool for loose hardware, misalignment or binding of moving parts, cracked or broken parts, damaged electrical wiring, and any other condition affecting safe operation.
- Cleaning: Periodically, wear ANSI-approved safety goggles and NIOSH-approved breathing protection, and blow dust out of the motor vents using dry compressed air. After use, blow debris from the planer, remove resin residue with pitch and gum remover, empty the dust collection system, and wipe external surfaces with a clean cloth.
- Lubrication:
- Elevation Screws and Columns: Remove both side covers, clean the screws and columns, and lubricate with a light coating of multipurpose grease.
- Roller Chains: Remove the left side cover, use chain cleaner, and lubricate with chain oil, wiping off excess.
- Table Waxing: Wax the infeed and outfeed tables after use.
- V-Belt Replacement: The V-belt can be replaced by removing the right side cover, moving the belt back and forth on pulleys while pulling it away, and then installing the new belt in reverse order.
- Damaged Parts: Any damaged guard or part must be carefully checked and properly repaired or replaced before further use. If the supply cord is damaged, it must be replaced by a qualified service technician.
- Troubleshooting: The manual includes a troubleshooting guide for common issues such as the tool not starting, operating slowly, decreased performance, difficult roller case adjustment, chain jumping, belt slipping, excessive dust, noise/rattling, and overheating/circuit breaker tripping. Solutions range from checking connections and replacing parts to having a qualified technician service the tool.
- Storage: After use, turn off the tool, unplug it, clean and lubricate it, and store it indoors out of children's reach.