EasyManua.ls Logo

Hercules HE77 - User Manual

Hercules HE77
20 pages
Print Icon
To Next Page IconTo Next Page
Loading...
10″ COMPACT JOBSITE TABLE SAW
WITH RACK & PINION FENCE
Model
HE77
Owners Manual &
Safety Instructions
20i
WARNING: To prevent serious injury, user must read and
understand Owners Manual. SAVE THIS MANUAL.
When unpacking, make sure that the product is intact and
undamaged. If any parts are missing or broken, please call
1-888-866-5797 as soon as possible. Reference 57673
Question and Answer IconNeed help?

Do you have a question about the Hercules HE77 and is the answer not in the manual?

Summary

IMPORTANT SAFETY INFORMATION

Work Area Safety

Safety guidelines for the work area.

Electrical Safety

Precautions for safe electrical connections and usage.

Personal Safety

Measures to ensure personal safety during operation.

Power Tool Use and Care

Power Tool Use and Care Guidelines

Best practices for using and maintaining power tools.

Tool Service Information

Information on servicing and replacement parts.

Mitre Saw Safety Instructions

Specific safety guidelines for mitre saw operations.

Specific Safety Warnings

Guarding Related Warnings

Warnings and instructions related to tool guards.

Cutting Procedure Warnings

Warnings and precautions for cutting procedures.

Kickback Causes and Warnings

Explanation of kickback causes and related safety warnings.

Operating and Grounding Safety

Table Saw Operating Procedures

Operating procedure warnings for table saw use.

Grounding Instructions

Important instructions regarding tool grounding.

Additional Safety and Specifications

Vibration Safety

Safety precautions related to tool vibration.

Technical Specifications

Technical specifications of the table saw.

Setup and Assembly Overview

Setup Before Use

Procedures to perform before operating the tool.

Functional Description

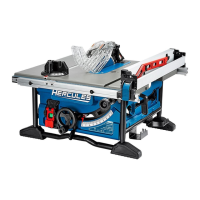
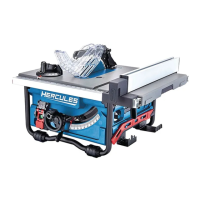
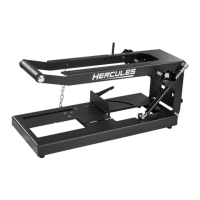
Description of the tool's main components and functions.

Assembly Procedures

Mounting the Table Saw

Instructions for mounting the table saw securely.

Attaching the Handwheel

Procedure for attaching the handwheel.

Removing the Table Insert

Steps to remove and reinstall the table insert.

Component Installation and Adjustment

Adjusting the Riving Knife

Instructions for adjusting the Riving Knife.

Blade Removal and Installation

Procedures for blade removal and installation.

Installing Safety Features

Installing Anti-Kickback Pawls

Steps for installing anti-kickback pawls.

Installing the Blade Guard

Procedure for installing the blade guard.

Setup and Operation Basics

Installing the Miter Gauge

Instructions for installing the miter gauge.

Installing the Rip Fence

Procedure for installing the rip fence.

Dust Collection System

Information on connecting a dust collection system.

Changing Blade Depth and Angle

Procedures for adjusting blade depth and angle.

Advanced Operation Techniques

Rip Fence Operation

How to operate the rip fence for accurate cuts.

Extension Table Usage

Supporting workpieces with the extension table.

Changing Miter Angle

Procedure for changing the miter angle.

Cutting Procedures and Best Practices

Work Area and Workpiece Setup

Preparing the work area and workpiece for cutting.

Hand Placement During Cutting

Safe hand placement during cutting operations.

Performing Rip and Cross Cuts

Instructions for performing different types of cuts.

Maintenance and Servicing

Cleaning, Maintenance, and Lubrication

Guidelines for cleaning and lubricating the tool.

Limited 90 Day Warranty

Overview

This document is an owner's manual and safety instructions for the HERCULES HE77 10" Compact Jobsite Table Saw with Rack & Pinion Fence.

Function Description

The HERCULES HE77 is a 10" compact jobsite table saw designed for cutting wood and wood-like products. It features a rack and pinion fence for precise adjustments. The saw is intended for through-cutting operations, with specific warnings against using abrasive cut-off wheels for ferrous materials. Key components include a saw blade, blade guard, riving knife, anti-kickback pawls, rip fence, miter gauge, and an extension table. The blade depth and angle can be adjusted for various cuts. A dust extraction port is provided for connection to a dust collection system.

Important Technical Specifications

  • Electrical Rating: 120VAC / 60Hz / 15A
  • Rated No. Load Speed: 4800 RPM
  • Cutting Capacity at 90°: 3-1/8"
  • Cutting Capacity at 45°: 2-1/4"
  • Maximum Bevel: 45°
  • Maximum Miter: 90°
  • Saw Blade: 10" Diameter (must be 5/8" arbor, rated to at least 4,800 RPM, and intended for woodcutting)

Usage Features

Work Area Safety:

  • Keep the work area clean, well-lit, and free from flammable liquids, gases, or dust.
  • Keep children and bystanders away.
  • Avoid operating the tool in damp or wet conditions; if unavoidable, use a Ground Fault Circuit Interrupter (GFCI) protected supply.

Personal Safety:

  • Stay alert and use common sense; do not operate when tired or under the influence.
  • Always wear eye protection (ANSI-approved) and breathing protection (NIOSH-approved).
  • Ensure the switch is in the off-position before connecting to power or carrying the tool.
  • Remove adjusting keys or wrenches before turning the tool on.
  • Maintain proper footing and balance.
  • Dress properly, keeping loose clothing, jewelry, hair, and gloves away from moving parts.
  • Connect and properly use dust extraction and collection facilities.
  • Avoid unintentional starting by preparing to work before turning on the tool.
  • Do not leave the tool unattended when plugged in.
  • This product is not a toy; keep it out of reach of children.
  • Individuals with pacemakers should consult their physician and avoid operating alone, using with the trigger locked on, and ensure proper grounding and maintenance.

Power Tool Use and Care:

  • Use the correct power tool for the application.
  • Do not use if the switch does not turn on and off.
  • Disconnect power before making adjustments, changing accessories, or storing.
  • Store idle tools out of reach of children.
  • Maintain tools and accessories, checking for misalignment, binding, breakage, or other conditions affecting operation.
  • Keep cutting tools sharp and clean.
  • Use the tool, accessories, and bits according to instructions, considering working conditions.
  • Keep handles and grasping surfaces dry, clean, and free from oil and grease.

Cutting Procedures:

  • ADANGER: Never place fingers or hands in the vicinity or in line with the saw blade.
  • Feed the workpiece into the saw blade only against the direction of rotation.
  • Never use the miter gauge for ripping, and do not use the rip fence as a length stop for cross-cutting with the miter gauge.
  • When ripping, apply feeding force between the fence and the saw blade. Use a push stick for distances less than 150mm, and a push block for distances less than 50mm.
  • Use only the provided or properly constructed push stick.
  • Never use a damaged or cut push stick.
  • Do not perform any operation "freehand."
  • Never reach around or over a rotating saw blade.
  • Provide auxiliary workpiece support for long and/or wide workpieces.
  • Feed workpiece at an even pace; if jamming occurs, turn off the tool, unplug, and clear the jam.
  • Do not remove cut-off material while the saw is running.
  • Use an auxiliary fence for workpieces less than 2mm thick.
  • Kickback Warnings:
    • Never stand directly in line with the saw blade.
    • Never reach over or behind the saw blade.
    • Never hold and press the cut-off piece against the rotating saw blade.
    • Align the fence parallel with the saw blade.
    • Use a featherboard for non-through cuts.
    • Use extra caution when cutting into blind areas of assembled workpieces.
    • Support large panels to minimize pinching and kickback.
    • Use caution when cutting twisted, knotted, or warped workpieces.
    • Never cut more than one workpiece at a time.
    • When restarting the saw with the blade in the workpiece, center the blade in the kerf.
    • Keep saw blades clean, sharp, and with sufficient set.

Table Saw Operating Procedures:

  • Turn off the saw and disconnect power before removing the table insert, changing the saw blade, or making adjustments to the Riving Knife, anti-kickback device, or blade guard.
  • Never leave the table saw running unattended.
  • Locate the table saw in a well-lit, level area with good footing and balance.
  • Frequently clean and remove sawdust.
  • The table saw must be secured.
  • Remove tools, wood scraps, etc. from the table before turning on the saw.
  • Use saw blades with correct size and shape of arbor holes.
  • Never use damaged or incorrect saw blade mounting means.
  • Never stand on the table saw or use it as a stepping stool.
  • Ensure the saw blade is installed to rotate in the proper direction; do not use grinding wheels, wire brushes, or abrasive wheels.

Grounding:

  • Grounded tools (three-prong plug) require a properly grounded outlet.
  • The green wire in the cord is for grounding and must not be attached to an electrically "live" terminal.

Extension Cords:

  • Grounded tools require a three-wire extension cord. Double insulated tools can use either a two or three-wire extension cord.
  • Use a heavier gauge extension cord for longer distances (refer to Table A for recommended minimum wire gauge).
  • Ensure the extension cord is suitable for outdoor use if operating outdoors (marked "W-A" or "W").
  • Ensure the extension cord is properly wired and in good electrical condition.
  • Protect extension cords from sharp objects, excessive heat, and damp or wet areas.

Vibration Safety:

  • Repeated or long-term exposure to vibration can cause injury.
  • Regular medical check-ups are recommended for regular users.
  • Do not smoke during use.
  • Use tools with the lowest vibration.
  • Include vibration-free periods.
  • Grip workpiece lightly while maintaining control.
  • Maintain the tool and stop use if abnormal vibration occurs.

Setup - Before Use:

  • Always turn off the power switch and unplug the tool before performing any setup procedures.
  • Mounting Table Saw: Select a workbench capable of supporting the saw's weight, ensure no hidden obstructions, mark and drill mounting holes, and secure with bolts, washers, and nuts (not included).
  • Attaching Handwheel: Remove from storage box, remove tape/set screw, place on spindle, align holes, and fasten with set screw.
  • Removing/Installing Table Insert: Lower blade, lock blade, turn insert lock clockwise, pull up insert. To reinstall, push down and turn insert lock counterclockwise.
  • Adjusting Riving Knife: Has three positions (uppermost for through cuts, middle for non-through cuts, down for shipping). Reposition by rotating lock lever up, pulling knife to release, sliding up/down, re-engaging lock pin, and pushing lock lever forward.
  • Removing/Installing Blade: Unplug saw, raise blade to maximum height, remove table insert, remove blade wrench from storage. Turn arbor nut while pulling spindle lock lever, loosen nut counterclockwise. Remove arbor nut, outer blade flange, saw blade. To install, place new blade onto inner blade flange, outer blade flange, arbor nut, tighten clockwise while pulling spindle lock lever. Ensure blade teeth point down toward the front.
  • Installing Anti-Kickback Pawls: Only for through cuts. Unplug saw, set blade angle to 0°, raise blade to maximum height, place riving knife in highest position. Remove pawls from storage, secure over riving knife into mounting hole.
  • Installing Blade Guard: Unplug saw. Hold knobs, push forward, push up until pin comes out of slot, remove guard. To install, hold knobs, push forward, place pin into slot on riving knife, pull guard fully back, push pin to lock. Adjust set screw if guard is not parallel to table.
  • Installing Miter Gauge: Slide into either miter gauge groove.
  • Installing Rip Fence: Raise lock levers, align slot with screw on rail, place fence on rail, push lock levers down. Ensure fence is parallel to blade and locked. Do not use for crosscutting.
  • Dust Collection System: Connect a dust collection hose to the port at the back of the saw.

Operation:

  • Read all safety information before use.
  • Changing Blade Depth: Set blade depth so outer points are 1/8" to 1/4" higher than workpiece, and gullets are below workpiece surface. Turn bevel lock handle clockwise, raise/lower blade with height adjustment knob.
  • Changing Blade Angle: Loosen bevel lock handle counter-clockwise. Push height/bevel handwheel to the left. Hold handwheel and slide bevel indicator to adjust angle (right to increase, left to decrease).
  • Rip Fence Operation: Rail lock lever allows adjustment of fence position. Push lever up to lock, down to unlock.
  • Extension Table: Used to support workpieces extending beyond the table or very narrow workpieces. Secure to rip fence in lower position for support, higher position for narrow workpieces.
  • Adjusting Knob: Allows precise adjustments to rip fence position. Unlock rail lock lever, slide fence, turn adjusting knob (clockwise to move right, counter-clockwise to move left), then lock rail lock lever.
  • Changing Miter Angle: Loosen lock knob counter-clockwise. Rotate gauge in miter gauge groove to desired angle.
  • Making a Cut: After adjusting width/angle, ensure trigger is off, plug into grounded 120V outlet. Insert switch key, turn switch on. Avoid bevel ripping on bevelling side. Hold workpiece firmly with left hand, push with right hand and push stick towards blade. Keep hands out of blade path. Continue guiding with push stick. After cut, maintain control, turn off switch, wait for blade to stop before removing workpiece. Turn off saw, remove key, disconnect power, clean, and store.

Maintenance Features

  • BEFORE EACH USE: Inspect the tool for loose hardware, misalignment or binding of moving parts, cracked or broken parts, damaged electrical wiring, or any other condition affecting safe operation.
  • AFTER USE: Wipe external surfaces with a clean cloth.
  • Damaged Supply Cord: If the supply cord is damaged, it must be replaced only by a qualified service technician.
  • General Maintenance: Procedures not specifically explained in the manual must be performed by a qualified technician. Do not use damaged equipment. If abnormal noise or vibration occurs, have the problem corrected before further use.
  • Parts Replacement: All repairs and parts replacements should be undertaken by certified and licensed technicians.

Hercules HE77 Specifications

General IconGeneral
BrandHercules
ModelHE77
CategorySaw
LanguageEnglish

Related product manuals