EN
8
1
2
3
670 mm / 26.4”
5. Placement and Mounting
5.1 Placement
A If your TV is placed on a table, you can place
the soundbar on the table directly in front of
the TV stand, centered with the TV screen.
B If your TV is attached to a wall, you can
mount the soundbar on the wall directly
below the TV screen.
5.2 Wall Mounting (if using option-B)
- Installation must be carried out by qualied
personnel only. Incorrect assembly can
result in severe personal injury and property
damage (if you intend to install this product
yourself, you must check for installations
such as electrical wiring and plumbing
that may be buried inside the wall). It is the
installer’s responsibility to verify that the
wall will safely support the total load of the
soundbar and wall brackets.
- Additional tools (not included) are required
for the installation.
- Do not overtighten screws.
- Keep this instruction manual for future
reference.
- Use an electronic stud finder to check the
wall type before drilling and mounting.
WARNING
• To prevent injury, this apparatus must be securely
attached to the oor/wall in accordance with the
installation instructions.
• Suggested wall mounting height: ≤ 1.5 meters.
1. Drill 2 parallel holes (Ø 5.5-6 mm each
according to wall type) in the wall. The
distance between the holes should be 670
mm.
2. Insert the supplied wall anchors into 2 screw
holes on the wall. Insert the supplied wall
bracket screws through the wall brackets into
the wall anchors. Fix and tighten the screws
on the wall.
3. Hang the unit on the wall mount brackets.
9
6. Connections
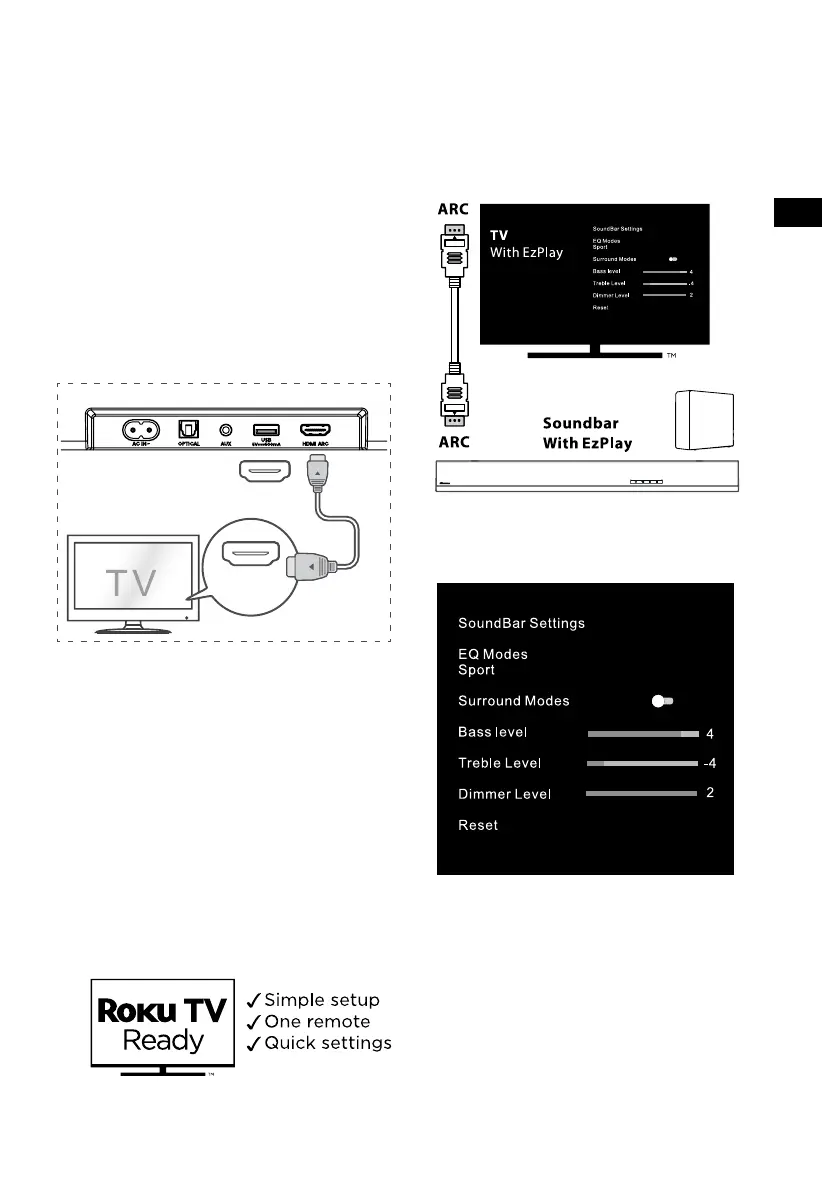
6.1 Use the HDMI ARC Socket
The ARC (Audio Return Channel) function allows
you to send audio from your ARC- compliant TV to
your soundbar through a single HDMI connection.
To enjoy the ARC function, please ensure your
TV is both HDMI-CEC and ARC compliant and set
up accordingly. When correctly set up, you can
use your TV remote control to adjust the volume
output (VOL
+
/
−
and MUTE) of the soundbar.
• Connect the HDMI cable from soundbar
HDMI ARC socket to the HDMI ARC socket
on your ARC compliant TV. Then press the
remote control to select HDMI ARC.
.*3/'8)
.*3/
'8)
Tips:
• Your TV must support the HDMI-CEC and
ARC function. HDMI-CEC and ARC must be
set to On.
• The setting method of HDMI-CEC and ARC
may differ depending on the TV. For details
about ARC function, please refer to the
owner’s manual.
• Only HDMI 1.4 or higher version cable can
support the ARC function.
6.2 Use the Roku TV
• If you have a Roku TV™, simply plug in the
HDMI cable to the ARC ports and follow the
Roku TV Ready™ on-screen instructions.
6.3 Use the Hisense EzPlay Function
For Hisense EzPlay, when the Soundbar connects
with a Hisense TV via HDMI ARC, the will be a
Soundbar Setting menu on the TV, and you can
control this menu via you TV remote to control
most of the Soundbar features.
TV menu example (different models may have
dierent menus) :
Setting--sound--Soundbar Setting.
Note:
• This function is available only when both
Soundbar and TV support Hisense Ezplay.
• This function requires Soundbar and TV
connected via HDMI ARC, and the CEC of the
TV must be trned ON.
• If everytime setting right, for the first time
connect, there would be a tip on the TV
screen to guide you find the Soundbar
setting menu.
 Loading...