48
English
Icing protection system (Fig. 39, 40)
This system is to protect carburetor from icing when the unit is
operated in winter time.
1. When you need icing system work, remove air fi lter cover (41).
Pull out the shutter (45) from inside the air fi lter cover and
reinstall it in winter time position by turning half-way. (Fig. 39)
This will allow heated air to fl ow from cylinder side to carburetor
cabin through the opening (46).
NOTE
When winter time has been over and carburetor will not suff er
from icing, make sure that the shutter is reinstalled in ordinary
position (Fig. 40).
For long-term storage
Drain all fuel from the fuel tank. Start and let engine run until it stops.
Repair any damage which has resulted from use. Clean the unit with
a clean rag, or the use of high pressure air hose. Put a few drops of
two-cycle engine oil into the cylinder through the spark plug hole,
and spin the engine over several times to distribute oil.
Cover the unit and store it in a dry area.
CHAIN SHARPENING
Parts of a cutter (Fig. 41, 42)
WARNING
○ Gloves should be used when sharpening chain.
○ Be sure to round off the front edge to reduce the chance of
kickback or tie-strap breakage.
47. Top plate
48. Cutting corner
49. Side plate
50. Gullet
51. Heel
52. Chassis
53. Rivet hole
54. Toe
55. Depth gauge
56. Correct angle on top plate (degree of angle depends on chain
type)
57. Slightly protruding “hook” or point (curve on non-chisel chain)
58. Top of depth gauge at correct height below top plate
59. Front of depth gauge rounded off
LOWERING DEPTH GAUGES WITH A FILE
1) If you sharpen your cutters with a fi le holder, check and lower the
depth.
2) Check depth gauges every third sharpening.
3) Place depth gauge tool on cutter. If depth gauge projects, fi le
it level with the top of the tool. Always fi le from the inside of the
chain toward an outside cutter. (Fig. 43)
4) Round off front corner to maintain original shape of depth gauge
after using depth gauge tool. Always follow the recommended
depth gauge setting found in the maintenance or operator
manual for your saw. (Fig. 44)
GENERAL INSTRUCTIONS FOR FILING CUTTERS
File (60) cutter on one side of the chain from the inside out. File on
forward stroke only. (Fig. 45)
5) Keep all cutters the same length. (Fig. 46)
6) File enough to remove any damage to cutting edges (side plate
(62) and top plate (63)) of cutter. (Fig. 47)
NOTE
Do not fi le or alter the tops of bumper drive links (61). (Fig. 46).
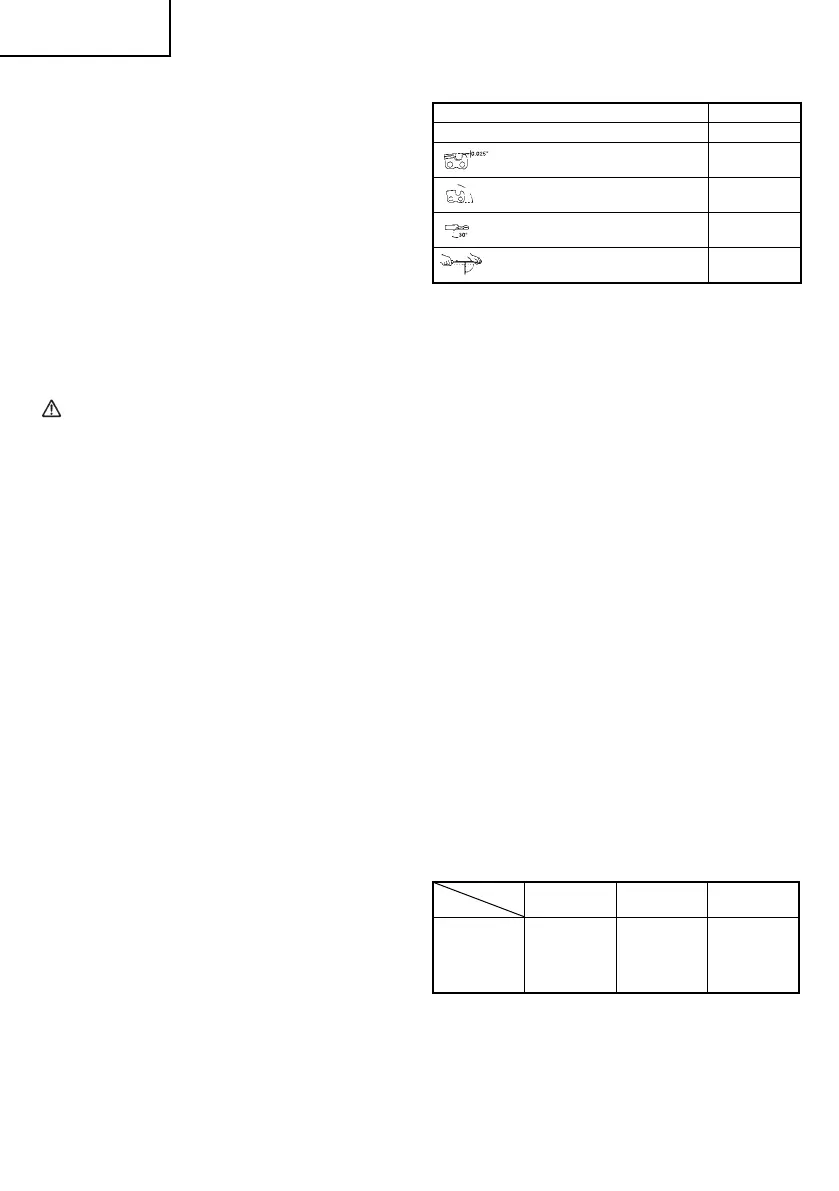
SHARPENING ANGLES FOR SHARPENING SAW CHAIN
1. Part Number 95VPX/20BPX
2. Pitch 0.325”
3. Depth Gauge Setting 0.025"
85°
4. Side Plate Filing Angle 85°
5. Top Plate Angle 30°
100°
6. File Guide Angle 100°
Maintenance schedule
Below you will fi nd some general maintenance instructions. For
further information please contact Hitachi Authorized Service
Centers.
Daily maintenance
○ Clean the exterior of the unit.
○ Clean the chain oil fi lter port.
○ Clean the groove and oil fi lter port in the guide bar.
○ Clean the side case of saw dust.
○ Check that the saw chain is sharp.
○ Check that the bar nuts are suffi ciently tightened.
○ Make sure that the chain transport guard is undamaged and that
it can be securely fi tted.
○ Check that nuts and screws are suffi ciently tightened.
Especially inspect the bolt of muffl er and ensure that they are
properly tightened before starting engine. Should any of the
bolts be loose, retighten them immediately. Failure to do so
could result in serious hazard.
○ Check the tip of the guide bar. Please exchange it for the new
one when it is worn out.
○ Check the band of chain brake. Please exchange it for the new
one when it is worn out.
○ Clean the air fi lter.
Weekly maintenance
○ Check the recoil starter, especially cord.
○ Clean the exterior of the spark plug.
○ Remove the spark plug and check the electrode gap. Adjust it to
0.6 mm or change the spark plug.
○ Clean the cooling fi ns on the cylinder and check that the air
intake at the recoil starter is not clogged.
Monthly maintenance
○ Rinse the fuel tank with gasoline, and clean fuel fi lter.
○ Clean chain oil fi lter.
○ Clean the exterior of the carburetor and the space around it.
○ Clean the fan and the space around it.
NOTE
When ordering the parts to your nearest dealer, please use the
item numbers showing on the parts breakdown section in this
instruction.
BAR NO.
LENGTH-
TYPE
CHAIN NO.
MODEL NO.
OREGON
130MLBK041
150MLBK041
160MLBK041
180MLBK041
200PXBK041
13”
15”
16”
18”
20”
95VPX-56
95VPX-64
95VPX-66
95VPX-72
20BPX-78
05EngCS51EAPNE.indd4805EngCS51EAPNE.indd48 2012/03/199:40:462012/03/199:40:46
 Loading...