Optimize
343-3512A (03/13)
1 of 27
System Guidelines
Denitions:
PARENT PANEL RUN - Panels (or a single panel) congured in a straight line intended to divide space. It is
usually longer than the panels used to stabilize it.
RETURN PANELS - Panels attached to a parent run for the purpose of stabilizing it. Return panels may also
have the effect of dividing space.
NOTE: Return panels must be no more than 30" lower than the maximum height of the parent.
A parent panel run must be a minimum of 48" and a maximum
of 10 feet, and must have at least two return panels totaling
at least 70% of the length of the parent run extended in one
direction (one at the beginning and at the end of the parent run)
as dened below:
X plus Y must total the greater of:
(A) 60% of the parent run length or
(B) 84"
A parent panel run must be a minimum of 48" and a maximum
of 10 feet, and must have a minimum of two return panels
totaling 20% of the length of parent run extended in opposing
directions on each side of the parent run.
Units must be suspended on panels of a corresponding width,
or suspended across two panels with a combined width equal
to the storage unit width. More than two storage units can
be suspended from a single panel only if return panels are
positioned at each end of the storage units.
Optimize Panel Systems Panel Specications
Overhead Storage Guidelines
343-3512A (03/13)
18 of 27
Optimize
Terrace DNA Installation Packet
(optional accessory):
Position shelf divider at an angle, as shown, and insert flange underneath lip of storage shelf back stop.
Rotate shelf divider down into position.
Move shelf divider to the desired position by lifting up on front of divider (approx. 15°) and sliding divider from
side-to-side.
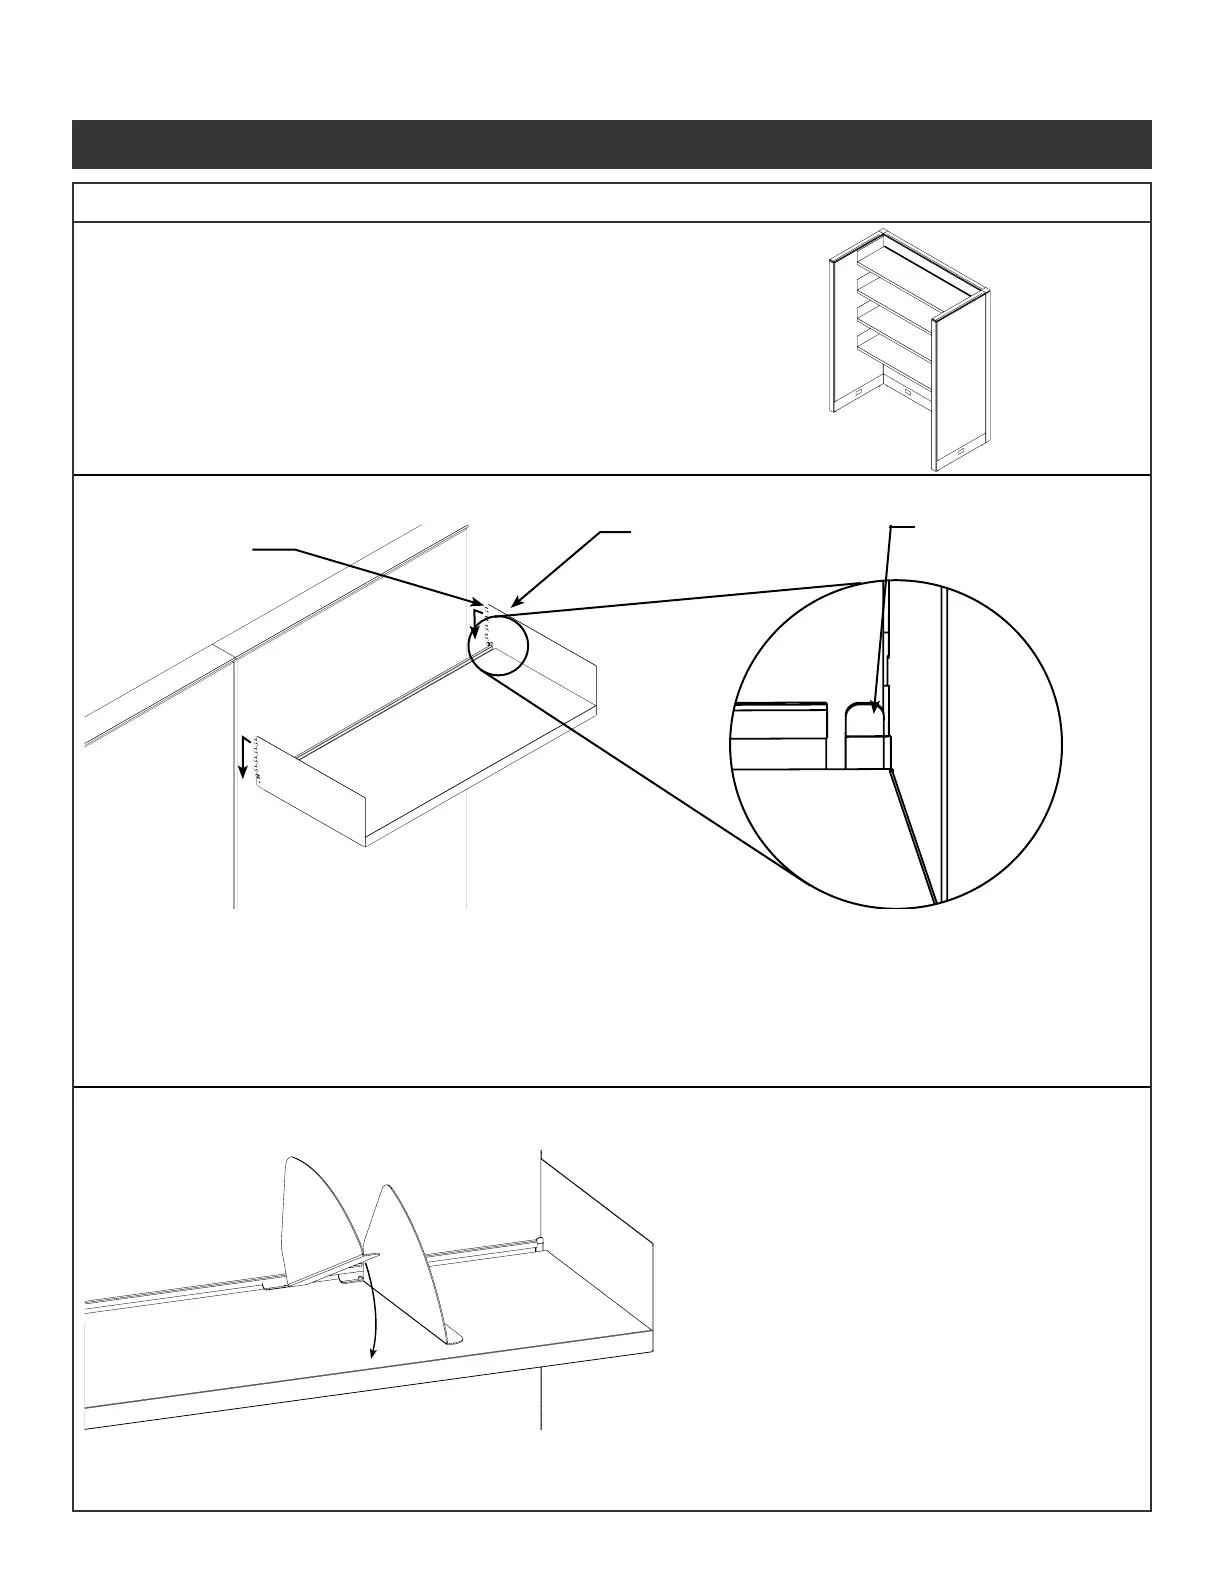
Attach overhead shelf unit to panel by inserting end panel hooks into panel slots.
Tap down on each end panel to fully seat hooks.
Pivot retaining clips toward panel to lock overhead shelf unit in place.
Pull retaining clips away from panel.
Carefully lift overhead shelf unit upward to unseat end panel hooks from panel slots.
Remove overhead shelf unit from panel.
End panel
hooks
shelf unit
(Underneath shelf)
Illustration 47a. Attach Overhead Shelf Unit:
Illustration 2: Shelf Divider (optional accessory)
Illustration 1: Attach Overhead Shelf Unit
Refer to Page 1 for Overhead Storage Guidelines
Overhead Storage Installation
343-3512A (03/13)
18 of 27
Optimize
Terrace DNA Installation Packet
(optional accessory):
Position shelf divider at an angle, as shown, and insert flange underneath lip of storage shelf back stop.
Rotate shelf divider down into position.
Move shelf divider to the desired position by lifting up on front of divider (approx. 15°) and sliding divider from
side-to-side.
Attach overhead shelf unit to panel by inserting end panel hooks into panel slots.
Tap down on each end panel to fully seat hooks.
Pivot retaining clips toward panel to lock overhead shelf unit in place.
Pull retaining clips away from panel.
Carefully lift overhead shelf unit upward to unseat end panel hooks from panel slots.
Remove overhead shelf unit from panel.
End panel
hooks
Overhead
shelf unit
Retaining clip
(Underneath shelf)
Illustration 47a. Attach Overhead Shelf Unit:
Illustration 2: Shelf Divider (optional accessory)
Illustration 1: Attach Overhead Shelf Unit
Refer to Page 1 for Overhead Storage Guidelines
Overhead Storage Installation
Retaining clip
(Underneath shelf)
Overhead Storage Unit Guidelines
Units must be suspended on panels of a corresponding
width, or suspended across two panels with
a combined width equal to the storage unit width.
More than two storage units can be suspended from
a single panel only if return panels are positions at
each end of the storage units.
Installation:
Step 1 - Attach overhead shelf unit to panel by inserting
end panel hooks into panel slots.
Step 2 - Tap down on each end panel to fully seat hooks.
Step 3 - Pivot retaining clips toward panel to lock over
head shelf unit in place.
Removal:
Step 1 - Pull retaining clips away from panel.
Step 2 - Carefully lift overhead shelf unit upward to
unseat end panel hooks from panel slots.
Step 3 - Remove overhead shelf unit from panel.
Step 1 - Position shelf divider at an angle, as
shown, and insert ange underneath lip of
storage shelf back stop.
Step 2 - Rotate shelf divider down into position.
Step 3 - Move shelf divider to the desired position
by lifting up on front of divider (approx. 15°)
and sliding divider from side-to-side.
Illustration 13. Countertop Installation
Illustration 14. Overhead Storage Installation
Illustration 14a. Overhead Shelf
Illustration 14b. Shelf Divider (optional accessory)
Panel System Installation Packet
343-3890A
(03/17)
Page 19 of 27
 Loading...