7
ANCHORING THE SAFE TO A FLOOR
PREPARATION
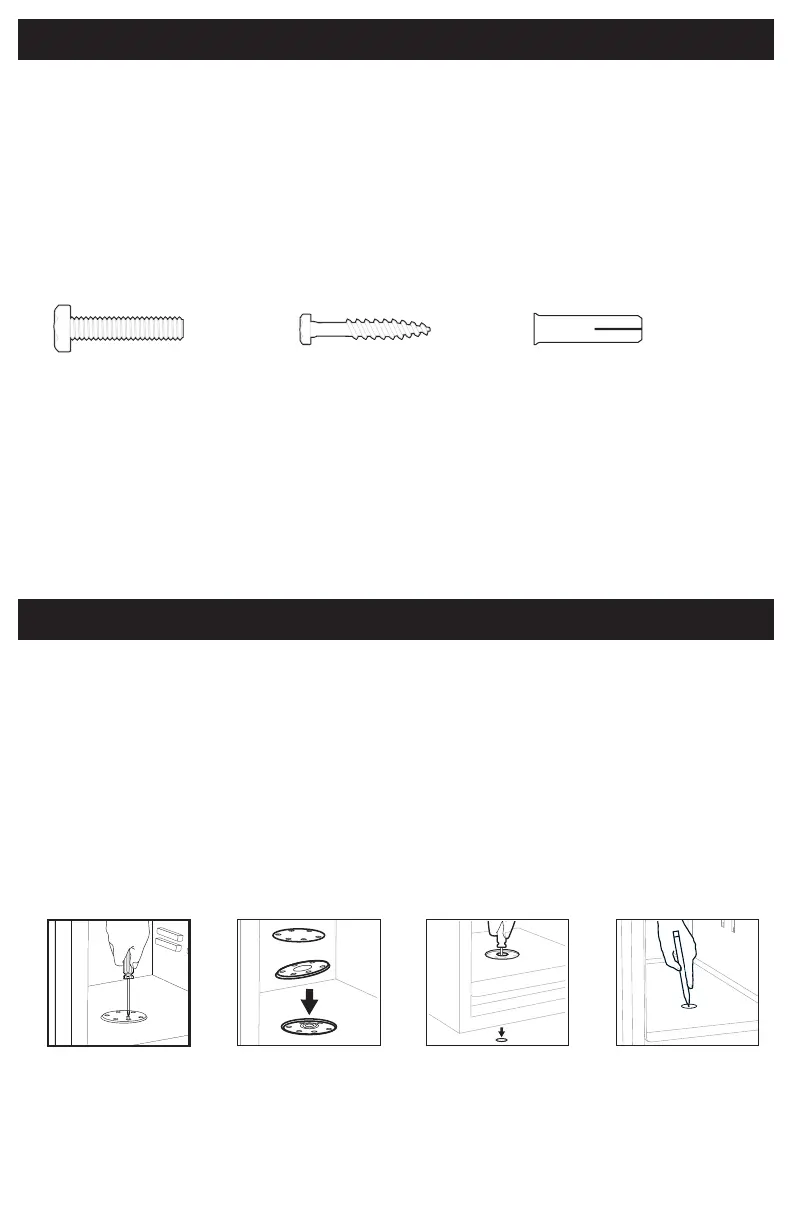
INCLUDED HARDWARE:
For added security, you have the option of anchoring your safe to the floor. The included hardware kit
and pre-drilled anchoring hole allow you to secure your safe to concrete or wood surfaces.
For metal surfaces, additional hardware is needed. Contact your local home center for assistance.
NOTE: Mounting this safe is at the consumer’s expense and discretion. LH LicensedProducts, Inc.
is not responsible for any costs incurred if the unit has to be replaced. If you have any questions
about mounting the safe, please check with your local home center/hardware retailer or
independent contractor.
3/8” (9.5mm) x 1-3/4” (45mm)
Hex Head Bolt – 1 ea.
3/8” (9.5mm) x 1-9/16” (40mm)
Drop-in Anchor – 1 ea.
Hex Head Wood Lag Bolt
3/8” (9.5mm) x 2-1/2” (64mm)
Tools Required for Anchoring to Concrete:
• Phillips Screwdriver
• Pen or Pencil
• Drill
• Hammer
• 1/2” Concrete Drill Bit
• 9/16” Socket Wrench
Tools Required for Anchoring to Wood:
• Phillips Screwdriver
• Pen or Pencil
• Drill
• 1/4” Wood Drill Bit
• 9/16” Socket Wrench
1. Find a suitable and convenient location for your safe. Empty all safe contents.
2. Locate the mounting hole cover plate on the inside floor of the safe. Remove the (6) screws
securing the plate and set aside. (Figure 1)
3. Remove the cover plate, gasket and cap, to reveal the mounting hole, and set aside for later
use. (Figure 2)
4. Tilt the safe backward and using a pencil or screwdriver, insert it into the mounting hole and
punch out the hole plug at the bottom of the safe. (Figure 3)
5. Place the safe in the desired location. Use a pencil or pen to mark the floor through the
mounting hole so you know where to drill. Move the safe aside. (Figure 4)
NOTE: If the floor is carpeted, cut a hole in the carpet (at least 1” diameter) to expose the wood or
concrete before drilling.
Figure 2 Figure 3 Figure 4Figure 1
 Loading...