3
4
8 9 10
5
6
7
2. SAFETY 3. MECHANICAL ASSEMBLY
Ensure that you read and understand these instructions BEFORE
handling or operating the equipment. Please pay particular attention to
the Safety Warnings.
WARNINGS
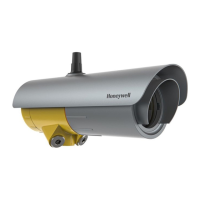
1. The Searchline Excel gas detector is certied for and intended for use in potentially
hazardous areas. Install and use the Searchline Excel gas detector in accordance with
the latest regulations.
2. For installations in the UK, the Code of Practice SELECTION, INSTALLATION AND
MAINTENANCE OF ELECTRICAL APPARATUS FOR USE IN POTENTIALLY
EXPLOSIVE ATMOSPHERES should be strictly observed. General recommendations are
given in BS EN 60079-14 & IEC 60079-14. Refer to BS EN 60079-29-2
& IEC 60079-29-2 in the UK or the appropriate local or national regulations.
3. For installations in North America, the national Electrical Code (NFPA 70) or later
issues should be strictly observed.
4. Elsewhere, the appropriate local or national regulations should be used.
5. The Searchline Excel gas detector must be properly earthed to protect against electrical
shock and minimise electrical interference. For electrical installation design
considerations refer to Section 3.
6. Operators must be fully aware of the action to be taken if the gas concentration exceeds
an alarm level.
7. Dismantling or repair of equipment should be carried out in the safe area only.
8. Test gases may be toxic and/or combustible. Refer to Material Safety Sheets for
appropriate warnings.
9. Do not drill holes in any housing as this will invalidate the explosion protection.
10. In order to maintain electrical safety, the unit must not be operated in atmospheres with
more than 21% oxygen.
11. Ensure that the bolts which secure ameproof enclosures are fully tightened. The
securing bolts used are made from a special certied grade of steel. Only bolts supplied
by Honeywell Analytics should be tted for this purpose.
12. Do not open the enclosure in the presence of an explosive atmosphere.
13. The transmitter unit contains high voltages when operational. These are discharged when
the unit is removed from its enclosure.
14. The conduit and cable glands tted to Searchline Excel should not be modied. If,
however, it becomes necessary to make modications they must comply with the
relevant national Codes of Practice.
15. The irradiance and power emitted by the Searchline Excel transmitters is less than
5 mW/mm
2
and 15 mW/mm
2
respectively.
Honeywell Analytics Limited reserve the right to change or revise the
information supplied in this document without notice and without
obligation to notify any person or organisation of such revision or
change. If further details are required that do not appear in this
document, contact Honeywell Analytics Limited or one of their agents.
4. INSTALLATION
INSTALLATION
4.1 GENERAL
Searchline Excel is designed to allow installation to be performed by a
single operator.
The installation procedure is split into mechanical installation and
electrical installation. Each unit needs to mounted to a supporting
structure before making the electrical connections. The diagrams show
different ways of orientation for the mountings.
4.2 MECHANICAL INSTALLATION
This mechanical installation procedure applies to both the receiver and
the transmitter.
1. Ensure that the equipment to be
installed is correct for the type
of installation required (i.e. short/
medium/long range).
2. Fit the mounting bracket to the
mounting plate for the unit, as
shown.
3. Fit the mounting plate to the
supporting structure in one of the
following ways:
• by through bolts directly to a at surface.
• by U-bolts (2 off) to a single 150mm diameter pipe/pole.
• by U-bolts (4 off) to two 55mm diameter pipes/poles,
166mm apart.
Identify the mounting holes using the following diagram and the
accompanying table. The subsequent diagrams show the different
types of mountings.
3.1 GENERAL
This section details the mechanical assembly information and important
dimensions necessary for installing the system units. Adjustable parts which form
part of the mounting assemblies are also shown.
NOTE: FOR DNV VERSIONS, REFER TO THE SEARCHLINE EXCEL TECHNICAL
HANDBOOK FOR SPECIAL INSTRUCTIONS ON THE INSTALLATION, ALIGNMENT AND
COMMISSIONING USING THE MARITIME BRACKET AND HARDWARE
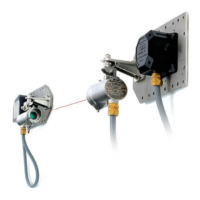
3.2 TRANSMITTER
MECHANICAL ASSEMBLY
INSTALLATION
7. Fit an adjustment clamp to the unit’s pivot block mounting stud
so that it sits on the stud’s shoulder with the correct orientation as
shown in the diagram.
INSTALLATION INSTALLATION
4.3 ELECTRICAL INSTALLATION
4.3.1 Electrical Connections
All ranges of Searchline Excel comply with the EMC requirements
EN50270. In order to maintain compliance with these standards it is
essential that the electrical installation of Excel is engineered correctly.
Electrical installation standards vary for different countries, companies
and applications and it is the responsibility of the installation design
authority to determine the applicable standards and ensure compliance
with them. When designing electrical installations for Excel,
Honeywell Analytics Limited recommend that the installation design
authority considers the following:
a. The unit cases should not, if possible, be connected to electrically
noisy (dirty) metalwork or conductors. Preferably, the case
(internally connected to the green/yellow GND wire) should be
connected to a low noise instrument (clean) earth. See also para e.
below. In order to facilitate electrical isolation of the Searchline
Excel from a noisy earth an isolation kit is supplied. This kit should
be tted as standard unless local regulations forbid this.
b. The entire length of the eld cabling connected to each unit should
be fully shielded. This should be connected to a low noise (clean)
earth.
c. The low noise instrument (clean) earth system should only be
connected to safety earth (usually dirty) at a single point on the
entire site/installation. This connection should be made in such a
manner that it does not introduce noise onto the low noise
instrument earth. Star earthing arrangements minimise earth current
crosstalk.
d. The shields of the eld cabling should not be connected such that
earth loops are produced, or in a manner that will result in the
shields carrying large currents from heavy plant or equipment.
e. Ideally, the eld cable shield should be connected to the unit’s
green/yellow GND wire, providing a single, continuous earth shield.
This connection must not be allowed to complete an earth loop.
160mm (SR)
211mm
(MR/LR)
291 (SR) 353 (MR/LR)
Approximately 300mm
417 (SR)
433 (MR/LR)
160mm
291mm
Approximately 300mm
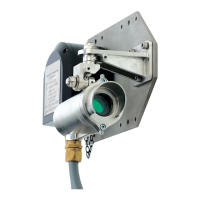
3.3 RECEIVER
417mm
3.4 ADJUSTABLE MOUNTINGS
Adjustment Clamp
lock screw (2 off)
Mounting Bracket
adjusting screws (2 off)
Clamp Nut
Adjustment Clamp
lock screw (2 off)
Pivot Block
adjusting screw (2 off)
Clamp Nut
Notes: 1. Drawing is not to scale.
2. Mountingplatexingholesareclear.SearchlineExcelsystem
componentmountingholesarethreaded.
3. Themountingplatexingsarenotsupplied.
4. Fit an adjustment clamp to the unit’s pivot block mounting stud
so that it sits on the stud’s shoulder with the correct orientation as
shown in the diagram.
5. Tighten the adjustment clamp’s
grubscrews until they just grip the
unthreaded part of the mounting stud.
6. Fit the pivot block to the mounting bracket
using a clamp nut and spring washer (M12
or M16) with the correct orientation as
shown in the diagram. Do not fully tighten
the nut.
Ensure that the adjustment clamp’s
stub lever is positioned approximately
centrally between the mounting bracket’s
grubscrews. Adjust the screws if required.
Pivot
Block
Mounting Stud
Adjustment
Clamp
Mounting
Bracket
Clamp Nut
and Spring
Washer
Mounting
Bracket
Grubscrew
Mounting
Stud
Adjustment
Clamp
Stub Lever
8. Tighten the adjustment clamp’s
grubscrews until they just grip
the unthreaded part of the unit’s
mounting stud.
9. Fit the unit to the pivot block using
a self-locking clamp nut and washer
(M12 or M16).
Do not fully tighten the nut.
Ensure that the adjustment clamp’s
stub lever is approximately centrally
positioned between the pivot block’s
grub screws. Adjust the screws if
required.
10. Fit a suitable junction box, e.g. OELD,
DX100(M) or other suitable type of
junction box, to the mounting plate
Note: Forinformationaboutalternative
typesofjunctionboxseeSection
4.3ElectricalInstallation.
11. Measure the distance (in metres)
between the transmitter and receiver
units.
This distance is required by the
system commissioning personnel.
Surface Mounting
Single Pipe/Pole
Dual Pipes/Poles
Identity Quan-
tity
Size Used For
A 8 ø7.5mm Dual 2’’ pipe or pole mounting, at
surface mounting
B 8 ø9.5mm Single 6’’ pole, at surface mounting,
Dual 2.5’’ ID pipe
C 4 M6 tapped 00780-A-0100 junction box mounting
D 3 M6 tapped DVC100(M) junction box mounting.
D1 2 M6 tapped DVC100(M) MK2 junction box (used in
conjunction with bottom two D holes)
E 4 M10 tapped DX100(M) junction box mounting
F 2 M6 tapped Killark/Akron junction box mounting
G 4 M6 tapped Sun/heat shade mounting
H 3 M8 tapped Short range Transmitter and all Receiver
brackets.
J 3 M10 tapped Medium/Long range Transmitter
mounting bracket.
K 2 M10 tapped XNX Universal Transmitter
Always mount
plate this
way up
60x45° 2 POSNS
6mm thick
stainless steel
plate
A
D1
D
D1
D
E
C
C
F F
D
G
G
G
G
C
C
E E
E
K K
J
J
J
H
H H
A
B
B
B
B B B
B B
A
A
A
A A
A
224
15
15
49
83
133.2
181
215
249
299.2
380
209
Mounting
Bracket
Mounting Plate
Isolation
Kit
NOTE: FOR DNV VERSIONS, REFER TO THE SEARCHLINE
EXCEL TECHNICAL HANDBOOK FOR SPECIAL
INSTRUCTIONS ON THE INSTALLATION, ALIGNMENT
AND COMMISSIONING USING THE MARITIME BRACKET
AND HARDWARE
 Loading...