Do you have a question about the Honeywell r7284 and is the answer not in the manual?
Defines hazard symbols and their meanings for safety.
Guidance on connecting the fuel lines to the burner, including safety precautions and valve/filter installation.
Step-by-step guide for initial start-up procedures and setting adjustments.
Procedures for setting combustion levels using specialized test instruments.
Provides error code interpretation, troubleshooting steps, and maintenance guidance for the control.
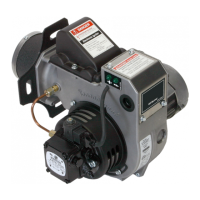
This document is an operator's manual for KNA Oil Fired Burners, specifically covering the KNA-S and KNA-M/L models. It provides comprehensive instructions for installation, operation, and maintenance, emphasizing the importance of professional service for safety and efficient performance.
The KNA Oil Fired Burner is designed to provide efficient heating by burning oil. It is intended for use in various heating systems and is engineered for reliable operation when properly installed and maintained. The burner's function involves atomizing fuel oil and mixing it with air for combustion, generating heat for the connected appliance.
The manual outlines several key aspects of using the KNA burner effectively and safely. Upon purchasing a KNA burner, owners are advised to familiarize themselves with the safety warnings and instructions. It is crucial to contact a qualified service agency for professional setup and ongoing maintenance to ensure years of efficient operation. If the burner shows signs of improper operation, immediate consultation with a qualified service agency is recommended.
Daily checks are essential for safe operation. Users should ensure that the area around the burner and equipment is clean and unobstructed, particularly air ventilation openings. No combustible materials should be stored near the heating equipment, and there should be no signs of oil or water leaks. Weekly, the oil tank level should be checked and kept full, especially during summer, to prevent moisture condensation.
The manual details the process of preparing the burner for installation. In most cases, the burner is ready to mount directly to the equipment. However, there might be situations where reconfiguration is necessary to ensure proper performance with the specific appliance. Owners should review the equipment manufacturer's specifications before installation to determine if any modifications are required.
Mounting the burner involves verifying the correct air tube insertion depth, typically 1/4" back from the inside wall of the combustion chamber. The leading edge of the air cone should not extend into the chamber unless specified by the equipment manufacturer. The burner is then bolted to the equipment using the provided flange.
Connecting fuel lines is a critical step. The manual stresses the importance of installing the oil tank according to applicable standards (NFPA 31 in the U.S. or CSA-B139 & CSA-B140 in Canada) and all local authorities. Users are warned against using Teflon tape on fuel oil fittings, as fragments can damage pump components and lead to oil leakage or impaired burner operation. Oil-resistant pipe sealant compounds should be used instead. The manual provides guidance on fuel line sizing, referring to the fuel pump manufacturer's instructions and typical installation layouts. For one-pipe systems, the inlet line connects to the pump inlet, allowing for gravity feed or lift (maximum 8 ft). For two-pipe systems, a bypass plug must be installed, and return and inlet lines attached, ensuring the return line terminates above the supply line inlet to prevent air introduction. A high-quality, oil-duty rated, fusible handle design shutoff valve should be installed close to the fuel tank, along with a fuel oil filter (50 microns or less) between the pump and tank.
Wiring the burner requires strict adherence to safety protocols. Electrical power must be disconnected before installation or servicing to prevent severe personal injury or death from electrical shock. Ground wiring must be provided to the burner, metal control enclosures, and accessories. All wiring must comply with the National Electrical Code ANSI/NFPA 70 (Canada CSA C22.1) and local codes and regulations. For burners packaged with equipment, the equipment manufacturer's wiring diagram should be followed. For job site installations, specific wiring diagrams are provided in the manual, emphasizing compliance with all codes.
Starting the burner and setting combustion involves several steps. First, shutoff valves in the oil supply line are opened. The air band pointer is adjusted according to equipment manufacturer specifications or, if unavailable, by referring to the provided figures. Calibrated test instruments are essential for final air and fuel adjustments. The thermostat is adjusted to call for heat, and the burner switch is turned "ON." Any air in the fuel pump is bled as the motor rotates. Finally, exhaust air is sampled with a Bararach smoke tester to achieve 0-1 combustion efficiency, adjusting the air band and fuel pressure as needed.
The manual also provides tables for KNA Air Tube, Air Cone & Static Disk Combinations, offering reference settings for different air tube lengths and GPH ratings. These settings are general guidelines, and actual equipment, vents, and field conditions will influence the optimal burner setup for satisfactory combustion.
Regular maintenance is crucial for the KNA burner's longevity and efficient operation. The manual strongly recommends annual inspection and service of the oil heating system by a qualified service agency. This is particularly important due to the increased efficiency of modern flame retention oil burners, which result in lower flue gas temperatures. These lower temperatures can lead to condensation and the formation of sulfuric acid, potentially causing corrosion, deterioration, and blockage in the coil, wrap, and connected plumbing, which could prevent proper exhausting of flue gases. Therefore, regular examination of the coil and combustion box is advised to prevent soot accumulation.
The manual explicitly states that tampering with the unit or controls is prohibited and can lead to equipment malfunction, asphyxiation, explosion, or fire. Only trained service technicians should perform maintenance. More frequent service intervals might be necessary in dusty or adverse environments.
Routine maintenance guidelines include:
The process for removing the nozzle for service is detailed, starting with turning off the main power switch. The copper connector tube assembly, nipple, and brass plug are disconnected from the gun assembly. The igniter is removed by unscrewing it from the fan housing, and the gun assembly is slid free. The nozzle is then carefully removed from the gun assembly, taking care not to damage electrodes or insulators.
For nozzle installation, users are cautioned to protect the nozzle from damage, as a damaged nozzle can cause impaired combustion, sooting, puffback, oil leakage, and fire hazards. Care must be taken when handling, removing, and installing oil nozzles. The gun holder assembly is removed to access the nozzle, and the nozzle adapter is removed using a wrench. Electrodes should not be squeezed to avoid changing settings or damaging ceramic insulators. Before installing a new nozzle, the gun holder assembly is inspected for grooves or scratches, which could cause oil leaks. The fuel nozzle and strainer must be protected from dirt or scratches. A new nozzle is inserted into the gun holder assembly and secured finger-tight, then tightened with a wrench, being careful not to bend the air cone, static disk, or electrodes. Over-tightening is warned against, as it can create grooves and prevent a proper seal. After nozzle replacement, electrode tips must be carefully checked and realigned according to the specified settings. If the air cone was removed, it must be reconnected to the air tube.
Blower wheel replacement involves ensuring a 1/4" space between the blower wheel and the motor face.
The manual also covers troubleshooting and maintenance for the Honeywell R7284U Electronic Oil Primary control, which is integrated into the burner. This section emphasizes that only trained, experienced service technicians should perform troubleshooting due to line voltage hazards. The control itself contains no field-serviceable parts and should be replaced if operation is not as described. Troubleshooting involves checking the burner and oil primary control for proper operation and condition. A critical check is the Cad Cell resistance, which should be below 1600 ohms for proper operation. Preliminary steps for troubleshooting include checking wiring connections, power supply, limit control, igniter-electrode contacts, oil pump pressure, piping to the oil tank, and the oil nozzle, supply, and filter.
| Control Type | Primary Safety Control |
|---|---|
| Ignition Type | Intermittent Pilot |
| Frequency | 60 Hz |
| Approvals | UL, CSA |
| Switch Action | SPDT |
| Mounting | Surface Mount |
| Material | Plastic |
| Ambient Temperature Range | -40°F to 150°F |
| Flame Sensor | Rectification |
| Operating Temperature Range | -40°F to 150°F |
| Lockout Time | 30, 60, 90 seconds (selectable) |