EasyManua.ls Logo

Honeywell T8511 - User Manual

Honeywell T8511
16 pages
Print Icon
To Next Page IconTo Next Page
Loading...
PRODUCT DATA
® U.S. Registered Trademark
Copyright © 1997 Honeywell Inc. • • All Rights Reserved
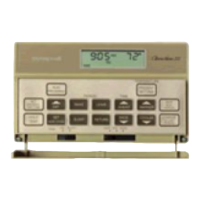
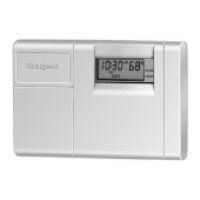
T8501 and T8511
Deluxe Electronic Thermostats
APPLICATION
The T8501 and T8511 Deluxe Electronic Thermostats provide
electronic control of 18 to 30 Vac single stage or multistage
heating and cooling systems, including heat pump systems.
T8501/T8511
FEATURES AND BENEFITS
Attractive styling complements any decor to the
homeowner’s delight.
Ease-of-use means fewer homeowner questions and
increased homeowner satisfaction.
Back lighting the large display makes the Liquid
Crystal Display (LCD) very easy to read.
Most frequently used keys are located by the LCD for
quick and easy access to information.
Models available with outdoor temperature sensor
capability for homeowner convenience. The sensor is
also more accurate than a thermometer.
Configurable features allows one model to be used to
replace many different models (less inventory, no
need to carry separate models to get these features).
°F or °C temperature display;
Automatic or manual changeover;
Electric or conventional heat fan operation;
Adjustable heating cycle rate.
Minimum off time for cooling compressors and heat
pumps protects and extends the life of the equipment.
Easy installation, setup and system test saves
installer time and increases productivity.
System test simplifies troubleshooting and saves time
by overriding the time delays.
Setpoints are permanently held in memory (no
batteries used) and retained during power outages for
increased installer and homeowner convenience.
Contents
Application........................................................................... 1
T8501/T8511 Features and Benefits ................................... 1
Specifications ...................................................................... 2
Ordering Information ........................................................... 2
Installation ........................................................................... 3
Wiring .................................................................................. 4
Settings ............................................................................... 6
Installer Setup ..................................................................... 6
Installer System Test ........................................................... 8
Checkout ............................................................................. 10
Operation ............................................................................ 11
Wiring Diagrams (Fig. 13-18) .............................................. 12
Troubleshooting Guide ........................................................ 14
68-0162-1

Other manuals for Honeywell T8511

Questions and Answers

  • L
    Leah SheppardAug 20, 2025
    Why Honeywell Thermostat display will not come on?
    • J
      Jay PerryAug 20, 2025
      If your Honeywell Thermostat display isn't turning on, the thermostat might not be getting power. Ensure the 'C' terminal is connected to the system transformer and check for 24 Vac between the 'C' and 'R' or 'RH' terminals. If there's no 24 Vac, check if the circuit breaker has tripped (reset it if needed), check if the system fuse is blown (replace if needed), ensure the HVAC equipment's power switch is in the 'On' position, and inspect the wiring between the thermostat and HVAC equipment, replacing broken wires and tightening loose connections. If 24 Vac is present, further troubleshooting is needed.
  • S
    Steven JohnsonAug 22, 2025
    Why Honeywell T8511 Thermostat heating will not come on?
    • T
      Tami HuntAug 22, 2025
      If your Honeywell Thermostat's heating isn't turning on, there could be several reasons. First, check that the 'C' terminal is connected to the system transformer and verify 24 Vac between 'C' and 'R' or 'RH' terminals. If there's no 24 Vac, check the circuit breaker (reset if tripped), the system fuse (replace if blown), the equipment switch (set to 'On'), and the wiring (repair or tighten connections). Also, the thermostat's minimum off time may be activated, so wait up to five minutes. Ensure the system selection is set to 'Heat'. For select models, check Installer Setup number 29 to correctly configure the O/B terminal, and verify the O or B terminal wiring based on your system's requirements.
  • W
    william59Aug 26, 2025
    Why won't my Honeywell Thermostat turn on the heat?
    • B
      Bryan McclainAug 26, 2025
      If your Honeywell Thermostat's heating isn't turning on, here's what to check: * First, ensure the thermostat has power by verifying the 'C' terminal is connected and checking for 24 Vac between the 'C' and 'R' or 'RH' terminals. If there's no 24 Vac, inspect the circuit breaker (reset if tripped), the system fuse (replace if blown), and the HVAC equipment's power switch (set to 'On'). Also, check and fix any broken wires or loose connections between the thermostat and HVAC equipment. * Second, the thermostat might be in minimum off time mode, so wait up to five minutes. * Third, confirm that the system selection is set to 'Heat'. * Fourth, on select models, verify the O/B terminal configuration in Installer Setup number 29 and rewire if the O or B terminal is miswired.
  • K
    katherineloweAug 27, 2025
    What to do if Honeywell Thermostat temperature settings will not change?
    • E
      Eric FisherAug 27, 2025
      If you cannot adjust the temperature settings on your Honeywell Thermostat, it might be due to reaching the upper or lower temperature limits. Check the temperature setpoints: for T8511, heating limits are 40°F to 90°F (7°C to 31°C), and for T8501, heating limits are 45°F to 88°F. Cooling limits are 48°F to 99°F (9°C to 37°C). Also, the setpoint temperature range stops might be configured. Check Installer Setup numbers 34 and 35 and reconfigure the setpoint stops.
  • M
    Michelle GouldAug 29, 2025
    Why is Honeywell T8511 Thermostat temperature display incorrect?
    • J
      Jeffery GoodAug 30, 2025
      If the temperature display on your Honeywell Thermostat is incorrect, it could be due to several reasons. The room temperature display may have been reconfigured; enter Installer Setup number 37 and reconfigure the display. Alternatively, the thermostat might be configured for °F or °C display; enter Installer Setup number 14 and reconfigure the display. Finally, a bad thermostat location can cause incorrect readings; relocate the thermostat.
  • G
    Grace MossAug 31, 2025
    How to fix a Honeywell T8511 with a blank display?
    • S
      Sheri GuerreroAug 31, 2025
      If the display on your Honeywell Thermostat isn't turning on, it might not be getting power. Check that the 'C' terminal is connected to the system transformer and verify that there is 24 Vac between the 'C' and 'R' or 'RH' terminals. If there is no 24 Vac, check if the circuit breaker is tripped (reset it if needed), if the system fuse is blown (replace it if needed), and if the power switch on the HVAC equipment is in the Off position (set it to the On position). Also, check the wiring between the thermostat and HVAC equipment, replacing any broken wires and tightening any loose connections. If 24 Vac is present, continue troubleshooting.
  • D
    Daniel SmithSep 2, 2025
    Why is the temperature wrong on my Honeywell T8511 Thermostat?
    • K
      Kristy LeonSep 2, 2025
      If the temperature displayed on your Honeywell Thermostat is incorrect, it could be due to several reasons: * The room temperature display might have been reconfigured. If so, enter Installer Setup number 37 and reconfigure the display. * The thermostat might be configured for a different temperature scale (°F or °C). Enter Installer Setup number 14 to reconfigure the display. * The thermostat might be poorly located. Relocate the thermostat.
  • J
    Jasmine MendozaSep 4, 2025
    What to do if my Honeywell T8511 Thermostat temperature settings won't change?
    • O
      owilliamsSep 4, 2025
      If you cannot change the temperature settings on your Honeywell Thermostat, it might be because: * You've reached the upper or lower temperature limits. For T8511 models, heating limits are 40°F to 90°F (7°C to 31°C), and for T8501 models, heating limits are 45°F to 88°F. Cooling limits are 48°F to 99°F (9°C to 37°C). * Setpoint temperature range stops have been configured. Check Installer Setup numbers 34 and 35 and reconfigure the setpoint stops.
  • T
    Thomas AndersonSep 6, 2025
    Honeywell T8511: System On, but no heat - what's wrong?
    • B
      Brian KeySep 6, 2025
      If the 'System On' indicator is lit on your Honeywell Thermostat, but no heat is being delivered, the heating equipment might not be operating. Verify the operation of the heating equipment in the system test.
  • S
    swashingtonSep 8, 2025
    Why is my Honeywell Thermostat outdoor temperature wrong?
    • W
      Whitney FuentesSep 8, 2025
      If the outdoor temperature display on your Honeywell Thermostat is incorrect, it could be due to: * The outdoor sensor might be connected incorrectly. Refer to the C7089B1000 installation instructions and check the wiring between the thermostat and the sensor. * You might have the wrong sensor. Replace the sensor with a C7089B1000 sensor.

Overview

The Honeywell T8501 and T8511 Deluxe Electronic Thermostats are designed for electronic control of 18 to 30 Vac single-stage or multistage heating and cooling systems, including heat pump systems. These thermostats offer attractive styling to complement various decors and are designed for ease of use, aiming to reduce homeowner questions and increase satisfaction.

Technical Specifications:

  • Input Power: 18 to 30 Vac, 50/60 Hz.
  • Load Rating:
    • Heat: 0.02 to 1.5 A running, 3.5 A inrush at 200,000 cycles.
    • Cool: 0.02 to 1.5 A running, 7.5 A inrush at 100,000 cycles.
    • Fan, Reversing Valve, Emergency Heat: 0.02 to 0.5 A running, 2.5 A inrush at 200,000 cycles.
  • Operating Ambient Temperature: 40°F to 110°F (4°C to 43°C).
  • Shipping Temperature Range: -20°F to 130°F (-29°C to 54°C).
  • Operating Relative Humidity Range: 5% RH to 90% RH; noncondensing.
  • Setpoint Range: 40°F to 99°F (4°C to 37°C), depending on model and mode (heating or cooling).
  • Display Range:
    • Controlled: 30°F to 110°F (1°C to 43°C).
    • Outdoor: -30°F to 120°F (-34°C to 49°C).
  • Display Updates:
    • Controlled: updated every minute.
    • Outdoor: displayed on demand and updated every 10 minutes.
  • Differential (auto changeover models): 3°F (1.5°C) minimum.
  • Interstage Differential (heat pump models): 1.7°F (0.9°C).
  • Minimum Off Time (Cooling and Heat Pumps): 5 minutes ± 0.5.
  • Mounting: Horizontally on a wall or a 2 in. x 4 in. outlet box using provided screws. Leveling is not required for proper function.
  • Dimensions: Approximately 5-1/4 in. (133 mm) wide x 4-1/8 in. (105 mm) high x 1-9/16 in. (40 mm) deep.

Function Description:

The thermostats feature a large, backlit Liquid Crystal Display (LCD) for easy readability. Frequently used keys are conveniently located near the LCD for quick access to information. Models are available with an outdoor temperature sensor capability, offering homeowner convenience and greater accuracy than a traditional thermometer.

Configurable Features:

These thermostats offer configurable features, allowing a single model to replace multiple different models, reducing inventory needs. These features include:

  • °F or °C temperature display.
  • Automatic or manual changeover.
  • Electric or conventional heat fan operation.
  • Adjustable heating cycle rate.

Usage Features:

  • Minimum Off Time: A minimum off time for cooling compressors and heat pumps protects and extends equipment life.
  • System and Fan Settings:
    • System: Em. Heat (T8511 only), Heat, Off, Cool, Auto. Auto mode automatically switches between heating and cooling based on indoor temperature.
    • Fan: On (continuous operation) or Auto (operates with equipment).
  • Temperature Settings: Default setpoints are 70°F (21°C) for heat and 78°F (25.5°C) for cool. Users can adjust these settings using the increase/decrease keys.
  • Installer Setup: This feature allows customization of the thermostat for specific systems. It includes options for fan operation, heating cycle rate, changeover type, temperature display units, extended fan operation, outdoor temperature display, O/B terminal energization, minimum off time for the compressor, and heating/cooling setpoint range stops.
  • Permanent Memory: Setpoints are permanently held in memory without batteries and are retained during power outages.
  • Outdoor Temperature Sensor (select models): Displays outdoor temperature when Installer Setup number 24 is set to 01 and a C7089B1000 Outdoor Sensor is installed.

Installation and Setup:

Installation involves mounting the wallplate and connecting system wires. Honeywell recommends using 18-gauge, color-coded thermostat cable. The thermostat should be installed about 5 ft. (1.5m) above the floor in an area with good air circulation, away from drafts, direct sunlight, or hidden pipes.

Installer Setup:

To enter Installer Setup, press and hold the Information (i) key along with the increase and decrease keys until the first number is displayed. The display will show all segments for approximately three seconds before the number appears. The Information (i) key advances to the next setting, while the increase/decrease keys adjust the setting. The setup automatically exits after five minutes of inactivity or by pressing and holding the Information (i) key until the display returns to normal.

Installer System Test:

This feature allows installers to check thermostat configurations and operation. It bypasses the minimum off time for compressors. To start, press and hold the increase and decrease keys simultaneously until two zeros appear. The display will show all segments before the zeros appear. The Information (i) key advances through tests, and the increase/decrease keys activate/deactivate functions. The system test times out after five minutes without key presses or can be exited by pressing and holding the increase and decrease keys for three seconds.

Troubleshooting Guide:

The manual provides a comprehensive troubleshooting guide for common issues such as:

  • Display not coming on (check power, wiring, circuit breaker, fuse, HVAC power switch).
  • Incorrect temperature display (reconfigure Installer Setup 37 for display adjustment or Installer Setup 14 for °F/°C display).
  • Temperature settings not changing (relocate thermostat if in a bad location, check setpoint limits, reconfigure setpoint range stops in Installer Setup 34 and 35).
  • Heating/cooling not coming on (check power, minimum off time, system selection, O/B terminal configuration/wiring).
  • Outdoor temperature not displayed or incorrect (activate option in Installer Setup 24, check sensor connection, replace sensor).

Maintenance Features:

  • Recycling Notice: If replacing a control containing mercury in a sealed tube, do not dispose of it in regular trash. Contact local waste management for proper recycling and disposal.
  • System Test: Simplifies troubleshooting by overriding time delays, saving time.

Honeywell T8511 Specifications

General IconGeneral
DisplayDigital
Display TypeLCD
Temperature ControlElectronic
MountingWall mount
Switch ActionSPST
MaterialPlastic
TypeProgrammable
Temperature Range40°F to 90°F
Power Source24 VAC
StagesUp to 2 heat / 1 cool
Power MethodBattery
Voltage Rating24V
Load TypeResistive

Related product manuals