to either main or pilot burner.
PILOT, which permits gas to flow to pilot burner
only (when gas cock knob is held depressed or when
generator is heated sufficiently to hold valve open).
ON, which permits gas to flow to both main and
pilot burners when the system is calling for heat.
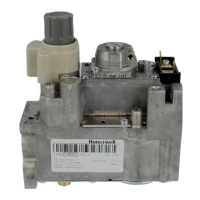
PILOT LIGHTING PROCEDURE
1. Slightly depress Lite-Rite knob if at PILOT
position and turn clockwise m to OFF. Wait 5
minutes for all unburned gas to vent. REMEMBER
that LP gas does not vent upward naturally.
2. Turn the Lite-Rite knob to PILOT, depress it
completely, and light the pilot burner. The knob must
be held down about one minute before the pilot
burner will stay lit after releasing the knob.
3. Turn the knob to ON, and set the thermostat
above room temperature to turn on main burner.
TEST FOR GAS LEAKS
WARNING - DO NOT OMIT THIS TEST
With main burner in operation, paint pipe joints,
pilot gas tubing connections, and valve gasket lines
with rich soap and water solution. Bubbles indicate
gas leakage. To stop leak, tighten joints and screws
or replace the gasket.
ADJUST PILOT FLAME
The pilot flame should envelop 3/8 to l/2
inch of the tip of the thermocouple. Remove
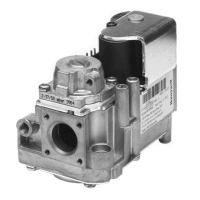
pilot adjustment cover screw (refer to Fig. 1).
Turn inner adjustment screw clockwise mto
decrease or counterclockwise n to increase
pilot flame. Be sure to replace cover after
adjustment to prevent possible gas leakage.
PROPER
3/S TO 112 INCH
CHECK GAS INPUT TO APPLIANCE
IMPORTANT
Do not exceed input rating stamped on
nameplate of appliance, or manufacturer’s
recommended burner orifice pressure for size
orifice(s) used. Make certain primary air supply
to main burner is properly adjusted for complete
combustion. Follow instructions of appliance
manufacturer if provided.
NOTE: IF METER CLOCKING METHOD IS USED
Make certain there is no gas flow through the
meter other than to the appliance being checked.
Other appliances must remain off, and the pilot
extinguished (or their consumption deducted from
the meter reading).
‘A” MODEL PROCEDURE (with pressure regulator)
1. Check input to main burner by clocking gas
meter or by using a pressure gauge (manometer)
connected to downstream tapping (Fig. 1). The
standard natural gas model is factory set at 3.5
inches WC outlet pressure, and the standard LP gas
model is set at 11 inches. If adjustment is required,
proceed with step 2.
2. Remove cover screw (see Fig. 1). Using
screwdriver, turn adjusting screw clockwise m to
increase or counterclockwise n to decrease gas
pressure to burner. (Note: Adjustment fitting is
plastic and may require slightly greater turning force
than metal thread.) Replace cover screw.
“B” MODEL PROCEDURE (no pressure regulator)
1. With main burner off, connect pressure gauge
(manometer) to downstream pressure tapping (Fig. 1).
2. With main burner operating, check burner
manifold pressure.
3. If pressure is not as specified by the appliance
manufacturer, readjust regulator on LP gas storage
tank.
STEP-OPENING PRESSURE REGULATOR
1°C” MODELS)
1. With main burner operating, check input by
clocking gas meter, or check burner manifold
pressure using pressure gauge (manometer)
connected to downstream pressure tapping (Fig. 1).
2. If adjustment is required, remove cover screw.
Using a small screwdriver, turn adjusting screw
clockwise m to increase or counterclockwise
n to decrease gas pressure to burner. Replace
cover screw.
3. Check burner performance at step pressure,
observing burner ignition and flame characteristics.
Burner should ignite properly and without flashback
to orifice, and all ports should remain lit. Cycle
burner several times (wait 30 seconds between
cycles to allow servo regulator to resume step
action.) Repeat after allowing appliance to cool.
CHECKOUT
Put the system into operation and observe through
complete cycle to be sure all controls function
properly. Make certain the Pilotstat unit shuts off gas
flow to main burner within 2-l/2 minutes after pilot
flame is extinguished.
3
 Loading...