Sect.
lV
Page 2
4-3
FUNCTION GENERATOR
(bi-stable circuit and integrator)
A.
REPAIR ANALYSIS OF FUNCTION
GE3lERATOR
me
voltage, then a simple test should be made to deter-
mine whether the fault
is
in the integrator or the
bi-stable circuit.
This test
is
as follows:
1) Connect a high resistance dc voltmeter between
B- and pin 3 of tube
V17.
2)
Set the
RANa switch to the
X.
01 position. Dis-
connect the lead from the center lug of the variable
resistor R58. Temporarily connect this lead to
pin 5, V6
(+
75 Reg.
).
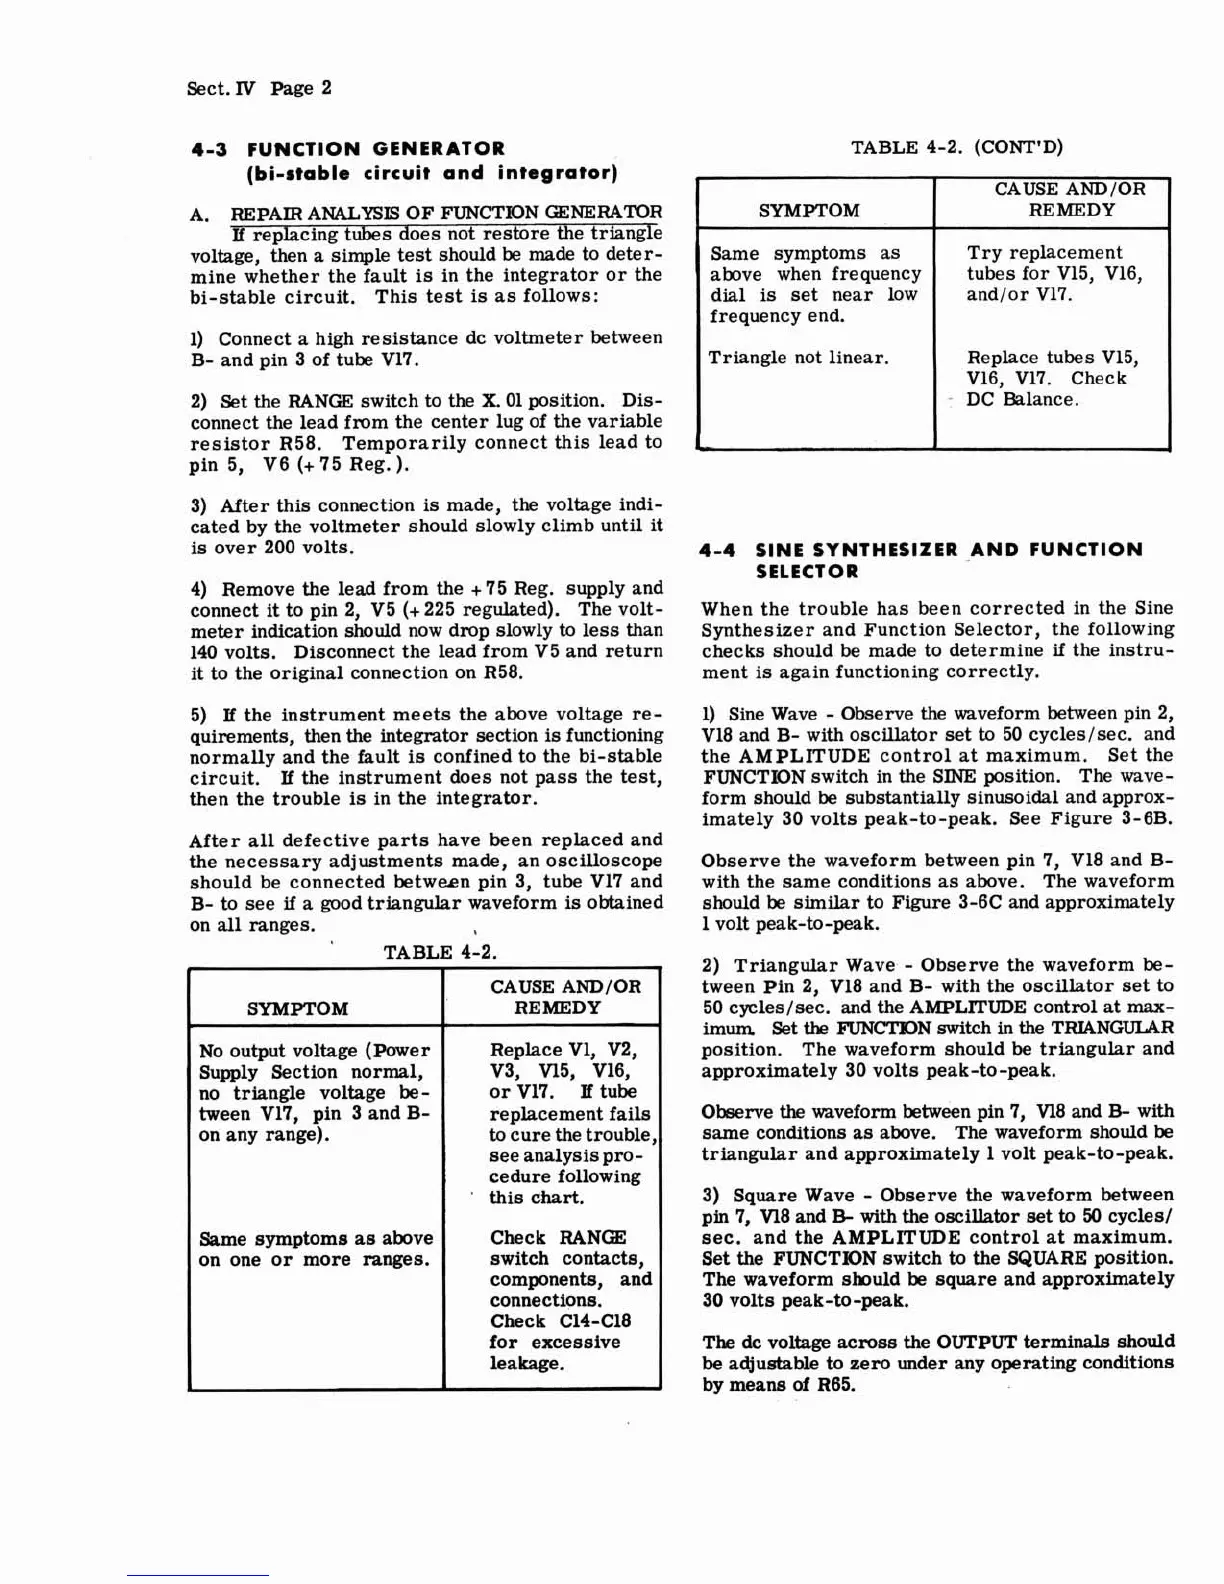
TABLE 4-2. (CONT'D)
3) After this connection
is
made, the voltage indi-
cated by the voltmeter should slowly climb until
it
is
over 200 volts.
4-4
SINE SYNTHESIZER _AND FUNCTION
SELECTOR
4) Remove the lead from the
+
75 Reg. supply and
connect
it
to pin 2, V5 (+225 regulated). The volt-
When the trouble has been corrected in the Sine
meter indication should now drop slowly
to
less than
Synthesizer and Function Selector, the following
140 volts. Disconnect the lead from V5 and return
checks should
be
made to determine
if
the instru-
it to the original connection on R58.
ment
is
again functioning correctly.
SYMPTOM
Same symptoms as
above when frequency
dial
is
set near low
frequency end.
Triangle not linear.
7
5)
If
the instrument meets the above voltage re-
quirements, then the integrator section
is
functioning
normally and the fault
is
confined to the bi-stable
circuit.
If
the instrument does not pass the test,
then the trouble
is
in the integrator.
CAUSE
AND/OR
REMEDY
Try replacement
tubes for V15, V16,
and/or
V17.
Replace tubes V15,
V16, V17. Check
-
DC Balance.
After all defective parts have been replaced and
the necessary adjustments made, an oscilloscope
should be connected between pin 3, tube
V17 and
B- to see
if
a good triangular waveform
is
obtained
on all ranges.
,
TABLE 4-2.
1) Sine Wave
-
Observe the waveform between pin 2,
V18 and B- with oscillator set to 50
cycles/sec. and
the AMPLITUDE control at maximum. Set the
FUNCTION switch in the SINE position. The wave-
form should
be
substantially sinusoidal and approx-
imately 30 volts peak-to-peak. See Figure 3-6B.
SYMPTOM
No output voltage (Power
Supply Section normal,
no triangle voltage be-
tween
V17, pin 3 and B-
on any range).
Same symptoms as above
on one or more ranges.
Observe the waveform between pin 7, V18 and B-
with the same conditions as above. The waveform
should be similar to Figure 3-6C and approximately
1 volt peak-to-peak.
CAUSE
AND/OR
REMEDY
Replace
V1,
V2,
V3, Vl5, V16,
or
V17.
If
tube
replacement fails
to cure the trouble,
see analysis pro-
cedure following
a
this
chart.
Check RANGE
switch contacts,
components, and
connections.
Check C14-C18
for excessive
leakage.
2) Triangular Wave
-
Observe the waveform be-
tween Pin 2, V18 and B- with the oscillator set
to
50 cycles/sec. and the AMPLITUDE control at
max-
imum Set
the
FUNCTION switch in the TRIANGULAR
position. The waveform should be triangular and
approximately 30 volts peak-to-peak.
Observe
the
waveform between pin 7, V18 and
B-
with
same conditions as above. The waveform should be
triangular and approximately
1
volt peak-to-peak.
3) Square Wave
-
Observe the waveform between
pin 7, V18 and
B-
with the oscillator set to
50
cycles1
sec. and the AMPLITUDE control
at
maximum.
Set the FUNCTION switch to the SQUARE position.
The waveform should be square and approximately
30 volts peak-to-peak.
The
dc voltage across the
OUTPUT
terminals should
be adjustable to zero under any operating conditions
by means of R65.