Do you have a question about the HP 6038A and is the answer not in the manual?
Verify product settings match line voltage and correct fuse is installed before applying power.
Connect instrument chassis to electrical ground via three-conductor power cable to minimize shock hazard.
Ensure input power lines contain a switch or adequate means for disconnecting the instrument.
Avoid operating the instrument in the presence of flammable gases or fumes.
Operating personnel must not remove covers; component replacement by qualified personnel only.
Do not attempt internal service or adjustment unless another person is present.
Do not exceed stated line voltages or frequencies to prevent leakage currents.
Explanation of symbols like instruction manual, hazardous voltages, and earth terminals.
Avoid installing substitute parts or unauthorized modifications to maintain safety features.
Overview of the operating and service manual for the HP Model 6038A System Power Supply.
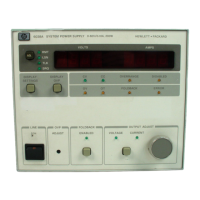
Details the HP 6038A as a 200W autoranging power supply with laboratory performance.
Lists parameters and features controllable via HP-IB, including voltage, current, and status.
Describes rear-panel connections, grounding options, and local/remote sensing.
Details the compact, fan-cooled System II-compatible modular enclosure for easy servicing.
Explains FLT and INH circuits for additional shutdown protection and fault indication.
Highlights the instrument as Safety Class 1 and refers to safety markings and manual instructions.
Lists instrument performance standards, limits, and supplemental characteristics.
Details available standard factory modifications and accessories for the instrument.
Lists System II cabinet and service accessories that can be ordered with or separately from the supply.
Explains the two-part serial number format and its meaning.
Describes HP-IB cables, connectors, and compatibility considerations.
Lists helpful documents for designing HP-IB systems, orderable from HP Sales Offices.
Details the HP-IB interface functions implemented by the 6038A.
Provides instructions for checking, repacking, mounting, and connecting the unit to AC power.
Instructs to inspect for any damage that may have occurred in transit.
Check for broken knobs, connectors, dents, and scratches on the unit.
Refers to Section V for verification procedures and Section III for abbreviated checks.
Ensures the power supply is connected to an appropriate AC input power source.
Specifies installation requirements for fan cooling and ambient temperature limits.
Illustrates the outline shape and dimensions of the instrument cabinet.
Describes bench operation, noting self-aligning plastic feet for stacking System II cabinets.
Details rack mounting options using standard 19-inch rack panels or enclosures.
Specifies acceptable nominal input voltages, ranges, and input currents.
Describes the factory-shipped power cord plug and replacement options.
Explains the process for converting the unit between line voltage options, noting factory calibration needs.
Provides recommendations for safely shipping the instrument, including contact information.
Describes operating controls, turn-on checkout, and procedures for HP 6038A.
Details front-panel controls and indicators, referencing figures and tables for descriptions.
Explains the concept of autoranging output locus and how load resistance determines operating mode.
Guides users through the power-on self-test sequence and initial operational checks.
Details precautions and steps for making rear-panel connections before applying power.
Provides guidance on selecting wire size and making load connections for safety and regulation.
Explains the OVP function, adjustment, and how it disables the output when tripped.
Describes foldback protection that disables output if the supply switches to a prohibited mode.
Details how remote sensing improves load voltage regulation by monitoring voltage at the load.
Explains rear-panel switches for configuring digital or analog programming modes.
Covers HP-IB connections, connectors, and compatibility with HP-IB systems.
Describes amplified voltage and current monitor outputs for remote indication.
Covers various protective actions like overrange, disabled, overvoltage, and error conditions.
Details front-panel control operations, including output adjustment and display settings.
Step-by-step guide to setting up the supply for constant voltage output.
Step-by-step guide to setting up the supply for constant current output.
Explains how to return the supply to local control from HP-IB or remote inhibit states.
General overview of operating the power supply using the HP-IB interface.
Lists and describes the HP-IB interface functions implemented by the power supply.
Explains how the power supply can request service from the controller via HP-IB.
Details the serial poll process, including the serial poll register and its bit definitions.
Describes parallel poll functionality for retrieving data from multiple instruments simultaneously.
Explains the function for operating the supply in either local or remote control modes.
Details how to set the HP-IB address using rear-panel switches.
Describes enabling power-on service request capability via the rear-panel PON SRQ switch.
Lists the default values the power supply initializes to upon power-on.
Provides rules and syntax for programming the power supply via HP-IB commands.
Explains how to format numbers for sending to the power supply, including notation types.
Details the use of commas and spaces as separators for HP-IB commands.
Explains how to terminate HP-IB command strings using line feed or semicolon.
Describes how data returned to the controller is terminated with carriage return and line feed.
Details how to program output voltage using volts or millivolts, and how to read the setting.
Explains programming output current in amps or milliamps and how to read the setting.
Describes how to instruct the power supply to measure its OVP trip voltage.
Explains setting soft limits to define maximum accepted programming values for voltage and current.
Details the delay function to mask mode changes or errors during output transitions.
Explains how to turn the power supply output on and off using specific commands.
Describes foldback protection setup and how it disables output if a specific mode is switched.
Explains how to reset the power supply output if disabled by OVP, foldback, or remote inhibit.
Details the hold and trigger features for synchronizing output changes and implementing commands.
Explains how to store and recall up to 16 complete power supply states for quick setup.
Describes the status register that reflects the present state of the unit's conditions.
Explains the accumulated status register for noting temporary or momentary conditions.
Details mask and fault registers for defining conditions that set the fault register and trigger faults.
Explains how to enable/disable power supply's ability to request service for fault conditions.
Describes the CLEAR command to return the power supply to its power-on state.
Explains how the power supply detects and indicates programming errors.
Details how to run power supply self-tests and interpret the results.
Explains how to obtain the power supply's model number and option information.
Overview of the principles of operation for the HP 6038A power supply.
Details the HP-IB board, including transceivers and interface circuits.
Explains the function of the microprocessor and clock circuitry within the instrument.
Describes the data bus latches and the free-run jumper's role.
Explains the address decoding logic used in the instrument's operation.
Details the memory circuits used for storing operational data and settings.
Describes the circuits responsible for initiating operation when power is applied.
Explains the function of address switches for configuration and selection.
Details the purpose and function of test LEDs on the instrument.
Describes the real-time clock functionality and its integration.
Explains the serializer component and its role in data processing.
Details the fault indicator circuit and its function in signaling errors.
Explains the remote inhibit circuit for external control of the instrument's operation.
Details the PSI board, including its isolation and control line functions.
Describes the isolation features within the power supply interface.
Explains the control lines output port and its role in system communication.
Details the address latches and decoders used for internal addressing.
Describes the output latches used for data storage and output.
Explains the function of current and voltage OACs (Output Amplifier Controllers).
Describes the analog multiplexer used for signal selection and routing.
Details the A-to-D converter and its role in digitizing analog signals.
Explains the A-to-D input port for receiving analog signals.
Describes the status lines input port for receiving status information.
Explains the identification input port for instrument identification.
Details the power clear function for resetting the instrument.
Describes the front panel board, including address latches and displays.
Details address latches and decoders for the front panel interface.
Explains the output ports and displays for voltage and current readings.
Describes the RPG (Remote Programming) function and associated latches.
Details the input port for front-panel controls and user interface.
Explains the function of mode indicators on the front panel.
Describes the OVP adjust control for setting the overvoltage protection trip level.
Details the power clear function for resetting the instrument.
Describes the power mesh and control board's architecture.
Explains the principles of autoranging power supply operation.
Provides a high-level block diagram overview of the instrument's architecture.
Presents a simplified schematic diagram of the power supply's key circuits.
Overview of the maintenance section, covering tests, calibration, and troubleshooting.
Lists the essential test equipment needed for maintenance procedures.
Covers calibration procedures and operation verification tests for the instrument.
Provides guidance on diagnosing and resolving instrument malfunctions.
Details procedures for repairing the instrument and replacing components.
Overview of the section detailing replaceable parts for the instrument.
Provides information on how to order replacement parts.
Details the 100 VAC input power option and its specifications.
Explains the logic symbols used in the instrument's circuit diagrams.
Provides information or diagrams related to the blank front panel option.
Describes the Control Interface Intermediate Language (CIIL) for programming.