JUPITER
IT - 23
6. For Loop L-PE measurements, in case measuring leads are used, insert the red
conductor into input terminal V L and the black conductor into input terminal
COM/E/N and connect the instrument to the system to be tested (see Fig. 24). The
value of voltage Phase-Earth is shown on the display
7. For Loop L-N measurements, in case the cable with Shuko plug is used, insert the
red conductor into input terminal V L and the black conductor into input terminal
COM/E/N and connect the instrument to the system to be tested (see Fig. 25). The
value of phase-to-neutral voltage is shown on the display
8. For Loop L-N measurements, in case measuring leads are used, insert the red
conductor into input terminal V L and the black conductor into input terminal
COM/E/N and connect the instrument to the system to be tested (see Fig. 26). The
value of phase-to-neutral voltage is shown on the display
9. For Loop L-L measurements, in case measuring leads are used, insert the red
conductor into input terminal V L and the black conductor into input terminal
COM/E/N and connect the instrument to the system to be tested (see Fig. 27). The
value of phase-to-phase voltage is shown on the display
10. Press key GO/HOLD to activate the test. The screens shown in Fig. 19, Fig. 20 and
Fig. 21 may appear on the display for a few seconds to signal anomalous conditions in
which the instrument does not carry out the test.
11. In case no anomalous conditions are present, the instrument carries out the test and
symbol flashes on the display. at the end of the test, the following screens (e.g.
relevant to Loop L-L measurement) are shown on the display
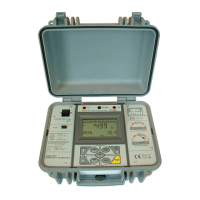
Fig. 28: Results of Loop L-L impedance measurement
12. The screen in Fig. 28
– left side, shows the value of Loop L-L impedance. Press keys
/
or to display the value of the assumed short-circuit current Isc (see § 9.3)