EasyManuals Logo

Huawei SUN2000 Series Quick Installation Guide

Huawei SUN2000 Series
12 pages
To Next Page IconTo Next Page
To Previous Page IconTo Previous Page
Page #5 background imageLoading...
Page #5 background image
4
Large handle
screwdriver
(recommended)
The N cable is inserted into hole 4. Do
not insert L1/L2/L3 into .
Socket
Cable sealing
cover
Auxiliary
connector
Click
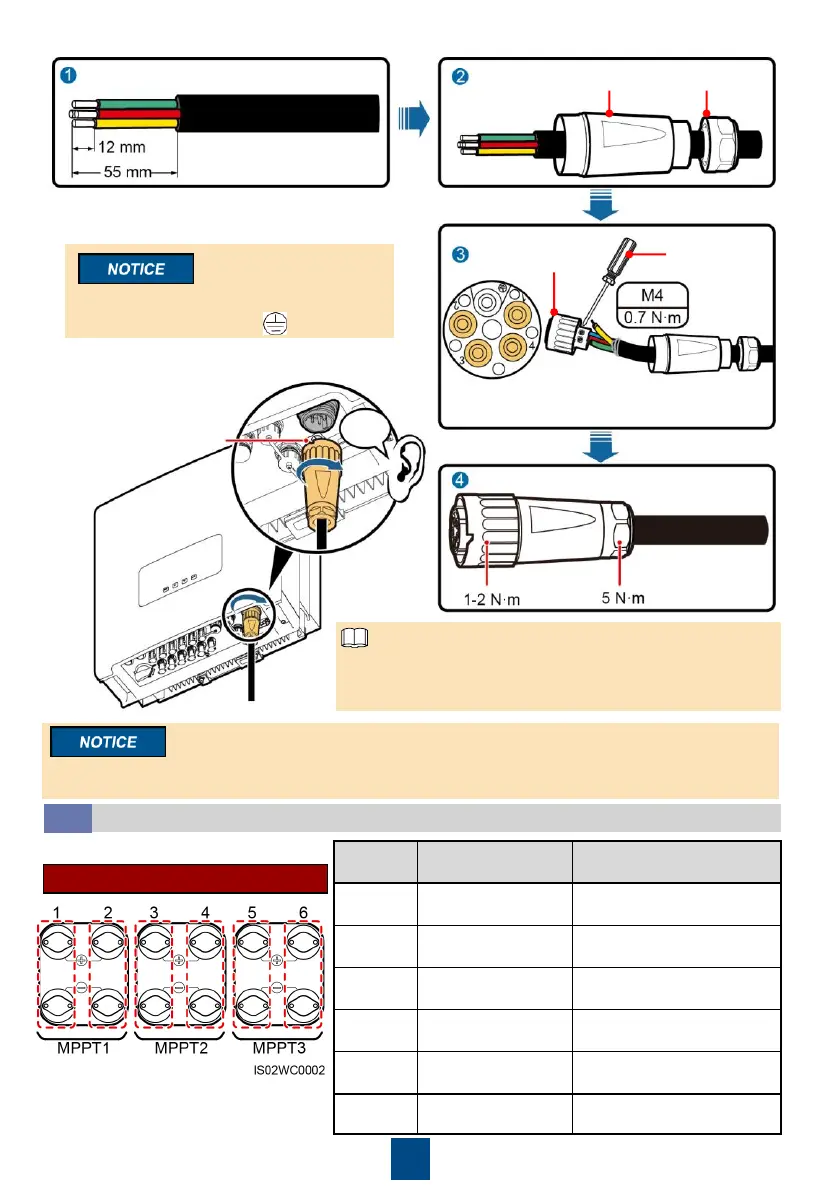
To quickly connect the AC output connector to the AC
output terminal of the inverter, keep the notch of the
connector facing exactly to the operator.
Notch
Ensure that the AC output connector is securely connected. Otherwise, the connector may be
damaged after the inverter has been running for a long time.
Optional DC input terminals:
Number of
Inputs
8KTL-12KTL 15KTL-28KTL
1
Connects to any one
route
Connects to any one route
2
Connects to routes 1
and 3
Connects to routes 1 and 3
3
Connects to routes 1,
2, and 3
Connects to routes 1, 3, and 5
4
Connects to routes 1,
2, 3, and 4
Connects to routes 1, 2, 3, and
5
5
N/A
Connects to routes 1, 2, 3, 4,
and 5
6
N/A
Connects to routes 1, 2, 3, 4, 5,
and 6
NOTE
Installing DC Input Power Cables
2.3

Other manuals for Huawei SUN2000 Series

Questions and Answers:

Question and Answer IconNeed help?

Do you have a question about the Huawei SUN2000 Series and is the answer not in the manual?

Huawei SUN2000 Series Specifications

General IconGeneral
Max Efficiency98.6%
MPPT Efficiency99.9%
Protection RatingIP65
Max. DC Voltage1100 V
Rated AC Frequency50 Hz / 60 Hz
Rated Power3kW - 10kW
Operating Temperature Range-25 °C ~ +60 °C
CommunicationRS485
Rated AC Power3kW - 10kW
Power Factor Adjustment Range0.8 leading to 0.8 lagging
Total Harmonic Distortion (THD)≤ 3%
ProtectionDC reverse polarity
CoolingNatural convection
DC ConnectionMC4

Related product manuals