13
42700-01•01/15/08•HunterFanCompany
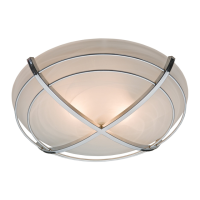
9 • Completing Your Installation
9-1. Partially install two light kit fitter screws into the light kit
mounting plate.
9-2.readtheplugconnectorfromthefanthroughthelightkittter.
9-3.Alignthekeyholesinthelightkittterwiththetwopartially
installed screws and rotate to engage the screws in the narrow
ends of the keyholes.
9-4.Installtheremainingscrewtosecurethelightkitttertothelight
kit mounting plate. Securely tighten all three screws.
9-5.Connectthe2-pinplugconnectorfromthefantothe2-pinplug
connectorfromtheballast.
9-6.Attachtheballasttothelightkittterwithtwoballastscrews.
9-7.Installtheincluded22Wattuorescentbulbintothehookson
the fitter.
9-8.Connectthe4pinplugfromtheballasttotheuorescentbulb.
9-9.Placetheglassglobeintotheglobetrimband.Alignthethree
holesinthetrimbandwiththethreeholesinthetter.Installand
securely tighten all three screws.
Steps 9-1 – 9-8
Step 9-9
Light Kit
Fitter
Ballast
Fluorescent
Bulb
Glass
Globe
Globe
Trim
Band