SUSPENSION
29
11
Always put the motorcycle on a
stable centerstand whenever
removing either front or rear wheel.
ATTENTION:
ATTENTION:
Service more frequently when
riding under hard conditions
FRONT SUSPENSION:
The Husaberg motorcycle is delivered with an
adjustable front fork from WP. For a maximum
performance it needs to be adjusted according
to the riding conditions and the rider's weight
and preferences. The front fork is pre-adjusted
from the factory as follows:
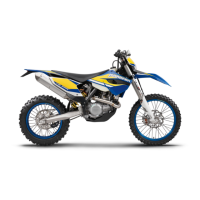
Rebound damping:
Adjustment knob (Fig. 11A-1) in 12th position
(FE models) or 16th position (FC, FX and FS
models) from the bottom position on both front
fork legs.
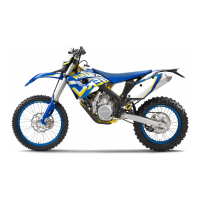
Compression damping:
Adjustment screw (Fig. 11B-1) in 20th position
(on all models) from the bottom position on both
front fork legs.
+ = more damping / - = less damping
Air bleeding of front fork:
The front fork ought to be bleeded after every
time the motorcycle has been used.
The front fork unloaded; undo the air bleed
screws (Fig. 11A-2) on both front fork legs until
you hear the air pass.
Tighten the screws.
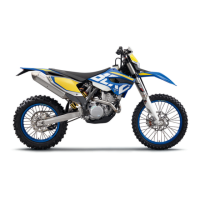
Static spring deflection/oil change:
Put the motorcycle on a centerstand in order to
get the front wheel off the ground. Measure the
distance (Fig. 11C-1).
Put the motorcycle on the ground (both wheels
on the ground and unloaded).
Grab the handlebar and push the front fork
firmly down a couple of times.
Measure the distance once again which now
ought to be 20-35 mm less than the first time.
If the distance is outside these 20-35 mm the
pre-load of the front fork has to be adjusted. The
pre-load ought to be in between 5-20 mm.
Oil change:
The oil needs to be changed after every 20 hours,
FE and FSe models, and 10 hours, FC, FSc
and FX models, for a maximum performance
and durability.
Follow the instructions of the WP Service Manual.
Fig.
11A
Fig.
11B
11 A
Fig.
11C