9
ABOVE-GROUND INSTALLATIONS
Where the swim spa is a ”stand-alone“ above-ground installaon
to be installed in regions where freeze/thaw condions may occur,
a level pao stone or pre-formed paver type base may be sufficient
if there is no abung deck(s) that could be damaged during
potenal seasonal movement of the ground. The potenal
drawback to this type of base is that splash water could eventually
de-stabilize the ground under the base, with the resultant shi of
the support base causing damage to the swim spa structure.
For best results, we recommend the installaon of a level concrete
pad:
• Dig out and level the ground 20-30 cm (8-12 in.) below
your desired base level
• Install 10-15 cm (4-6 in.) of crushed stone
• Next, install 10-15 cm (4-6 in.) of poured concrete
• Level the concrete and apply a broom-type finish
• We recommend that the pad be made 15 cm (6 in.) larger than
the swim spa on three sides, and 1 m (3 .) larger on the side
where the access steps and/or planters will be installed.
· Swimspa must be installed on a level pad
In regions where freeze/thaw occurs, or where there will be
custom decking abung the swim spa, we recommend the
installaon of poured concrete foongs extending below the frost
line beneath the pad to prevent the possibility of future shiing.
Recommended Minimum Concrete
Pad Dimensions
Models
With Factory
Cabinet & Steps
13FFP and 14AX 259 cm x 576 cm
102 in x 228 in
16EX and 17AX 259 cm x 671 cm
102 in x 264 in
19EX and 19DTAX 259 cm x 726 cm
102 in x 286 in
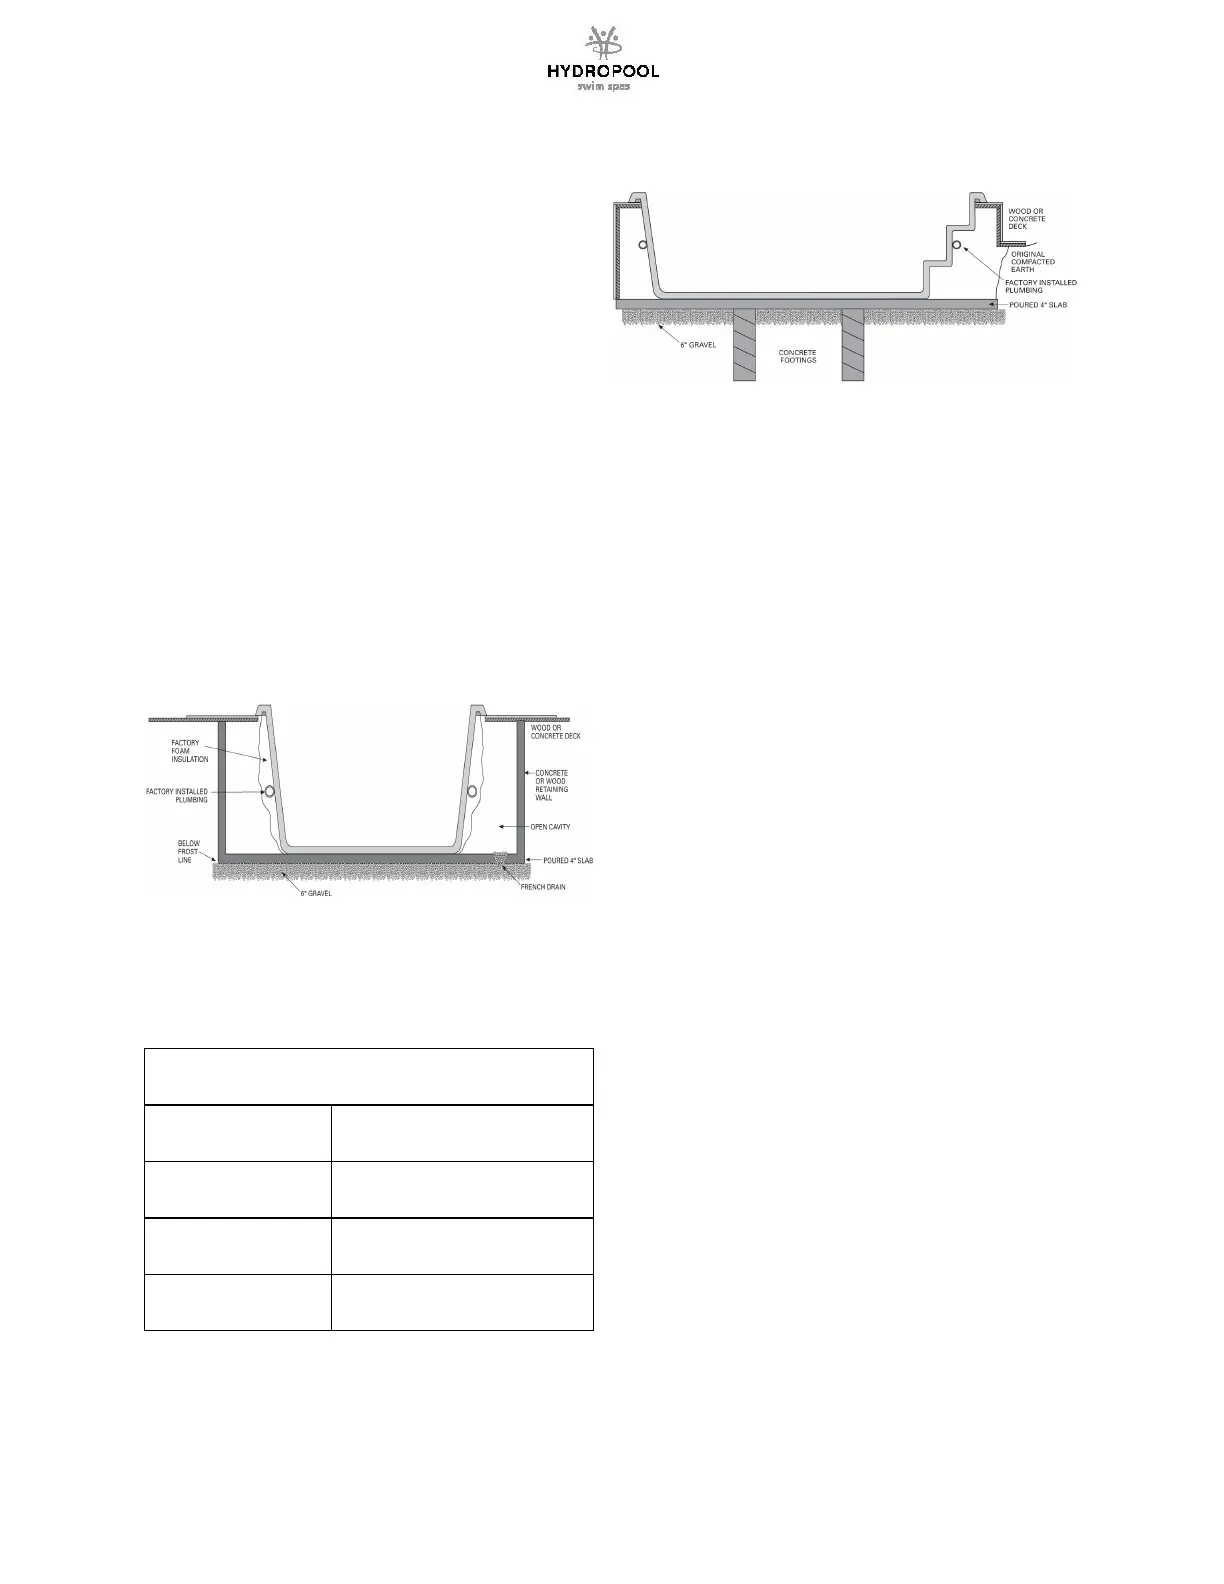
IN GROUND & PARTIAL IN GROUND INSTALLATIONS
When recessing the swim spa all or part way below ground level, a
concrete base along with a concrete or wood retaining wall to hold
back the earth is suggested. This forms a box or ’bunker‘, in which
the swim spa is placed. Hydropool does not recommend back-filling
full in-ground or paral in-ground installaons.
• It is recommended leaving a 61 cm (24 in) wide crawl-space around
the enre unit to ensure adequate accessibility.
• Non-freezing climates – it is sufficient to ensure that the base of the
hole or cavity created for the swim spa has a dry, stable, compacted
level base and proper drainage.
• Climates where freeze/thaw occurs – it is necessary that a poured
level reinforced concrete base, complete with concrete foongs, be
installed as outlined in the secon ABOVE-GROUND INSTALLATIONS.
Areas with a high ground water table – a level concrete base, as well as
a concrete or wood retaining wall to hold back the earth, is
recommended. This forms a box or ‘bunker’, in which the swim spa is
placed.
• ALWAYS ensure that there is good drainage, via a properly designed
French (gravel) drain system and/or a sump pump, to prevent ground
water flooding damage to the support equipment or structure of the
swim spa.
• Install protecve waterproof conduit to house any cables that will be
buried
• Access for future service must be considered at the me of design
and installaon. You must be able to access all sides and areas of your
swim spa. Difficult access will result in supplemental service labour
charges not covered by the factory warranty. Consider easily
removable deck materials.
• Make sure the swim spa is tested for 48 hours before you prepare
the installaon of the surrounding/finish deck around your swim spa.
Even though all units are tested in our plant, some transport/site
handling damage can occur and we suggest you make sure the swim
spa is perfectly waterproof before finalizing your installaon.
• It is recommended to backfill the first 12 inches of material with 3/4”
gravel to provide proper drainage around the perimeter of the
swimspa prior to backfilling with earth.
• If at any point you choose to drain down your swim spa for a long
duraon make sure that you brace the interior of the shell wall
approximately 12” down from the top in order to minimize any stress
from the force created by the backfill. In normal condions, the weight
of the water is the opposing force to the earth but when the swim spa
is emped down there is no opposing force and there is the risk of
inward bowing which could compromise the structural integrity of the
shell.
OVERALL SUPPORT (non-cabinet installaons)
Your Hydropool swim spa is equipped with a factory installed load
support substructure, which distributes the weight of the water over
the enre foot area of the swim spa. The cabinet, either factory
installed or customized on-site, should be decorave only, and not
relied on for overall support. Although the lip of the swim spa must be
supported to ensure it remains level, never suspend a swim spa from a
deck or floor by the outer acrylic edge, as this will lead to product
damage and/or serious personal injury.
SITE PREPARATION