14
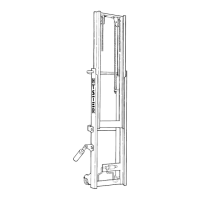
9. Inspect the chain anchors and pins for cracks and
damage.
10. Make sure the lift chains are adjusted so that they
have equal tension. Adjustment or replacement of the
lift chains must be done by authorized personnel. See
Lift Chain Adjustments described in the GENERAL
PROCEDURES later in this section.
6705
1
2
3
4
5
6
7
1. WORN PIN
2. CRACKS
3. EDGE WEAR
4. HOLE WEAR
5. LOOSE LEAVES
6. DAMAGED PIN
7. CORROSION
FIGURE 15. CHECK THE LIFT CHAINS
Operator Restraint System
(See FIGURE 16.)
The seat belt, hip restraint brackets, seat and mount,
hood, latches and floor plates are all part of the operator
restraint system. Each item must be checked to make
sure it is fastened correctly, functions correctly and is in
good condition.
The seat belt must fasten correctly. Make sure the seat
belt can be pulled from the retractor and retracts
smoothly. The seat belt must not be damaged or worn.
Make sure the seat rails and latch striker are not loose.
The seat rails must lock tightly in position, but move
freely when unlocked. The seat rails must be correctly
fastened to the mount surface. If the mount surface is the
hood, the hood must be fastened to the floor plate with
the latch. The floor plate must be fastened to the lift
truck frame. Try to lift the hood to make sure it is fas-
tened correctly and will not move. See FIGURE 16.
1. LATCH STRIKER
2. HOOD LATCH
3. LATCH LEVER
4. SEAT
5. SEAT BELT LATCH
6. HIP RESTRAINT
7. SEAT RAIL
8. FLOOR PLATE
9. HOOD
10. GAS CYLINDER
11. HINGE
1
1
4
GASOLINE AND DIESEL ARRANGEMENT
LPG ARRANGEMENT
2
3
6
5
9
4
6
5
10
7
7
8
11
H70–110XL SHOWN
FIGURE 16. CHECK THE HOOD AND SEAT LATCHES