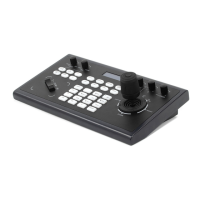
This document describes the Ikan OTT-CONTROLLER, an IP PTZ Camera Controller compatible with VISCA, ONVIF, and PELCO protocols.
Function Description
The OTT-CONTROLLER is designed to provide comprehensive control over PTZ cameras. It supports both IP control modes (IP VISCA & ONVIF) and analog control modes (RS422 & RS232), making it versatile for various camera setups. The controller facilitates quick switching between devices, setting and recalling presets, and fine-tuning camera parameters.
Button Description:
- [AUTO FOCUS]: Sets the camera to auto focus mode. Lights up when the camera is in manual focus mode.
- [AE AUTO] (Auto Aperture): Sets the camera to automatic aperture mode. Lights up when the camera is in manual aperture mode.
- [CAMERA OSD]: Calls or closes the camera's On-Screen Display (OSD).
- [HOME]: Returns the camera to its home position if the camera OSD is off. When the camera OSD is on, this button confirms the camera OSD function.
- [F1]~[F2]: Custom function buttons, available in VISCA and IP VISCA modes.
- [SETUP]: Accesses local settings to modify and view configurations. Navigation within menus is done using the Joystick.
- [SEARCH]: Searches for all available ONVIF protocol devices on the LAN (only in ONVIF Mode).
- [INQUIRE]: Checks currently added devices.
- [WBC MODE] (Auto White Balance): Sets the camera to auto white balance mode. Lights up when the camera is in manual white balance mode.
- [CAM1]~[CAM4]: Quickly switches to CAM NUM 1-4 devices (ONVIF, IP VISCA) or address code 1-4 devices (VISCA, PELCO).
- [PRESET]: Short presses set presets; long presses delete presets. Uses number keys and [ENTER] for setting/deleting.
- [CALL]: Uses number keys and [ENTER] to move the camera to a preset.
- [IP]: Manually adds network devices (only in ONVIF and IP VISCA modes). Uses [ENTER] to confirm each step.
- [CAM]: In IP VISCA and ONVIF modes, quickly switches to the CAM NUM bound device when adding a device via CAM. In VISCA and PELCO modes, switches to the address code when entering an address. Uses [ENTER] to confirm each step.
- [1]~[9]: Number keys (0-9). Keys 2, 4, 6, 8 also serve as directional keys for pan, tilt, and camera OSD control.
- [ESC]: Returns to the previous screen or cancels an action.
- [ENTER]: Confirms any/all settings.
Rocker Switch and Knob:
- [NEAR] [FAR]: Manually adjusts the focal length.
- [OPEN] [CLOSE]: Manually adjusts the aperture (OPEN for Aperture Plus, CLOSE for Aperture Minus).
- [R-] [R+]: Manually adjusts the Red Gain.
- [B-] [B+]: Manually adjusts the Blue Gain.
- [PTZ SPEED-] [PTZ SPEED+]: Adjusts PTZ Speed from 1-8, where "-" is Slow and "+" is Fast.
- [T-ZOOM-W]: Rotatable knob for Zoom Tele and Zoom Wide.
Joystick Control:
The four-dimensional joystick allows for intuitive control:
- Up/Down/Left/Right: Controls pan and tilt movements.
- Rotation (Tele/Wide): Controls zoom in/out.
Important Technical Specifications
- Ethernet: 1 x Ethernet Port
- Joystick: Four-dimensional control (up, down, left, right), rotatable for zooming (Tele/Wide).
- Connection: Lead
- Display: LCD
- Prompt Tone: Button Sound Prompts On/Off
- Power Supply: DC 12V1A±10%
- Power Consumption: 0.6 W Max
- Operating Temperature: 32°F-122°F (0°C-50°C)
- Storage Temperature: -4°F-158°F (-20°C-70°C)
- Dimensions: 320 x 180 x 100mm
Usage Features
Precautions:
- CAM NUM Function: When adding a network device, CAM NUM binds with the entered IP and port, allowing quick switching via the "CAM" button.
- Entering IP Address: IP addresses are entered in four segments. The controller automatically jumps to the next segment after three numbers. For single-digit segments, the joystick must be moved rightward to advance.
- Clearing Input: Move the joystick leftward to clear input information.
- Home Page Display: In IP VISCA and ONVIF Modes, "Visca!" or "Onvif!" prompts indicate the controller's local IP. "Visca:" or "Onvif:" prompts indicate the connected device's IP.
Local Settings (SETUP):
Accessed via the [SETUP] button, navigated with the joystick. Settings include:
- Delete Device
- Network Type (Dynamic/Static)
- Button Sound Prompt (On/Off)
- Language Setting (English/Chinese)
- Mode (VISCA, IP VISCA, ONVIF, PELCO)
- Local IP
- Version Information
- Restore Factory Settings
- Function Button 1 ("F1") Setup
- Function Button 2 ("F2") Setup
VISCA & IP VISCA Mode Shared Setting:
- Custom functions for F1 and F2 buttons can be set using VISCA commands. Input custom name, then the VISCA command (e.g., 01040702 for 8101040702FF).
IP VISCA Mode Setting:
- Allows viewing and deleting saved devices. Joystick navigates devices, rightward views port info, leftward views IP/CAM NUM info. [ENTER] deletes selected device.
VISCA Mode Setting:
- Control settings for baud rate (1-7 addresses). Joystick navigates addresses, then baud rates (e.g., 9600).
PELCO Mode Setting:
- Control settings for baud rate and protocol (1-255 addresses). Joystick navigates addresses, then protocols (PELCO-D/PELCO-P), then baud rates.
ONVIF Mode Setting:
- Allows viewing and deleting saved devices. Joystick navigates devices, rightward views port info, leftward views IP/CAM NUM info. [ENTER] deletes selected device.
Connection and Control:
- ONVIF Mode: Press [SEARCH] to find devices on the LAN. Select a device with the joystick, press [ENTER], then enter username, password, and CAM NUM. [ENTER] to save. Alternatively, use [IP] for manual addition. [INQUIRE] views added devices; select with joystick, [ENTER] to control, or use [CAM].
- IP VISCA Mode: Searching is not available; devices must be added manually via the [IP] button. [INQUIRE] views added devices; select with joystick, [ENTER] to control, or use [CAM].
- VISCA & PELCO Mode: Set address code and baud rate. For PELCO, also set PELCO-D or PELCO-P protocol.
Web Page Configuration:
- Connect the controller and computer to the same LAN. Enter the controller's IP address in a browser.
- Default username:
admin, Password: empty.
- The home page has three segments: Search Device List (green), Added Device List (blue) or Manually Add (yellow), and Device Details (orange).
- Click "Search" to find ONVIF devices. Select devices from the "Search Device List" and click "Add" (use Ctrl for multiple selections).
- Select devices from the "Added Device List" and click "Delete" (use Ctrl for multiple selections).
- Click an IP address in the "Added Device List" to edit account and port information.
- Click "Save" to confirm all additions, deletions, and modifications.
LAN Settings (Web Page):
- Modify device IP access type (Dynamic/Static) and port parameters.
- Dynamic Address: Controller automatically acquires IP from the router.
- Static Address: Manually input network segment information.
- Click "Save" to confirm changes.
Maintenance Features
Upgrade (Web Page):
- Available for maintenance and updates.
- Choose an update file and click "Start" to update the controller. The device will automatically reboot after updating.
- Caution: Do not operate the controller, shut off power, or disconnect from the network during the upgrade process.
Restore Factory (Web Page):
- Restores the controller to factory default settings.
- Use with caution, especially after improper modifications leading to unexpected failures.
Reboot (Web Page):
- Reboots the controller. Recommended for maintenance if the controller has been running for a long period.
Warranty Service:
- Free service for one year from purchase date for manufacturing errors.
- Components and maintenance fees apply if the warranty period has expired.
- Warranty does not cover damage from abuse, misuse, dismantling, unauthorized changes, natural disaster, abnormal voltage, or environmental factors.
For further support, contact sales@ikancorp.com or visit www.ikancorp.com.