3 - English
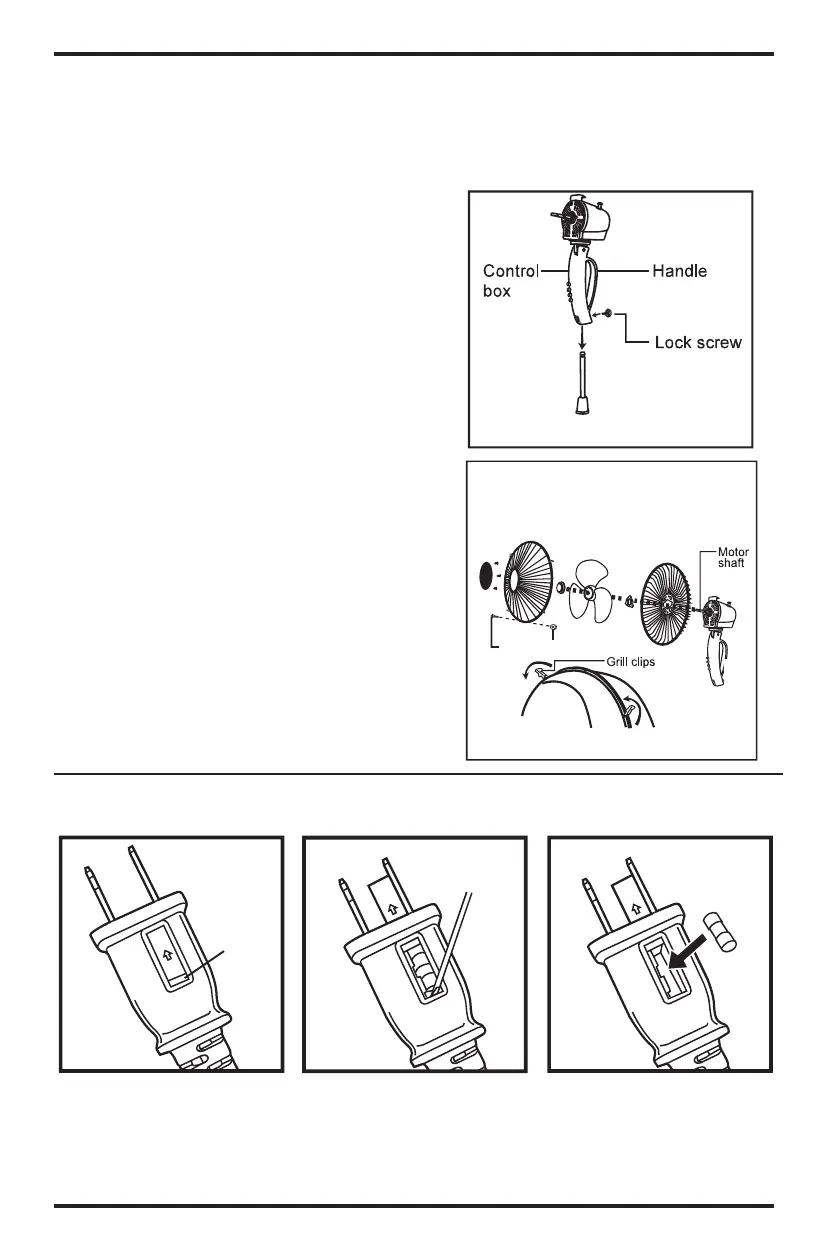
Step 2: Positioning the motor housing and
control box (Fig.2)
1. Remove the lock screw (N) on the back of
the control box, by turning it counter-clock-
wise, (DO NOT REMOVE THE LOCK SCREW
COMPLETELY) then place the motor hous-
ing and control box (K and M) on top of the
inner pole (P), then use the lock screw (N)
to secure it to the inner pole (P) by turning
it clockwise.
Step 3: Assembling the fan head (Fig.3)
1. Attach grill cover (A) onto front grill (B)
using supplied screws.
2. Position the rear grill (small nut and
screw hole pointing downward) (G) by
aligning the guide holes with the two round
pegs located at the 12 o'clock and 6 o'clock
positions on the Motor Housing (K). Screw
on the grill locknut (F) clockwise to secure
the rear grill (G) to the motor housing (K).
3. Insert the Motor Shaft (I) through the
hole on the Fan Blade (E) by matching the
prongs on the Motor Shaft (I) to the prong
notches on the back of the Fan Blade (E).
Secure the Fan Blade (E) with the Blade
Cap (D) by turning it counterclockwise.
4. Place the front grill (B) onto the rear grill
(G) using the grill hook at the bottom of the
front grill. Then secure both grills together
with the grill clips (C) on the outer edge of
the front grill (B).
Fig. 3
Small screw and nut may be attached to the
bottom of the front grill. Remove before attach-
ing front and rear grills together, then re-attach
to the 2 grills for added security.
Small Nut and Screw
(
m b
P
t
F
o
o
a
p
k
C
s
s
1
o
t
t
S
re
a
Fig. 2
(
m b
P
t
F o
o
a
p
k
C
s
s
1
o
t
t
S
re
a
Ta b
FUSE REPLACEMENT
1. Slide the fuse door on the
plug upward using the tab.
2. Using a flat head jewelers
screw driver (smallest one)
gently pry the fuse out from
the bottom.
NOTE: Please becareful when
performing the above
instructions.
3. Replace with a new
2.5Amp/125V fuse, then slide
the door closed.
NOTE: DO NOT USE FUSES
THAT ARE RATED HIGHER
THAN 2.5Amps/125V