CLS FUSION Montage- und Betriebsanleitung
CLS FUSION Mounting and Operating Instructions
19
6.3. Electrical connection
The cabelling for the CLS FUSION is via the upper cable
inlets.
A cable entry at the rear is possible in the wall-
mounted housing. Therefore the prepunched
sheet needs to be removed from the rear wall of
the housing.
While doing installation works at the system,
please consider that the delivered installation pro-
tection at its correct position. This ensures that no
conductive parts that can destroy the electronics
through short circuits. Before starting, the electronic
needs to be checked on cleanliness and the installation
protection needs to be removed. The installation protec-
tion is also an additional terminal labeling.
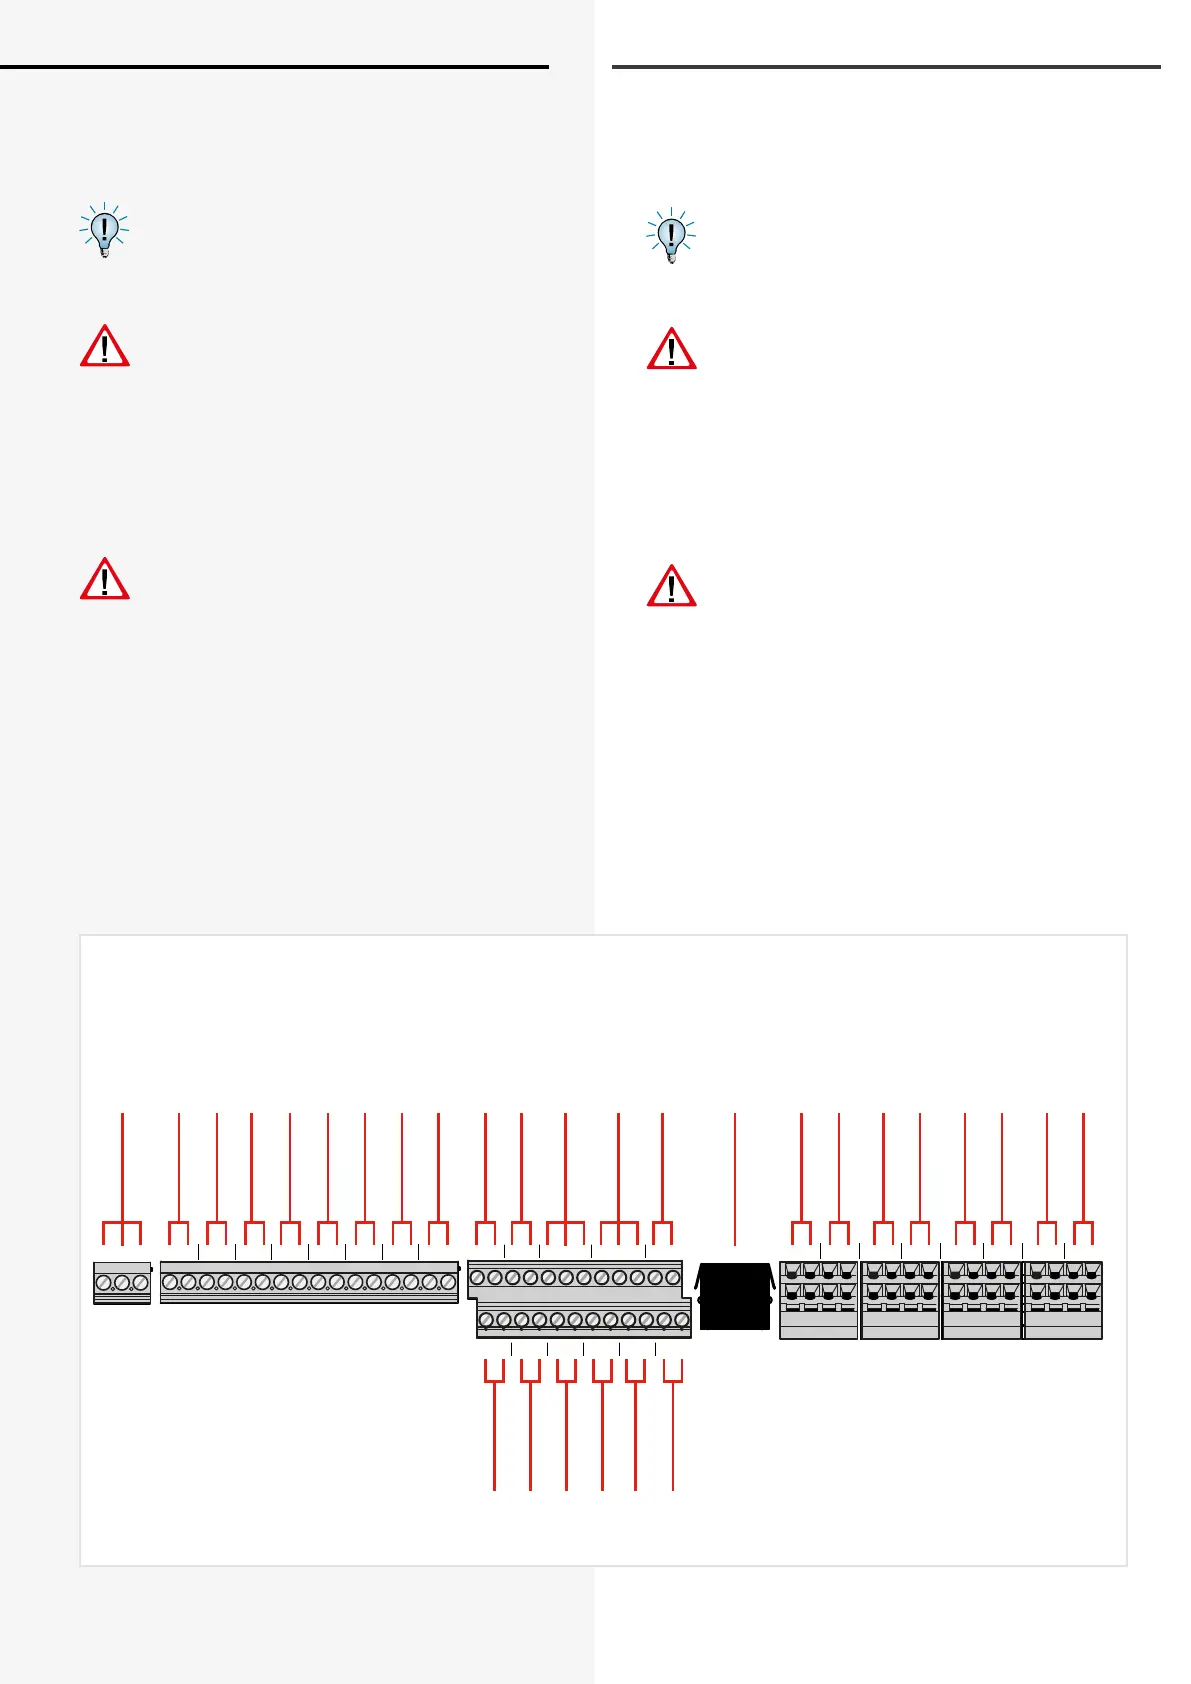
The left-hand PE terminal, above the LSA contacts,
is only intended for the PE conductors of the light
sequence switching module (230V potential). The
right-hand „PE terminal“, above the outgoing circuits,
serves as a base terminal and is insulated from the hous-
ing. The insulated base terminal is only to be used when
a multi-core cable is used for the wiring of the nal cir-
cuits (24V potential). Unused cores can be connected
there for safety reasons. Mixing the conductors for nal
circuits and light sequence switching or of the PE termi-
nal and the base terminal is not permitted!
Do not connect the earth conductor (green/yellow) of
3-core cables. In the event of a short-circuit failure, a
voltage transmission of 230V may destroy the 24V nal
circuits.
6.3. Elektrischer Anschluss
Die Verkabelung erfolgt bei der CLS FUSION über die
oberen Kabeleinführungen.
Im Aufputzgehäuse der CLS ist auch eine rücksei-
tige Kabeleinführung möglich. Dazu ist das vorge-
stanzte Blech in der Gehäuserückwand zu
entfernen.
Bei Installationsarbeiten an der Anlage ist darauf
zu achten, dass der mitgelieferte Montageschutz
an seiner korrekten Position sitzt. So wird gewähr-
leistet, dass keine leitfähigen Teile die Elektronik durch
Kurzschlüsse zerstören kann. Vor dem Einschalten ist die
Elektronik auf Sauberkeit zu kontrollieren und die Monta-
geschutzabdeckung zu entfernen! Die Montageschutz-
abdeckung dient gleichzeitig als zusätzliche
Klemmenbeschriftung.
Die linke Erdleiterklemme, über den LSA Kontak-
ten, ist nur für die PE-Leiter der Lichtschalterabfra-
gen vorgesehen (230V Potenzial). Die rechte „Erd-
leiterklemme“, über den Stromkreisabgängen, dient als
Stützpunktklemme und ist isoliert zum Gehäuse aufge-
baut. Die isolierte Stützpunktklemme ist nur dann zu ver-
wenden, wenn für die Verdrahtung der Endstromkreise
eine mehradrige Leitung verwendet wird (24V Potenzial).
Nicht verwendete Adern können dort zur Sicherheit auf-
gelegt werden. Ein Vermischen der Leiter von Endstrom-
kreisen und Lichtschalterabfragen bzw. auf der Erdleiter-
klemme und der Stützpunktklemme ist nicht zulässig!
Bei 3-adrigen Leitungen sollte auf den Anschluss des Erd-
leiters (grün/gelb) verzichtet werden. Im Fehlerfall-Kurz-
schluss könnte eine Spannungsverschleppung von 230V
die 24V Endstromkreise zerstören.
Netzanschluss
Mains connection
Lichtschalterabfrage
Light sequence switching
Lichtschalterabfrage
Light sequence switching
Lichtschalterabfrage
Light sequence switching
Lichtschalterabfrage
Light sequence switching
Lichtschalterabfrage
Light sequence switching
Lichtschalterabfrage
Light sequence switching
Lichtschalterabfrage
Light sequence switching
Lichtschalterabfrage
Light sequence switching
optional
Leuchte 1 ... 20
Luminaries 1…20
INOWeb
INOLan
Leuchte 1 ... 20
Luminaries 1…20
Leuchte 1 ... 20
Luminaries 1…20
Leuchte 1 ... 20
Luminaries 1…20
Leuchte 1 ... 20
Luminaries 1…20
Leuchte 1 ... 20
Luminaries 1…20
Leuchte 1 ... 20
Luminaries 1…20
Leuchte 1 ... 20
Luminaries 1…20
Fernschalter (FS+/FS-)
Remote switch (FS+/FS-)
DPÜ
(SL+/SL-)
Three-Phase-Monitor (SL+/SL-)
Externe Komponenten (24V, IB, GND)
External components (24V, IB, GND)
Übergeordnete Überwachung (RTG)
Higher-level monitoring (RTG)
Kontakt 1
Störung / Failure
Kontakt 2
Betrieb / Operation
Kontakt 3
Batt. -Betrieb / Batt. Operat.
Opt. RIF Kontakt 4
Opt. RIF Kontakt 5
optional
- + - +- + - + - + - + - +- +
L N L N L N L N L N L N L N L NLPE N
1 2 3 4 5 6 7 8 9 10 11 12
13 14 15 16 17 18 19 20 21 22 23 24
230V Eingang In
24V Ausgang Out
 Loading...