35
Product Support: www.instron.com
Chapter 4
Operation
This chapter contains procedures for installing and removing specimens. Each
procedure contains an equipment list, a checklist and a set of instructions.
• Installing a specimen . . . . . . . . . . . . . . . . . . . . . . . . . . . . . . . . . . . . . . . . . . . . . . . 35
• Removing a Specimen. . . . . . . . . . . . . . . . . . . . . . . . . . . . . . . . . . . . . . . . . . . . . . . 37
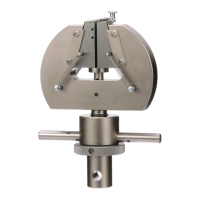
Installing a specimen
The force you use to turn the control nut handle determines the initial gripping pressure
on the specimen. However, the tensile load on the specimen determines the gripping
force during the test.
Do not exceed 35 kN (55 kN for the 50 kN grips) or the maximum load rating of any
load string component. Exceeding the maximum load rating of a component will
damage it.
Do not load the grips with compressive forces. Compressive loading removes the
gripping force from the specimen.
Checklist
Check for the following conditions before installing a specimen:
• The attachment kits are preloaded (unless you are installing a preload specimen).
• The size and type of jaw faces are appropriate for the test specimen.
• The side plates are secure. If you are using a 50 kN wedge grip, ensure that either
the spacers or side plates are fitted on the grip and are secure.