Chapter: Operation
36 M10-14052-EN
• If using 50 kN grips, either the side plates or spacers are installed, whichever is
appropriate for the thickness of the test specimen.
• There is enough space between the upper and lower grip to install the specimen.
• The load frame extension limits are set to prevent the grips from colliding.
Procedure
If your control system has a Specimen Protect or Load Protect function, use it when you
install a specimen. Refer to the control system documentation for details.
1. Separate the jaw faces by rotating the grip control nut on both grips.
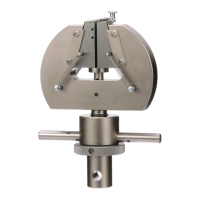
2. If you are using the specimen centering device, loosen the thumbscrew and adjust
the L-shaped arm so it centers the specimen.
Hazard - Keep your fingers clear of the area between the jaw faces.
Align the specimen correctly to prevent equipment damage and specimen
slippage.
3. Position the specimen in the grips so it engages the entire length of the jaw faces.
Figure 10 on page 37 illustrates proper specimen placement.
4. Adjust the centering device until it just touches the specimen edge. If you are not
using a specimen centering device, align the specimen visually.
Do not over tighten the control nut. Excessive tightening can damage the grip and
exert unwanted preload on the specimen.
5. Hand-tighten the lower grip’s control nut until the jaw faces engage the specimen.
6. Hand-tighten the upper grip’s control nut until the jaw faces engage the specimen.