INTERMATIC INCORPORATED | 1950 Innovation Way, Suite 300 | Libertyville, Illinois 60048 | www.intermatic.com 7
Intermatic Connect 365-Day Programmable Smart Wi-Fi Timer Programming Guide: Models ETW2CP, ETW3CP
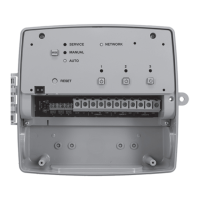
Modes
Switching modes using the Mode button: When the user presses the Mode
button, the LED associated with the next Mode (see below) will begin to blink
on and off. This Mode LED will continue to blink for 3 seconds, and if no further
Mode button presses occur, the device will switch Modes and the LED associated
with the selected Mode will stop blinking and turn to solid on. If the user presses
the Mode button before the 3 second timeout, the LED associated with the next
Mode will begin to blink and the 3 second timer will restart.
If the user presses the Mode button enough times to get back to the Mode the
device is currently in, the Mode LED will turn to solid on, letting the user know
there in the current Mode already.
For example:
Initial state: Mode = Manual and schedule exists
• 1
st
button: press Auto LED blinks
• 2
nd
button: press (within 3-secs) Service LED blinks
• 3
rd
button: press (within 3-secs) Manual LED goes solid on
1.1.1 Manual
• Default mode out of the box and after a factory reset.
• Transition to other Modes can be done by user via Device Buttons/Mobile/
Voice UI.
• Schedule events/holidays are ignored.
• Circuit override buttons are enabled.
• Override inputs (if enabled) can override associated Circuit.
• Mobile app overrides are enabled when device is connected to the cloud (Remote).
• Voice UI overrides are enabled when device is connected to the cloud
(Remote).
1.1.2 Auto
• Requires at least 1 schedule event or holiday in device to enter Auto mode.
• The device will follow the schedule/holiday events when in Auto mode.
• The device can be placed into Auto mode using the Mode button on the
device, mobile application, or Voice UI.
1.1.3 Service
Service Mode is to be utilized by a service technician.
• The only method of placing the device into Service Mode is at the device
using the Mode button only.
• Circuit/Output override buttons are enabled.
• If the device is cloud connected, entering Service mode will start BLE
communications, allowing a local service technician the ability to connect to
the device and perform local operations. BLE communications will remain
enabled until the device is placed into another mode of operation (Auto or
Manual).
• Mobile App connected via the Cloud will not be able to make changes to the
device while in Service Mode.
• Mobile App connected via the Cloud will be able to show a user the device is
in Service Mode.
• An onsite service technician connected locally to the device (peer-to-peer via
Bluetooth) will have the ability to fully configure settings and schedule.
• When the Service timer expires, the device will automatically revert to the
previous mode of operation (Auto or Manual) prior to entering Service Mode.
This assumes the service technician didn’t delete all schedule/holiday
events. If all events are removed while in Service Mode, the timer will return
to Manual Mode and set the output/Circuit to Off.
• Schedule events/holidays are ignored.
• Sensor (Presence or Light) override inputs are automatically disabled in
Service Mode.
• Changing device mode via Voice UI is disabled.
• Voice UI override commands (sets) are disabled when device is in Service
mode. Voice UI shall tell the user why they can’t command Mode/State.
| “[Device Name] is in Service mode, overrides are not allowed while in
this mode”.
• Voice UI: The user shall be able to ask what mode the device is in while in
Service mode.
| Response form Voice UI while in Service Mode: “[Device Name] is in
Service mode which will expire at 4:30 PM”.
• For Cloud onboarded devices, Bluetooth communications will be re-enabled
when a user places the device in Service mode.
• Overrides are not honored while in Service Mode.
• When entering Service Mode, from either Auto or Manual, all Outputs will be
commanded Off.
• When leaving Service Mode (either by the user pressing the Mode button or
Service timer expiration), the device act as follows:
| If the previous Mode was set to Manual, Outputs will be restored to their
previous values prior to entering Service Mode.
| If the previous Mode was set to Auto, when leaving Service Mode, the
Outputs will be set based on the Schedule and Sensor Override Inputs.
Overrides
“Override” is defined as the manual action of toggling an output from “On”
to “Off” or “Off” to “On” state. “Off” is defined as power is removed from the
Normally Open contact on the Relay, “On” is defined as Power is applied to the
Normally Open contact of the Relay. Overrides only occur when the product is
in Auto Mode, i.e manually overriding the scheduled state in Auto Mode. If the
product is in Manual Mode, the “override” concept doesn’t exist. In Manual mode,
overrides change the state of the output for eternity or until the user changes the
Mode or State.
California title 20/24 mandates that an override is not to exist more than 2 hours.
Default override time for General Purpose and Pool Timer products will be 120
minutes.
Physical override inputs exist on the General Purpose and Pool Timer devices only.
An active physical override is defined as a high voltage (level) present on the input.
All 3 products can be overridden by the mobile App and Voice UI.
 Loading...