DAYLIGHT SAVING TIME SETTING
- 6 -
Press "TIME SET" button again "24H" or "12H" blinks on the display.
(24H means 24-hour clock, 12H means 12-hour clock)
Press "▲" or "▼" button to adjust the time format.
Press "TIME SET" button again and the "YEAR" digits will blink.
Press "▲" or "▼" button to adjust the year.
Press "TIME SET" button again or wait for 40 seconds to return to the
clock display.
Press and hold “TIME SET” button the HOUR and MINUTE digits will
blink at the same time, Press “ ”or “ ” button to adjust the minute.
Press "▲" or "▼" button to adjust the hour;
Press “TIME SET” button again ,the “MONTH” and “DATE” digits will
blink at the same time, Press “ ”or “ ” button to adjust the date,Press
"▲" or "▼" button to adjust the month .
SNO OZE/ / /S TO.
▲
▲
LED
▲/ME M.
MODE
-
+
VOL
TIM E ZONE
PM
SLP
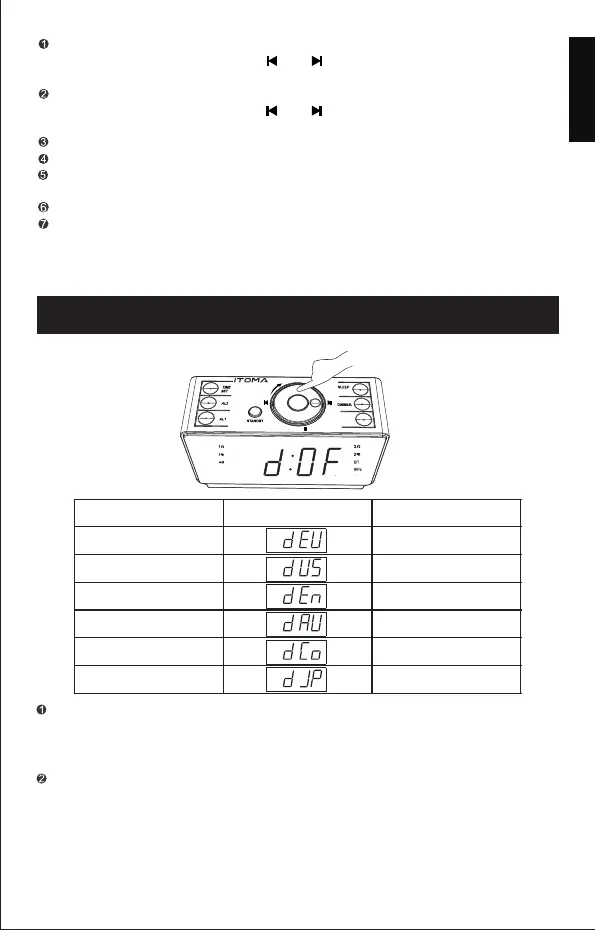
Once the product RESET(factory setting) becomes, the product needs
to set DST before reuse.This DST setting can be set in the Time Setting,
just after the setting of hour, minute, month, day, year and 12/24 hours,
and this method can be available only in this condition.
You can also set the DST Time area by long press the "▲"button until
the DST words( /dJP) flashes, then pressdOF/dEU/dUS/dEn/dAU/dCo
the "▼" button again to switch to your local DST.(dOF is for Turn off DST;
dEU is for Europe; dUS is for United States;dEn is for The United
Kingdom;dAU is for Australia;dCo is for Mexico dJP applies to Japan; )
This clock was preseted Auto DST(Daylight Saving Time) for different
countries as below:
Note: When your local DST starts, the indicator "DST" will appear on
the display untill the DST ends up.
English
DST
America/Canada
United Kingdom
Australia
Mexico
PRODUCT CODE DISPLAY INDICATION AREA
NA
UK
AU
CO
JP
Japan
DE
Europe