EasyManua.ls Logo

JABSCO 17800 series User Manual

JABSCO 17800 series
4 pages
To Next Page IconTo Next Page
Page #1 background imageLoading...
Page #1 background image
Model 17800-Series
PORTA QUICK OIL CHANGER
FEATURES
Pump Body: Bronze construction
Impeller: Nitrile (oil resistant)
Shaft Seal: Lip Type
Motor: Reversible with integral reversing
switch
Container: Plastic with 14 quart capacity
Power Cord: 8 feet with alligator clips
Suction Hose: 4 feet of neoprene hose with
40 inch Teflon* dipstick probe
Dimensions: 13-1/2" (343mm) diameter,
13-5/8" (354mm) high
Weight: 9 lb (4.1 kg)
OPERATING INSTRUCTIONS
1. Run the engine approximately 5 minutes to heat oil
(minimum oil temperature 140°F; maximum 185°F),
then shut off engine prior to oil removal.
2. Push the 1/2" suction hose onto the pump inlet hose
fitting. Position one hose clamp on the end and
tighten to secure the hose to the hose barb.
3. If using the 1/4" dipstick probe (instead of the
Female Garden Hose Connector), insert the probe
into the 1/4" x 1/2" (approximately 1" long) rubber
bushing until the end of the probe and the bushing
are flush with each other. Slide the hose clamp over
the end of the 1/2" hose and position the end of the
plastic probe, with bushing attached, in the end of
the suction hose. Slide the hose clamp to a position
where it will be approximately centered over the
probe/ hose bushing, and with a pair of pliers,
squeeze it together very tightly to affect a positive
airtight seal.
If using the Female Garden Hose Fitting, install it
onto the end of the 1/2" suction hose by inserting the
1/2" barb fitting into the
hose and secure it by
screwing together the
two halves of the plastic
clamp on the hose at the
position of the barb.
4. Clamp the power cord
alligator clips (red to
positive and black to
negative) to the termi-
nals of an appropriate
voltage battery.
NOTICE: Failure to use proper size fuse in power cord
fuse holder may cause motor damage and void
w a r r a n t y.
Model Amp Fuse
Number Voltage Draw Size
17800-2000 12 7 10
17800-2090** 12 7 10
17800-2024** 24 3-1/2 5
** Models 17800-2090 and 17800-2024 conform with
EN50081-2 for suppression of electro-magnetic interference
and are marked.
Question and Answer IconNeed help?

Do you have a question about the JABSCO 17800 series and is the answer not in the manual?

JABSCO 17800 series Specifications

General IconGeneral
BrandJABSCO
Model17800 series
CategoryWater Pump
LanguageEnglish

Summary

Features

Operating Instructions

Prepare Engine for Oil Removal

Run the engine to heat oil to between 140°F and 185°F, then shut off before removal.

Connect Suction Hose

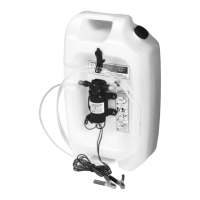
Attach the 1/2" suction hose to the pump inlet fitting and secure with a hose clamp.

Attach Dipstick Probe or Garden Hose Fitting

Connect the 1/4" dipstick probe or garden hose fitting to the suction hose end.

Connect Power Cord to Battery

Connect the power cord alligator clips (red to positive, black to negative) to the battery terminals.

Insert Dipstick Probe into Engine

Insert the dipstick probe to the pan bottom, adjust slightly, and secure for oil removal.

Select Pump Direction

Use the reversible switch to select the desired oil flow direction.

Avoid Motor Overspeeding

Switch off the pump immediately once oil is removed to prevent impeller damage.

Disconnect and Remove Probe

Disconnect power clips from battery and remove the dipstick probe after oil removal.

Empty Oil Container

Use the pump to discharge oil to a receptacle or use the pour spout.

Exploded View and Parts List

Exploded View Diagram

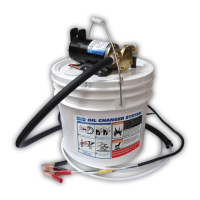
Illustrates the assembly of the oil changer with numbered parts.

Parts List

Lists components with their corresponding part numbers and quantities.

Disassembly Instructions

Step-by-step guide for taking apart the oil changer unit.

Assembly Instructions

Step-by-step guide for reassembling the oil changer unit.

Warranty Information

Limited Warranty Terms

Details the conformity to specifications and freedom from defects in material and workmanship.

Warranty Adjustment Process

Outlines the procedure for obtaining repair or replacement for defective products.

Exclusions and Liability Limitations

Specifies conditions under which the warranty is voided and liability is limited.

Consumer Rights

Explains specific legal rights granted to consumers by the warranty.

Related product manuals