2525
Notes:
- When rst turned on, all of the numbers and LEDs on the control
panel will turn on; the codes relative to the software, rmware and
set control model with dip-switch will appear.
When this time has passed, the system will enter stand-by mode.
XPress the TEST button of the dierential switch located up-
stream from the electrical system to which the spa is connected.
If it does not trip, it may be faulty or it may have tripped due to
problems in the electrical system of the building.
Disconnect the spa and do not use it until you have identi-
ed and eliminated the defect.
XCheck the operation of the hydromassage pumps using the
key (upon pressing the key for the rst time, the pump is acti-
vated; it is turned o by pressing the key a second time).
XCheck that the spotlights switch on and o using the key
.
XCheck that there are no leaks from the hydraulic connections
or other problems.
XCompletely disinfect the spa by carrying out “super-chlorin-
ation” treatment.
Please refer to the Jacuzzi system water treatment guide
and relative catalogue for details on water quality mainte-
nance, the methods and warnings governing the use of rela-
tive chemical products.
XAfter a few hours, turn o the omnipolar switch.
XOpen the drain valve(s) and completely empty the spa.
XIf included, re-install the front and side panels.
CAUTION
Do not use the spa the rst time you start it as there is a
high concentration of chlorine in the water during this
phase. Immediately empty the bath.
Contact the local authorities for the standards govern-
ing the discharge of chemically treated water.
XClose the drain valve(s) and ll the spa again with fresh water
as previously explained.
XTurn the omnipolar switch back on and check that the spa
works correctly.
XCheck and as necessary modify the water ltering cycles
based on how you intend to use the spa.
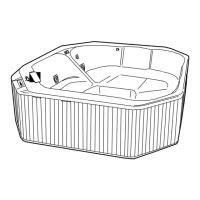
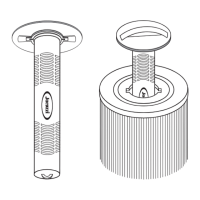
QInstallation of front and side panels
(where included)
Consult the drawings and information relevant to the supplied model.
X(2, part.1) Insert the rubber spacers on the threaded pins
(located on the lower part of the support legs).
Wood panels (--> Sasha mi) can ONLY be used for inte-
rior installations.
X(2, part.2) Set one of the two panels with corners (A-B) at
the edge of the tub and check that the slots on the lower bracket
coincide with the threaded pins.
X(2, part.3-4) Insert the edge of the upper bracket in the
under-edge prole. Then set the panel next to the tub, so that
the threaded pins are inserted into the slots. (part.5)Temporarily
fasten the panel with the indicated nuts.
XInstall the other panel in the same way.
XUsing the same procedure, install the front panels (C and D). To
make insertion easier, if necessary pull out on panels A and B.
Finally, make sure the panels are aligned with one another.
XPermanently secure the panels by tightening the nuts all the
way, until any vertical gaps are closed between the panel and
the corner.
Control panel and functions
CAUTION
Only modify the parameters indicated: do not change the
conguration of the other parameters.
(5) All spa functions are managed by the control panel on the
tub, as are the respective settings/programming.
NOTE: the display is equipped with keys “ ” and “ ” to increase
or decrease the values.
QSetting the water temperature
The water is heated by a tubular electrical heater. Do not set an
excessively high water temperature, i.e. over the limit of 40 °C. The
recommended temperature is 35-36 °C.
NOTE: with the version with 1.5 Kw heater, when the pump is
activated, the heater is turned o (the LED relative to the symbol
ashes) and is turned on once again after the pump has been
switched o.
Water heating temperature (“set point”).
To check or modify the water heating temperature, do the following:
XPress keys “ ” or “ ”: the display will show the current
memorized temperature.
 Loading...