Janfire NH Burner Service Installation Manual 4.16.09 - Technical specifications are subject to change without prior
notice.
12(38)
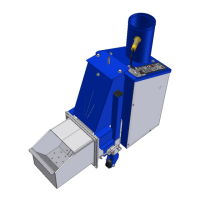
4.2 Mounting the Burner
The boiler lower front door has a pre-made opening for the burner.
1. Locate the eyelets shipped with the burner.
2. Screw in the eyelets into the tappings directly adjacent to the burner bulkhead opening.
3. Unpack the burner and remove plastic transporter handle. Check the integrity of the burner/ boiler
sealing braid.
NOTE: To achieve the best output from your system the boiler must be airtight. The sealing gasket
between boiler and burner must be airtight to stop any extra air from entering the system.
4. Check if flame deflector is in place and place the burner into the boiler; adjust eyelets on the boiler
bulkhead then lock burner in place.
NOTE: Make sure that the burner door insulation remains intact after burner insertion. Add high
temperature insulation (not supplied) if necessary between burner flame deflector and burner door
insulation.
5. Adjust the burner’s height by releasing the locking screw and lowering the support wheels. Tighten the
locking screw when the correct height is achieved.
6. Attach the burner electrically to the boiler aquastat according to Fig. 15 electrical wiring diagram.
7. The NH pellet burner is supplied with an outdoor sensor and boiler sensor. Attach the common sensor
wiring box to the right side of the boiler. Route the boiler sensor underneath the boiler top jacket panel
to the boiler well located in the top of the rear boiler section.
8. Combine the NH burner boiler sensor along with Honeywell capillary and blocking spacer into the
immersion well. Make sure all sensors are fully inserted into the well. Screw Honeywell aquastat to top
of jacket panel. (see Fig. 6)