The JBL Paragon is a unique and classic loudspeaker system, renowned for its innovative acoustic design, which was granted a United States patent. Introduced in 1957, it has become legendary for its acoustic and visual excellence, and its continued popularity attests to its enduring appeal. Each Paragon is meticulously crafted by JBL artisans, requiring over 112 hours of construction.
Function Description:
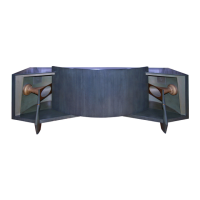
The Paragon is designed to project a continuously balanced stereophonic image to the listener, even when seated far off-axis. Its impressive size contributes to the breadth and spaciousness of sound it produces, filling a room with music in a manner remarkably similar to a live performance. The system is comprised of two main enclosure sections and a convex refractor panel, which is a major element of its patented design. Within the enclosure are JBL's finest component loudspeakers, critically designed, machined, and assembled for maximum performance.
Important Technical Specifications:
- Amplifier Power: Maximum Recommended 200 watts per channel
- Nominal Impedance: 8 ohms
- Dispersion: 120°
- Crossover Frequencies: 500 and 7000 Hz
- Sensitivity: 95 dB SPL, 1W, 1m (3.3 ft)
Low Frequency Loudspeaker:
- Nominal Diameter: 380 mm (15 in)
- Voice Coil: 100 mm (4 in) edgewound copper ribbon
- Magnetic Assembly Weight: 10.3 kg (22¾ lb)
- Flux Density: 0.95 tesla (9500 gauss)
- Sensitivity: 95 dB SPL, 1W, 1m (3.3 ft) (averaged from 100-500 Hz)
Midrange Compression Driver:
- Throat Diameter: 50 mm (2 in)
- Voice Coil: 100 mm (4 in) edgewound copper ribbon
- Magnetic Assembly Weight: 10.7 kg (23½ lb)
- Flux Density: 1.5 tesla (15,000 gauss)
- Sensitivity: 118 dB SPL, 1W, 1m (3.3 ft)
High Frequency Ring Radiator:
- Nominal Diameter: 98 mm (3⅞ in)
- Voice Coil: 44 mm (1¾ in) copper
- Magnetic Assembly Weight: 1.5 kg (3¼ lb)
- Flux Density: 1.65 tesla (16,500 gauss)
- Sensitivity (averaged above 4 kHz): 110 dB SPL, 1W, 1m (3.3 ft)
Physical Specifications:
- Finish: Oiled Walnut
- Dimensions: 902 mm x 2632 mm x 614 mm deep (35½ in x 103⅝ in x 24⅛ in deep)
- Shipping Weight: 317 kg (698 lb)
Usage Features:
- Placement: Due to its special acoustic characteristics, the Paragon's performance is virtually the same regardless of room placement. However, in "live" rooms with hard, reflective surfaces (e.g., large windows, paneled walls, hard wood floors), sound clarity may be improved by placing drapes, tapestries, or bookshelves behind the listeners.
- Assembly: The Paragon is shipped in three parts: left and right enclosure halves, and the convex refractor panel. The rear legs should be adjusted by the user for leveling after the system is permanently located. The two main enclosure sections are leveled by adjusting the outer legs, then pushed together, ensuring dowel pins align with corresponding holes. The enclosure sections are semi-permanently locked together by six wedge brackets (three front, three rear), secured with wood screws. The curved refractor panel is then set into place, sliding its edges through notches at the ends of the cabinet sections, taking care to avoid scratching the midrange horns.
- Connecting the Paragon: Connections are made via four pushbutton terminal posts on the back of the enclosure. The amplifier must be turned off before connecting or disconnecting loudspeakers to prevent damage. For wire lengths up to 15 m (50 ft), 1 mm (#18 AWG) insulated wire is recommended; heavier gauges are needed for longer distances. Wires should be stripped approximately ¼ inch, inserted into the exposed opening of the terminal post, and the button released. The black terminal post connects to the amplifier's "common" or "ground" (-), and the red terminal post to the 8-ohm speaker output. While 8-ohm impedance is nominal, 4- or 16-ohm amplifier terminals can be used.
- Adjusting the System: The three-position switch on each midrange dividing network (LX5) should typically be in the MED (medium) position. The continuously variable control on the high frequency dividing networks (N7000) should be rotated to the "12 o'clock" position (number four on the knob). These settings provide a smooth tonal balance in most rooms, but alternate settings may be required for excessively reverberant or "dead" rooms, or to suit personal listening preferences.
- Balancing Procedure: Audition favorite recordings (solo voices are recommended for easier detection of imbalance) with amplifier tone controls set to "flat" and mode selector to monaural (L & R). Adjust one channel by placing the balance control full left or right.
- Midrange Adjustment: Ensure the midrange control is in MED. Rotate the high frequency control to its extreme left to attenuate high frequencies, focusing on the balance between low frequency and midrange loudspeakers. Adjust the midrange control to MIN if the voice sounds too bright, or MAX if it sounds distant/muffled.
- High Frequency Adjustment: Once the midrange network is adjusted, gradually increase the high frequency control until a pleasing overall balance is achieved. Use recordings with bells, cymbals, and triangles for this test.
- Finalization: After each adjustment, listen to two or three different recordings. Once final settings are determined for one channel, duplicate them on the other. Tone controls on the amplifier or receiver can be used for individual recording differences.
Maintenance Features:
- Component Removal (for testing or repair):
- Low Frequency Loudspeaker: Remove 16 Phillips-head screws from the rear panel. Tilt the panel outward, detach wire leads, remove four screws holding the loudspeaker to the baffle board. Gently separate if the gasket adheres.
- Midrange Driver and Horn: Remove the upper section of the sculptured front leg. Unscrew two Phillips-head machine screws from the front edge of the horn mouth and two from the rear edge. Use a ⅛" Allen wrench to remove four socket-head machine screws fastening the midrange driver to the horn. Detach wire leads. Loosen two ⁹⁄₁₆" square nuts retaining the clamp assembly. The driver can then be pulled forward. When reinstalling, ensure input terminals face the rear of the enclosure and do not clamp the driver until it's attached to the horn and front horn flanges.
- High Frequency Driver: Wire leads are accessible from the rear. Detach leads, remove five Phillips-head wood screws holding the clamp ring. Loosen the screw at the bottom of the clamp ring to remove the driver. When reinstalling, insert the two larger wood screws through holes nearest the base of the clamp ring, positioning the ring so its base is directed towards the bottom of the enclosure.
- Dividing Networks: Detach amplifier leads from network terminals. Remove four screws from each network mounting plate. Lift out each network, gently pulling wire leads through holes. Identify each wire for proper reinstallation.
- Replacement: Reverse the removal procedure. Tighten mounting screws evenly to prevent frame warpage and air leaks. Avoid excessive force.
- Caution: JBL loudspeakers are rugged, but cones and moving parts are susceptible to accidental damage. Exercise extreme caution with tools. When the horn is removed from the compression driver, cover the driver's mouth with plastic tape. An intense magnetic field exists, so keep iron chips, mounting hardware, and other metal items away from the area.
- Cabinetry Care: The enclosure features a 2.7 m (9 ft) expanse of prime walnut veneer, finished with an exclusive oil-wax formula and hand-rubbed to perfection.
- Dusting: Occasional dusting with a clean, soft cloth maintains the original beauty.
- Stains: Moisture cannot penetrate the oiled surface, so most household stains can be easily removed with a damp cloth.
- Waxing: Treat the surface only with wax specifically formulated for oiled finishes. Conventional furniture waxes, polishes, or cleaners are not recommended.
- Re-oiling: As the oil penetrates, the finish may appear to dry out. Re-oil periodically using JBL finishing oil or other clear oil finishing preparations. Apply liberally, wait 10-15 minutes, then wipe off excess with a soft, clean, dry cloth.
- Scratches: Surface scratches can usually be removed by gently rubbing with very fine steel wool (4/0 grade) and applying oil to the entire panel. Deep scratches or dents should be repaired by a qualified furniture refinisher.
- Rags: Improper storage of wiping rags can cause spontaneous combustion. Spread them out to dry in a well-ventilated area before storage or disposal.
- Troubleshooting:
- Extraneous Noises: Noise usually originates from other components of the music system or the program material itself. If a loudspeaker component stops working or produces a rattling/scraping sound, it may be defective.
- One Channel Inoperative: Check loudspeaker wiring and balance control. If centering the balance control doesn't fix it, reverse right/left loudspeaker connections at the amplifier (with amplifier off). If the previously non-functional channel now works, the amplifier or a program source is malfunctioning. If still inoperative, the loudspeaker is defective.
- Identifying Defective Component: If the amplifier is not faulty, alternately check each program source (tuner, phono, tape deck) until the defective unit is isolated.
- Interference (Static/Radio Signals): Disconnect inputs from the receiver/amplifier until interference stops. If interference persists with no input devices, the receiver/amplifier is likely defective. Shorting plugs in unused phono inputs can eliminate stray hum.
- Hum: May be caused by turntable/tape recorder placement near the amplifier. Separate AC leads and shielded cables. Power line interference can be attenuated with a heavy-duty line interference filter.
- Fuzzy/Indistinct High Pitched Sounds: Often traced to the recording, a defective cartridge, worn stylus, or insufficient tracking force.
- Low Frequency Reproduction Problems: Usually due to room acoustics or speaker placement. Excessive bass boost or incorrect loudness compensation can cause a "muddy" or "boomy" sound.
- Acoustic Feedback: Caused by mechanical vibrations from excessive bass at high volumes. Solutions: place speaker far from turntable, adjust/replace turntable shock mountings, place turntable on a rubber/sponge mat. If low frequency tone persists, it may be inherent turntable rumble.
- Service: If service is required, remove the defective component and return it to the JBL dealer. If a dealer cannot be reached, contact the JBL Service Department. Products returned to the factory must be sent prepaid. Warranty is recognized only when repaired by JBL or an authorized JBL Service Agency, and if the serial number is intact.
- Additional Information: For assistance with performance, consult a JBL Audio Specialist. If the dealer cannot assist, contact the JBL Technical Services Department.