EasyManua.ls Logo

Johnson 40-6080 - User Manual

Johnson 40-6080
16 pages
Print Icon
To Next Page IconTo Next Page
Loading...
©2012 Johnson Level & Tool - Rev. 2 1
Magnetic Digital Laser Level
Model No. 40-6080
Instruction Manual
Congratulations on your choice of this Magnetic Digital Laser Level
with Rotating Display. We suggest you read this instruction manual
thoroughly before using the instrument. Save this instruction manual
for future use.
This is a Class IIIa laser tool and is manufactured to comply
with CFR 21, parts 1040.10 and 1040.11 as well as international
safety rule IEC 285.
5821H-English_Manuals 5/2/12 8:04 AM Page 1
Question and Answer IconNeed help?

Do you have a question about the Johnson 40-6080 and is the answer not in the manual?

Summary

Instruction Manual Overview

Kit Contents

Features and Functions

Safety Instructions

Location of Warning Labels

Location of Parts and Components

Operating Instructions

Battery Installation Guide

Steps for installing batteries, including opening the cover, inserting batteries, and closing the cover.

Post-Installation Display Check

Indicates LCD display after battery installation and the need for calibration.

Using the Product

Key Guide Overview

Visual guide identifying all instrument buttons and their general functions.

Power and Hold Key Operations

Instructions for Power key (on/off) and Hold key (lock reading).

Sound;LCD Backlight Control

Activates LCD backlight and sound functions, with details on sound feedback.

Mode Key and Laser Operation

Operational Status Indicators

Explains auto shut-off feature and low battery indication on the LCD.

Sound, Hold, and Laser Functions

Inclination Indicator Explained

Triangle arrows on LCD show the direction of inclination relative to horizontal.

Zero Degree Indication

Rotating Display Feature

Highlights that the instrument's LCD screen can be rotated 180 degrees.

Self-Check and Fine Calibration

Checking Horizontal Accuracy

Procedure to check horizontal accuracy using a flat surface and 180-degree rotation.

Checking Vertical Accuracy

Procedure to check vertical accuracy using a vertical surface and 180-degree rotation.

Horizontal Calibration Procedure

Vertical Calibration Procedure

Step-by-step guide to calibrate the vertical accuracy using the ZERO key.

Technical Specifications

Care and Handling

Product Warranty

Overview

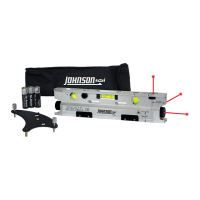
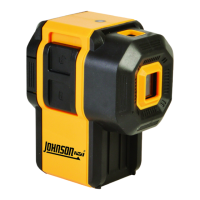
This document describes the Johnson Magnetic Digital Laser Level, Model No. 40-6080, a precision tool designed for accurate measurement of angles and slopes. This device is a Class IIIa laser product, manufactured to comply with CFR 21, parts 1040.10 and 1040.11, as well as international safety rule IEC 285.

Function Description

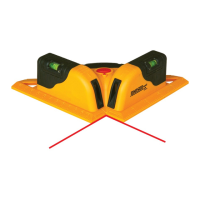
The Johnson Magnetic Digital Laser Level is primarily used for measuring and displaying angles and slopes with high precision. Its core function is to provide digital readings of inclination, making it suitable for various construction and leveling tasks. The device incorporates a laser for projecting a bright red dot, which aids in alignment and establishing reference points over distances.

A key feature of this digital level is its ability to measure in five different construction "languages" or units of measure. Users can switch between degrees, percentage of slope, millimeters per meter, inches per foot in decimal form, and inches per foot in fractional form. This versatility allows the tool to be adapted to a wide range of applications and regional preferences.

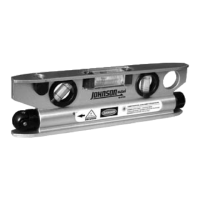
The instrument is equipped with a rotating LCD display, which automatically inverts the numbers when working overhead. This ensures that the readings are always upright and easy to read, regardless of the tool's orientation.

For enhanced usability, the level includes a sound function. When activated, the device emits a signal tone to confirm 0° and 90° positions of inclination. The beep rate increases as the instrument approaches these critical angles, becoming a continuous tone when exactly at 0.0° or 90°. This auditory feedback is particularly useful in situations where the display may not be easily visible.

The device also features a "Hold" function, which allows the user to lock the current angle reading on the LCD. This is beneficial for recording measurements or when the display needs to be viewed after the tool has been moved from its measuring position.

An automatic shut-off mechanism is integrated into the electronic module, turning off the device after 20 minutes of inactivity to conserve battery life.

Usage Features

To begin using the digital laser level, three "AAA" alkaline batteries must be installed. The battery compartment is accessed by turning a screw counter-clockwise. Once batteries are inserted according to polarity, the cover is snapped back and secured. Upon successful battery installation, the LCD will briefly display "good" before showing "-0-", indicating it's ready for use. It is crucial to calibrate the instrument after battery installation and before each use to ensure accuracy.

The device is operated via a simple keypad with distinct buttons for various functions:

  • Power Key: Turns the instrument on and off. The device beeps twice when turned on and once when turned off.
  • Hold Key: Locks the current angle reading on the LCD. When activated, the "HOLD" symbol appears, and the display flashes.
  • Sound/LCD Backlight Key: A short press toggles the sound function on/off. When sound is on, a horn symbol appears on the LCD. A long press (2 seconds) turns the LCD backlight on/off.
  • Mode Key: Cycles through the five available units of measure (degrees, percent, mm/m, in/ft decimal, in/ft fractional). A symbol on the upper right of the screen indicates the current mode.
  • Laser Key: Turns the laser beam on and off. The instrument beeps once when the laser is activated, and the "LASER" symbol appears on the LCD. The laser output window emits a bright red laser dot.
  • Calibration Key: Used to initiate the self-check and fine calibration procedures.

Inclination direction is indicated by triangle arrows on the two ends of the LCD, guiding the user towards the desired level or plumb position. When the level is at 0 degrees, two specific arrows will be displayed.

The magnetic base of the level allows it to be securely attached to metallic surfaces, providing stability during measurements. Additionally, a 1/4" - 20 thread is provided for connecting the instrument to a tripod, offering further versatility for hands-free operation and precise positioning.

Low battery indication is provided by a battery symbol on the display. When this symbol appears, batteries should be replaced promptly. The absence of the battery symbol indicates a full battery.

Maintenance Features

Proper care and handling are essential to maintain the accuracy and longevity of the Johnson Magnetic Digital Laser Level.

  • Handling: This is a precision tool and must be handled with care. Avoid exposing the unit to shock vibrations and extreme temperatures, as these can affect its accuracy and functionality.
  • Storage: Always turn off the unit before moving or transporting it. When not in use, store the unit in its provided soft-sided pouch or case to protect it from damage.
  • Battery Management: For extended storage periods (more than three months), remove the batteries to prevent potential damage to the unit from battery deterioration. Replace batteries when the low voltage indicator appears.
  • Cleaning: Keep the laser unit dry and clean. Pay particular attention to the laser output window. Any moisture or dirt should be removed with a soft, dry cloth. Harsh chemicals, strong detergents, or cleaning solvents should not be used, as they may damage the instrument.
  • Environmental Protection: Avoid getting the unit wet. The device is not designed for use in explosive environments or in the presence of gases or flammable liquids.
  • Self-Calibration: The instrument is self-calibrated, but users are responsible for verifying its calibration before each use. This involves a self-check and fine calibration procedure for both horizontal and vertical accuracy, as detailed in the manual. If the difference between two 180-degree measurements (A1 and A2) exceeds 0.2°, calibration is necessary.
  • Repair: Do not attempt to repair or disassemble the laser tool. Unauthorized attempts to repair will void the warranty. Use only original Johnson® parts and accessories from an authorized dealer; use of non-Johnson® parts will also void the warranty.
  • Safety: Always turn the laser tool off when not in use or left unattended. Keep the tool out of reach of children and untrained persons. Never stare directly into the laser beam or project it into the eyes of others. Avoid setting up the tool at eye level or near reflective surfaces. Do not view the laser beam through optical tools like telescopes.

Johnson 40-6080 Specifications

General IconGeneral
Laser Wavelength635nm
Accuracy±1/8 inch at 30 feet
Self-Leveling Range±4°
Battery Life20 hours
Working Range30 feet
Laser TypeRed Beam

Related product manuals