Do you have a question about the Juiced Bikes RipCurrent and is the answer not in the manual?
Juiced Bikes contact details including phone, email, and website for support.
Essential safety checks and practices for riding the e-bike.
Guidelines for riding in wet weather and at night.
Safety advice for extreme riding and general e-bike operation.
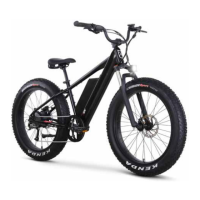
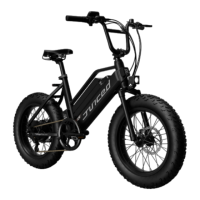
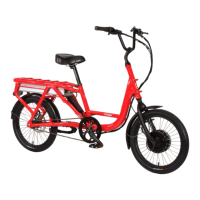
Overview of the e-bike's main features like throttle, battery, and display.
Detailed descriptions of electric motor, gear shifter, brakes, and fuse.
Diagram of electronic modules and key technical specifications.
Step-by-step instructions for securely installing the front wheel.
Guide for installing handlebars and pedals correctly on the e-bike.
Recommendations for the first ride and pre-ride safety checks.
How to use brakes, shifting gears, and pedal assist system.
Using the pedal assist control system for riding.
Using the throttle, reading battery levels, and understanding range factors.
Understanding the advanced matrix display, buttons, and screen metrics.
How to turn the e-bike on/off and adjust pedal assist levels.
Activating headlights, walk mode, and cruise control functions.
Resetting trip data and switching between main and advanced display screens.
Detailed explanation of data shown in the advanced display mode.
How to enter and adjust various e-bike settings in the setup menu.
Troubleshooting error codes for the e-bike electronics.
Procedures for managing and removing the e-bike battery pack.
Step-by-step instructions for safely charging the e-bike battery.
Onboard charging process, hydraulic brake care, and oil cups.
Common symptoms, causes, and solutions for e-bike issues.
Details on covered products, warranty period, and exclusions.
How to submit warranty claims and the scope of service.
Procedure for reporting and handling shipping damage.
The device is an electric bicycle, also known as an e-bike, designed to provide a boost to the rider's pedaling efforts through an integrated electric motor. It combines the functionality of a traditional bicycle with an electric propulsion system, allowing users to ride using both pedal power and battery-supplied electric power simultaneously or independently.
The core function of the e-bike is to assist the rider with an electric motor, which is built into the hub of the rear wheel. This motor is powered by an onboard rechargeable lithium battery pack, located within the downtube of the bike. A controller, also housed within the downtube, regulates the amount of power sent from the battery pack to the motor.
The e-bike features a Pedal Assist Control System, often referred to as "pedelec." This system utilizes cadence sensors to measure the rider's pedaling input. This information is then transmitted to the controller, which generates the appropriate power to assist the rider. The pedal assist system can maintain a constant level of assistance, and various assist levels can be selected by the rider. When the battery power button is pressed and the LCD power button is held for 3 seconds, the controller turns on, and the system calibrates, indicating the battery's charge level and the selected pedal assist level on the display. The pedal assist will activate only when the power is turned on and the rider begins pedaling. The system will maintain a constant pedal assist until the brakes are applied, the assist level is adjusted, pedaling stops, or the battery pack runs down.
In addition to pedal assist, the e-bike is equipped with a Throttle Operation feature. The throttle, located on the left handlebar, allows the rider to control the bike's speed without pedaling. By rotating the throttle control, the rider can increase the e-bike's speed. The throttle can be used in conjunction with pedal assist or as a standalone means of propulsion.
The e-bike also includes a Cruise Control Function to maintain a desired speed without continuous throttle or pedal input. To activate it, the rider reaches the desired speed using the throttle or pedal assist, then pushes and holds the "assist down" button for 2 seconds. A "C" graphic on the display confirms activation, and the bike maintains the speed. The cruise control is automatically modulated to maintain the desired speed, which is limited to 20 mph in accordance with regulations. This function can be deactivated by using the brakes, throttle, or pressing the "assist up" or "assist down" buttons.
For situations where the rider needs to push the bike uphill, a Walk Mode is available. Activating this mode by pushing and holding the "assist down" button for 2 seconds causes the motor to turn at a walking speed, assisting in moving the bike. Releasing the button or using the brake levers will stop the walk mode.
The e-bike is controlled through an LCD Display and a series of buttons. The display provides essential information such as battery pack voltage, battery charge state, current speed, assist level, power output in watts, and trip distance. It also features a headlight graphic that appears when the LED headlight is turned on, which also illuminates the display's backlight for visibility in the dark.
The display has three main control buttons: a Power Button (on the back side), an "Assist Up" button (on the front face), and an "Assist Down" button (on the front face). These buttons are used to turn the e-bike on and off, adjust the pedal assist levels (ECO, 1, 2, 3, SPORT), activate/deactivate the LED headlight and display backlight, and engage/disengage the walk mode and cruise control.
An Advanced Matrix Display Screen provides more detailed real-time data, including voltage, power, amps, assist level, speed, watt-hours, amp-hours, controller temperature, and trip distance. This mode can be accessed by simultaneously pushing the power button and the "assist up" button for 1 second. The display also allows for adjustment of certain parameters in a Setup Menu, which can be accessed by holding the "assist up" and "assist down" buttons for approximately 3 seconds. Menu options include Unit (mph/kmh), Speed Limit, Backlight brightness, Wheel Size circumference, "Power Off" Delay (automatic shutoff duration), NDW (pedal assist level limiter), Torque sensor activation (on/off), and Low Volts setting (battery discharge limit).
The e-bike is equipped with Brakes that use friction to slow the bike. The brake levers on the handlebars control the braking. An electrical switch integrated into the brakes cuts power to the electric motor when the brakes are applied, preventing unintentional acceleration. The front brake is controlled by the left-hand lever, and the rear brake by the right-hand lever. The front brake provides the majority of stopping power.
A Gear Shifter, located on the right handlebar, allows the rider to change the ratio between the pedals and the rear wheel. This helps in finding a comfortable pedaling cadence for various riding conditions, such as starting, climbing hills, or riding at speed. The gear shifting system operates independently of the pedal assist control system.
Regular maintenance is crucial for the e-bike's performance and longevity. The manual emphasizes preventive maintenance and suggests having maintenance and repairs done by an authorized dealer.
Battery Maintenance: The lithium battery pack should be charged fully before its first use and after every ride, even if only lightly used. It's recommended to recharge the battery pack at least once a month to prevent permanent capacity loss. The battery pack can be charged while connected to the e-bike or when removed. Onboard charging involves locating the charge port dust cover on the top of the battery pack, rotating it to expose the DC charge port, plugging in the charger, and connecting it to a power outlet. The charger's indicator LED turns red during charging and green when fully charged, at which point it automatically stops charging.
Brake Maintenance: The hydraulic brakes require inspection for wear and tear. The manual recommends inspecting brakes before every ride. The brakes undergo a "bedding-in" period after the first 40-50 full stops, after which they reach 100% grip capacity. Adjustments to the brake lever may be needed after this period. Mineral oil cups on the handlebars should be serviced by a trained mechanic.
General Checks: Before each ride, a mechanical check is recommended, including verifying that hardware is properly fastened, tires are inflated to the correct psi, brakes operate properly, handlebars are adjusted and secured, and the front wheel is secure and properly locked. Cable connections should also be tight.
Troubleshooting: The e-bike's electronic system has a self-diagnosis capability and reports faults via error codes on the display. The manual provides a chart explaining these error codes and their potential solutions, such as checking throttle units, battery voltage, motor sensor wires, controller temperature, and cable connections. For further troubleshooting, users are directed to the manufacturer's FAQ section or support contact.
Warranty: The e-bike comes with a limited warranty against manufacturing defects. Battery packs are covered for 1 year, and other electronic components, bicycle frames, and mechanical components are also covered for 1 year from the date of purchase. The warranty process involves registering the bike, contacting support with photos or videos of damaged parts, and adhering to specific claim procedures.
| Frame | 6061 Aluminum |
|---|---|
| Category | E-Bike |
| Top Speed | 28 mph |
| Fork | Suspension Fork |
| Brakes | Hydraulic Disc Brakes |
| Tires | 26" x 4" |
| Display | LCD |