Do you have a question about the JUKI JX-100 and is the answer not in the manual?
Explains hazard levels and warning symbols used for machine safety.
Fundamental safety guidelines for operating the machine.
Guidance on safety equipment, alarm labels, and their proper use.
Specifies suitable environmental conditions and operational precautions.
Cautions regarding electrical safety, covers, and general machine handling.
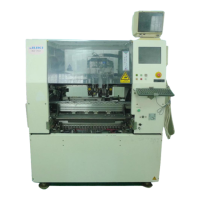
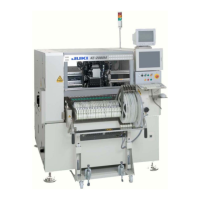
Identifies and describes key machine components like cameras, heads, nozzles, and feeders.
Explains the machine's role in placing electronic parts on circuit boards.
Illustrates the physical layout and key components of the machine.
Presents a flowchart detailing the steps from power-on to daily inspection.
Instructions for safely turning on the main unit power and initial checks.
Details the procedure for warming up the machine to ensure stable production.
Guide on selecting and loading the correct production program file.
Instructions to navigate to and display the main PWB production control screen.
Adjusting machine settings for PWB dimensions, including rails, stoppers, and alignment.
Instructions on how to attach components to supplying devices like tape feeders.
Procedure for correctly installing tape feeders onto the feeder bank.
Verifying and teaching the precise position for picking up components.
How to start and run the PWB production process.
Steps for properly stopping and exiting the production screen.
Instructions for safely powering down the main unit.
Procedures for managing component shortages and related errors during operation.
Steps to resolve errors related to the machine's inability to recognize board marks.
Instructions for cleaning and resolving errors caused by a dirty laser sensor.
Troubleshooting common component placement issues like tombstone and pick-up failures.
Procedures for resolving errors related to nozzle attachment or detachment.
Using the function to manage component supply during temporary stops.
Procedures for resuming PWB production after an abnormal stop or interruption.
| Brand | JUKI |
|---|---|
| Model | JX-100 |
| Category | Industrial Equipment |
| Language | English |