EasyManua.ls Logo

JVC KD-W110 - Page 10

JVC KD-W110
20 pages
Print Icon
To Next Page IconTo Next Page
To Previous Page IconTo Previous Page
Loading...
Timer
playback
procedure
(Decks
A
and
B)
1.
Connect
the
components.
2.
Turn
on
the
POWER
switches
of
amplifier
and
KD-W110.
Set
the
knobs
and
switches
for
Playback
and
ad-
just
the
volume
and
tone.
3.
Load
the
cassette
to
be
played
back.
4.
Set
the
timer
to
the
desired
time.
When
this
is
done,
electricity
does
not
flow
to
the
deck
or
amplifier.
5.
Press
the
pm
PLAY
button.
Playback
will
start
at
the
time
set
on
the
timer.
Notes:
@
Read
the
instruction
manual
of
the
timer
carefully
before
using
it.
@
Timer
recording
cannot
be
performed
if
the
cas-
sette’s
safety
tabs
are
removed.
@®
When
switching
off
the
power
by
the
timer,
it
is
advisable
to
set
the
timer
to
the
sufficient
time
in
order
not
to
turn
off
the
power
before
the
tape
stops
automatically.
TROUBLESHOOTING
What
seems
to
be
trouble
is
not
always
real
trouble.
Make
sure
first.
1.
Tape
moves
but
no
sound
is
heard.
*
Are
all
connections
properly
and
securely
made?
Is
the
MONITOR
switch
of
the
stereo
amplifier
set
to
the
TAPE
position?
!s
the
VOLUME
control
of
the
stereo
amplifier
set
to
MIN?
2.
MUSIC
SCAN
operation
does
not
function
prop-
erly.
Or,
tape
stops
in
the
middle
of
a
tune.
Is
the
non-recorded
section
between
tunes
short
(less
than
4
sec)?
Or,
is
the
recording
level
of
the
’
program
too
low?
(See
page
6.)
.
Sound
quality
is
poor.
Are
the
positions
of
the
TAPE
SELECT
switches
the
same
for
both
recording
and
playback
of
the
same
tape?
*
Is
the
position
of
the
NR
SYSTEM
switch
the
same
for
both
recording
and
playback
of
the
same
tape?
is
the
head
section
dirty?
Is
the
record/playback
head
magnetized?
is
the
tape
worn
out?
.
Recording
cannot
be
performed.
Are
all
connections
properly
and
securely
made?
Is
the
head
section
dirty?
.
Recording
from
LINE
IN
cannot
be
performed.
Does
the
unit
enter
the
dubbing
mode
by
pressing
the
»
PLAY
button
of
deck
A?
.
Tape
does
not
run
at
double
speed
when
dubbing.
Is
the
SPEED
switch
set
to
NORM
(
-@
)?
Is
the
safety
tab
of
the
tape
in
deck
B
broken?
*
cast)
*O1
*
*D
*
OK
OF
*
*O)
co
«NJ
.
The
playback
sound
of
deck
A
cannot
be
heard.
Is
the
pm
PLAY
button
of
deck
B
pressed?
.
The
cassette
operation
buttons
of
deck
B
do
not
function.
Is
the
CONTINUOUS
PLAY
button
pressed?
9.
Dubbing
is
not
possible.
*
ts
the
safety
tab
of
the
tape
in
deck
B
broken?
10.
Previous
recording
is
not
completely
erased.
*
Is
the
erase
head
dirty?
*
Are
the
TAPE
SELECT
switches
set
correctly?
11.
Since
tape
speed
is
irregular,
wow
and
flutter
occurs.
ts
the
pinch
roller
or
capstan
dirty?
*
*
MAINTENANCE
The
importance
of
cleaning
When
the
tape
is
moving,
magnetic
powder
and
dust
naturally
accumulates
on
the
heads,
capstan
and
pinch
roller.
When
they
become
too
dirty:
@
Tone
quality
deteriorates
@
the
output
sound
level
drops
@
the
previous
sound
is
not
satisfactorily
erased.
®
recordings
are
not
satisfactory.
Because
of
these,
clean
the
heads,
etc.
every
10
hours
of
use.so
that
important
recordings
will
not
be
missed.
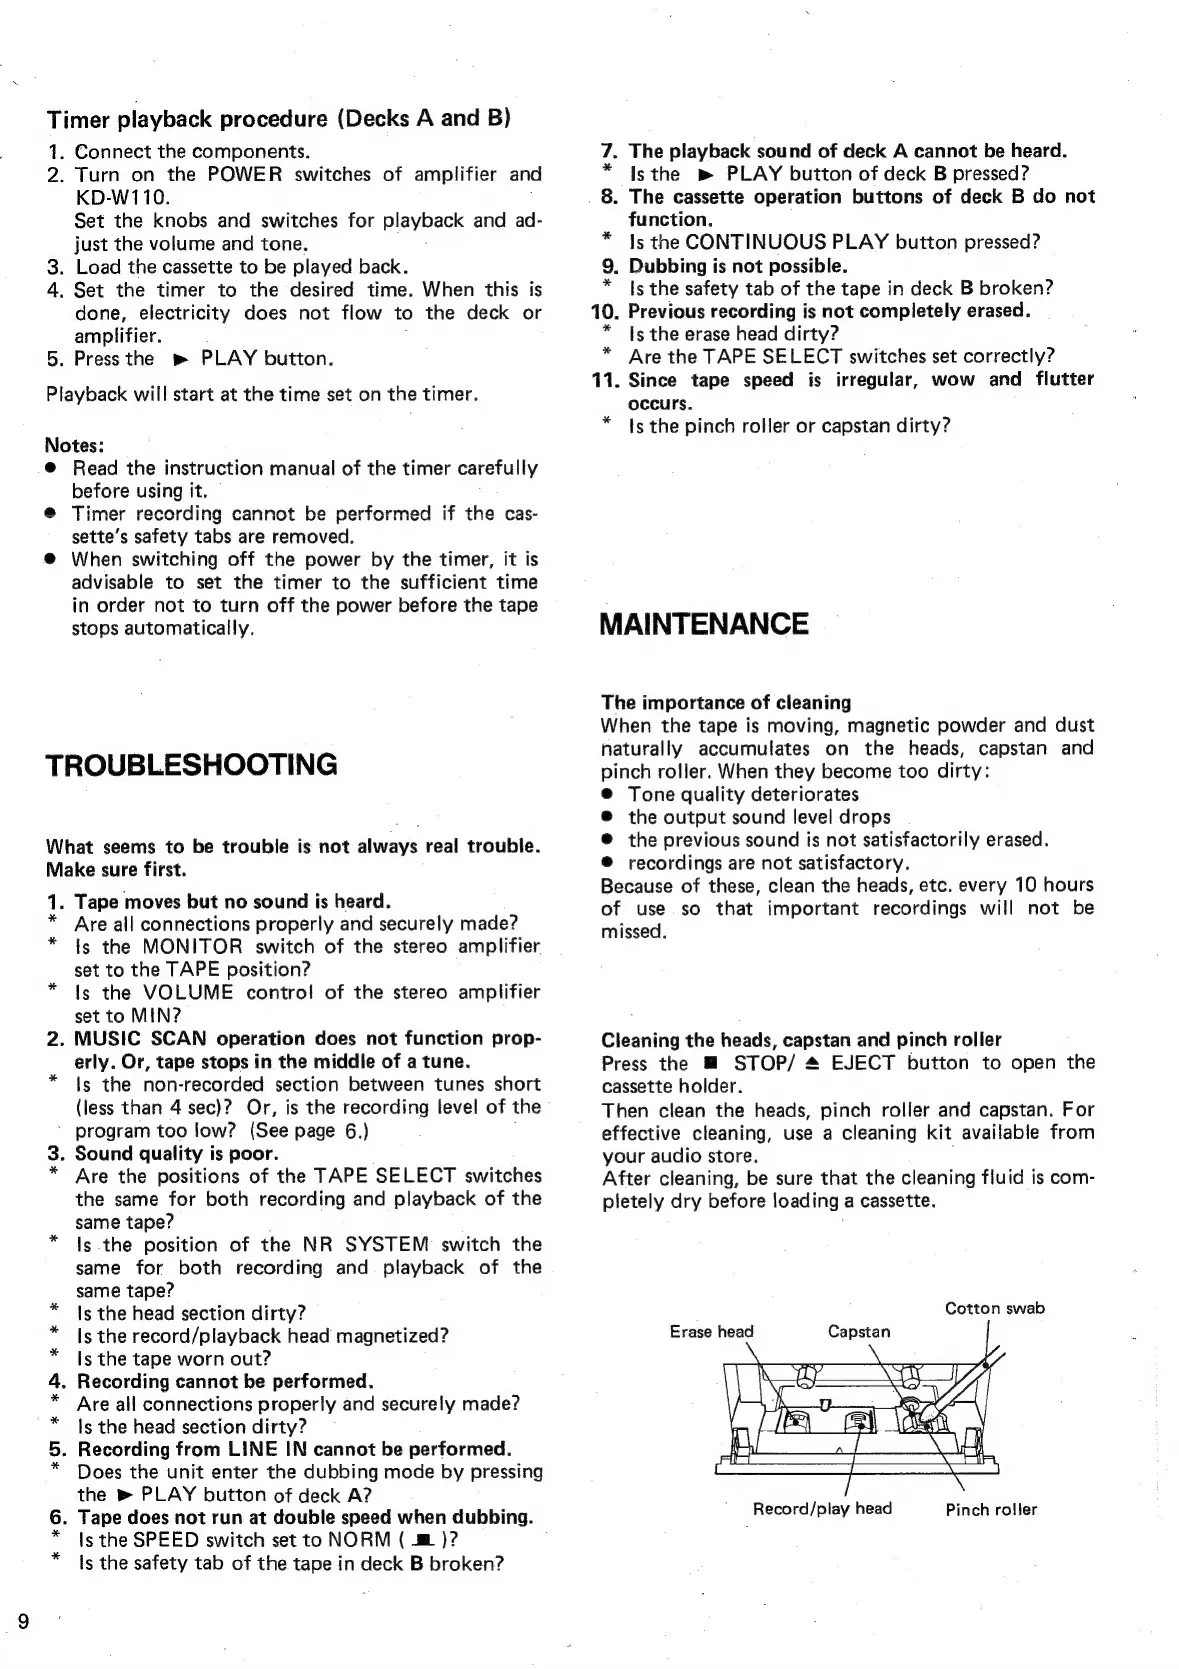
Cleaning
the
heads,
capstan
and
pinch
roller
Press
the
@
STOP/
&
EJECT
button
to
open
the
cassette
holder.
Then
clean
the
heads,
pinch
roller
and
capstan.
For
effective
cleaning,
use
a
cleaning
kit
available
from
your
audio
store.
,
After
cleaning,
be
sure
that
the
cleaning
fluid
is
com-
pletely
dry
before
loading
a
cassette.
Cotton
swab
Erase
head
Capstan
Record/play
head
Pinch
roller