3
2
1
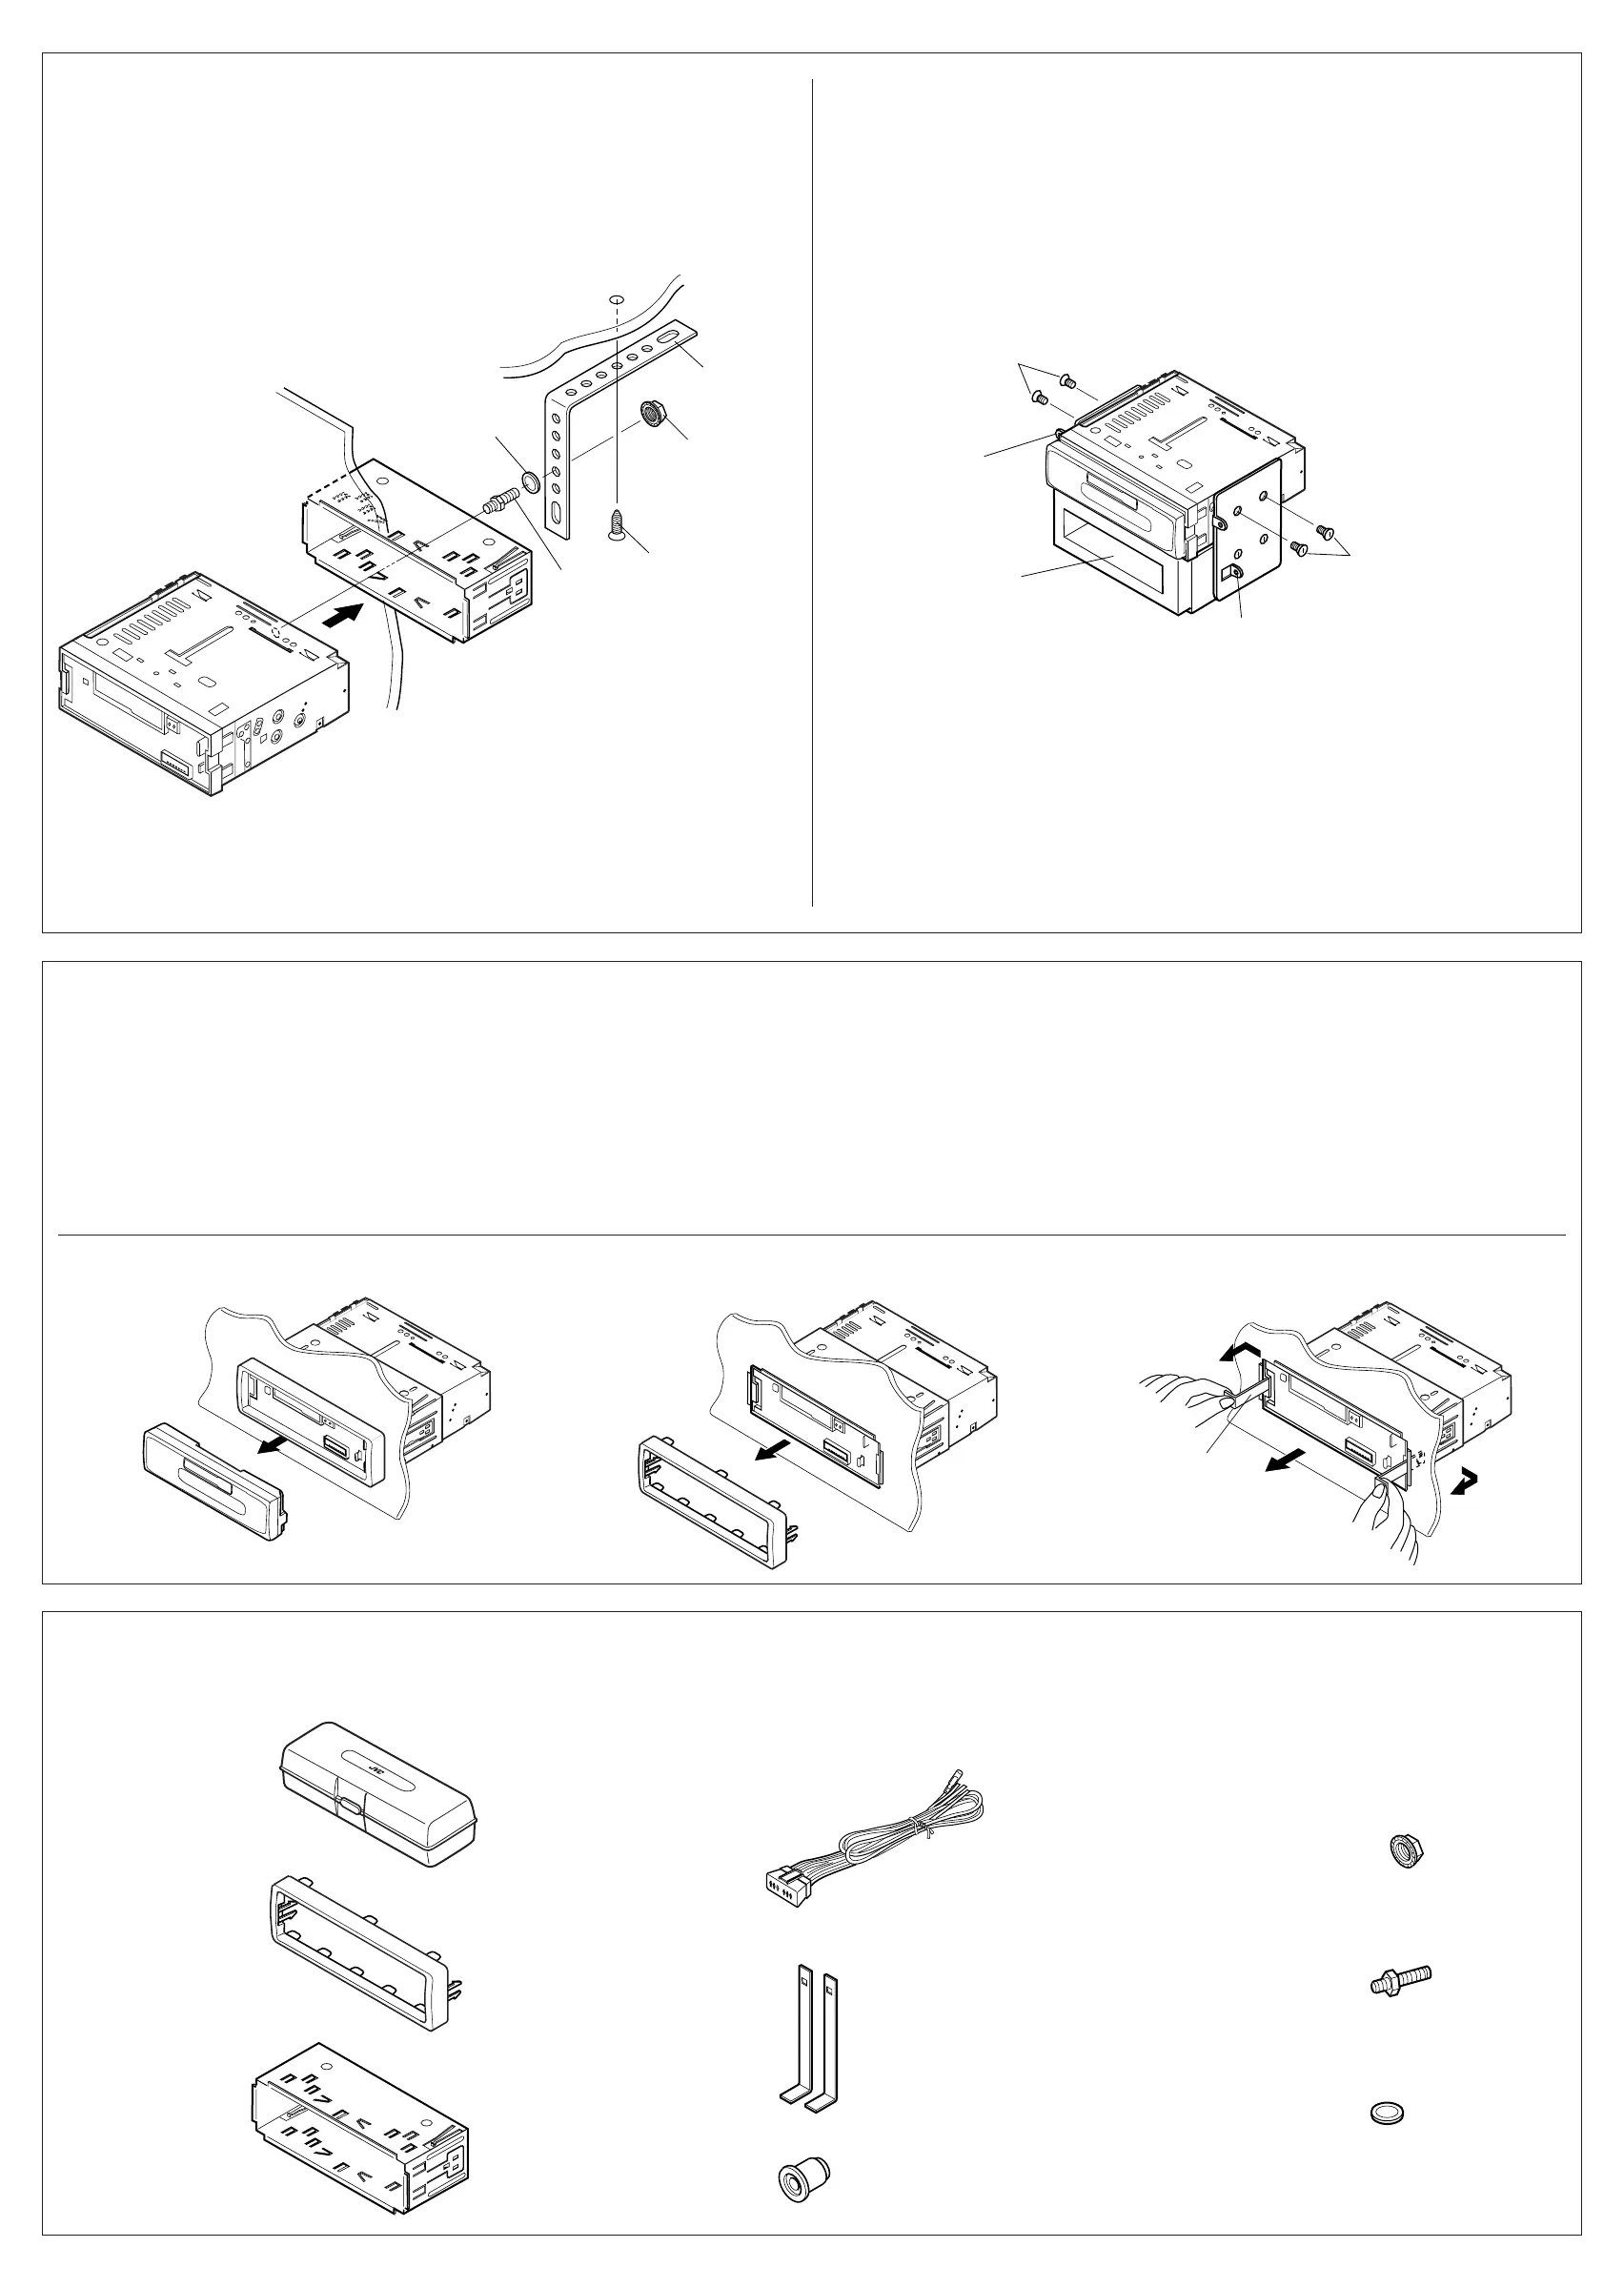
Removing the unit
• Before removing the unit, release the rear section.
1
Remove the control panel.
2
Remove the trim plate.
3
Insert the 2 handles into the slots, as shown. Then, while gently
pulling the handles away from each other, slide out the unit.
(Be sure to keep the handles after installing it.)
• When using the optional stay
Dashboard
Fire wall
Mounting bolt
VOd²« —UL
Sleeve
Screw (option)
©wU{«® wždÐ
Parts list for installation and connection
The following parts are provided with this unit.
After checking them, please set them correctly.
Stay (option)
Lock nut
XO³¦²« WuL
Multi
Music
Scan
SEL
SSM
7
12345
6
40W
X
4
/I
ATT
CD-
CH
TUNER TAPE
s W¹UL(« —«bł
o¹d(«
…—UO« uKÐUð
w«u« qJON«
…—UO« uKÐUð s “UN'« Ÿe½…—UO« uKÐUð s “UN'« Ÿe½
…—UO« uKÐUð s “UN'« Ÿe½…—UO« uKÐUð s “UN'« Ÿe½
…—UO« uKÐUð s “UN'« Ÿe½
•ÆwHK)« ¡e'« —dŠ ¨“UN'« Ÿe½ q³
±±
±±
±ÆrJײ« WŠu Ÿe½«
≤≤
≤≤
≤ÆWM¹e« WŠu Ÿe½«
≥≥
≥≥
≥bFÐ ÆqJA« w 5³ u¼ UL ¨‚uIA« qš«œ 5²U*« qšœ«
¨Èdšô« sŽ …bŠ«u« «bOFÐ WUDKÐ 5²U*« V×Ý ¡UMŁ« ¨p–
Æ×U)« v« “UN'« V×Ý«
©“UN'« VOdð bFÐ 5²U*UÐ pþUH²Š« s bQ𮩓UN'« VOdð bFÐ 5²U*UÐ pþUH²Š« s bQð®
©“UN'« VOdð bFÐ 5²U*UÐ pþUH²Š« s bQ𮩓UN'« VOdð bFÐ 5²U*UÐ pþUH²Š« s bQð®
©“UN'« VOdð bFÐ 5²U*UÐ pþUH²Š« s bQð®
qOu²«Ë VOd²« ¡«eł« WLzUqOu²«Ë VOd²« ¡«eł« WLzU
qOu²«Ë VOd²« ¡«eł« WLzUqOu²«Ë VOd²« ¡«eł« WLzU
qOu²«Ë VOd²« ¡«eł« WLzU
Æ“UN'« l …œËe WOU²« ¡«ełô«
Æ`O× qJAÐ rN³Odð vłd¹ ¨¡«ełô« Ác¼ h× bFÐ
•
XO³¦²K wU{« bM «b²Ý« bMŽXO³¦²K wU{« bM «b²Ý« bMŽ
XO³¦²K wU{« bM «b²Ý« bMŽXO³¦²K wU{« bM «b²Ý« bMŽ
XO³¦²K wU{« bM «b²Ý« bMŽ
ŠKIW «ŠJUÂ
«²uOq
XO³¦ð bM
©wU{«®
Rubber cushion
WOÞUD*« …uA(«
Sleeve
w«u« qJON«
Hard case
VK ‚ËbM
Handles
• When installing the unit without using the sleeve
In a Toyota for example, first remove the car radio and install the unit in its place.
•
w«u« qJON« «b²Ý« ÊËbÐ “UN'« Vdð UbMŽw«u« qJON« «b²Ý« ÊËbÐ “UN'« Vdð UbMŽ
w«u« qJON« «b²Ý« ÊËbÐ “UN'« Vdð UbMŽw«u« qJON« «b²Ý« ÊËbÐ “UN'« Vdð UbMŽ
w«u« qJON« «b²Ý« ÊËbÐ “UN'« Vdð UbMŽ
Washer
UU*«
Trim plate
WM¹e« WŠu
Washer (ø5)
ÂUJŠ« WIKŠ
©µ dD® qOu²«
Handle
WU*«
Power cord
WOzUÐdNJ« WUD« pKÝ
Lock nut (M5)
® XO³¦²« WuLM5©
Mounting bolt (M5 x 20 mm)
® VOd²« —ULM5©rK ≤∞ ™
• !"#
!"
!
!"
!
!
• !"#$%&'($
!"#$%&'()*+,6mm !"#$%&' !"()*+,-#
!TOYOTA !"#$%&'()*+,-.)/012&3456
! (M5 x 6 mm)*
* !"#$
*
*
! (M5 x 6 mm)*
!
• !"#$%&!"'()*+,-.(/012
1
!"#$
2
!"#
3
!"#$%&'()*+,-."/01234$5
!"#$%&'() *+
!"#$%&'()*+,-.
!"
!"#$%&'(
!"#$%&'()
!"#$%&'()*
!
!"#$%&
!"
!"
! (M5)
(ø5)
! (M5 x 20 mm)
Note: When installing the unit on the mounting bracket, make sure to use the 6 mm-long screws. If
longer screws are used, they could damage the unit.
∫WEŠö∫WEŠö
∫WEŠö∫WEŠö
∫WEŠöWUŠ w ÆrK ∂ ‰uÞ wž«dÐ Âb²Ý« s bQð ¨XO³¦²« WOH² vKŽ “UN'« VOdð bMŽ
«b²Ý«wž«dÐÆ“UN'« —d{ Ë« nKð V³¹ Ê« sJ1 p– ÊU ¨rK ∂ s ‰uÞ«
ŽKv ݳOq «*¦U‰¨ w ÝOU—« ½uŸ ðu¹uðU¨ «½eŸ —«œ¹u «OU—… «Ëô ÐFb –p —ÒV «'NU“ w JU½tÆ
M
u
lt
i
Mu
lti
M
u
s
i
c
M
us
ic
S
c
a
n
S
can
S
E
L
S
E
L
S
S
M
SS
M
7
123 4 5
6
40W40W
X
4
/I
/I
A
T
T
TT
CD
-
CD-
C
H
CH
T
U
N
ER
TUNER T
A
PE
* Not included with this unit.
Bracket*
Bracket*
Flat type screws (M5 x 6 mm)*
® …bŽUI« W¹u² wž«dÐM5©rK ∂ ™ *
VOł
XO³¦²« WOH²
*
Pocket
WOH²
XO³¦²«
*
*
Ëe dOžÒÆ“UN'« «c¼ l œ
Flat type screws (M5 x 6 mm)*
® …bŽUI« W¹u² wž«dÐM5©rK ∂ ™ *
•
•
•
Install.KS-F150[U]/1 02/15/2000, 12:54 PM2
 Loading...