2
INSTALLATION (IN-DASH MOUNTING)
The following illustration shows a typical installation. However,
you should make adjustments corresponding to your specific
car. If you have any questions or require information regarding
installation kits, consult your JVC car audio dealer or a
company supplying kits.
• If you are not sure how to install this unit correctly, have it
installed by a qualified technician.
Before installing the unit
• When mounting the unit, be sure to use the screws provided,
as instructed. If other screws are used, there is a possibility
that parts could become loose or damaged.
• When tightening screws or bolts be careful not to pinch any
connection cord.
• Make sure not to block the fan on the rear panel to maintain
proper ventilation when installed.
Mounting bracket removed from the car
!"#$%&
·∑Ëπ√Õß∑’Ë∂Õ¥ÕÕ°®“°√∂¬πµÏ
Screws removed from the car in step
1
1
!"#$%
°√Ÿ∑’Ë∂Õ¥ÕÕ°®“°√∂¬πµÏ„π¢—ÈπµÕπ∑’Ë
1
1
Remove the audio system originally installed in the car,
together with its mounting brackets.
Note: Be sure to keep all the screws and parts removed
from your car for future use.
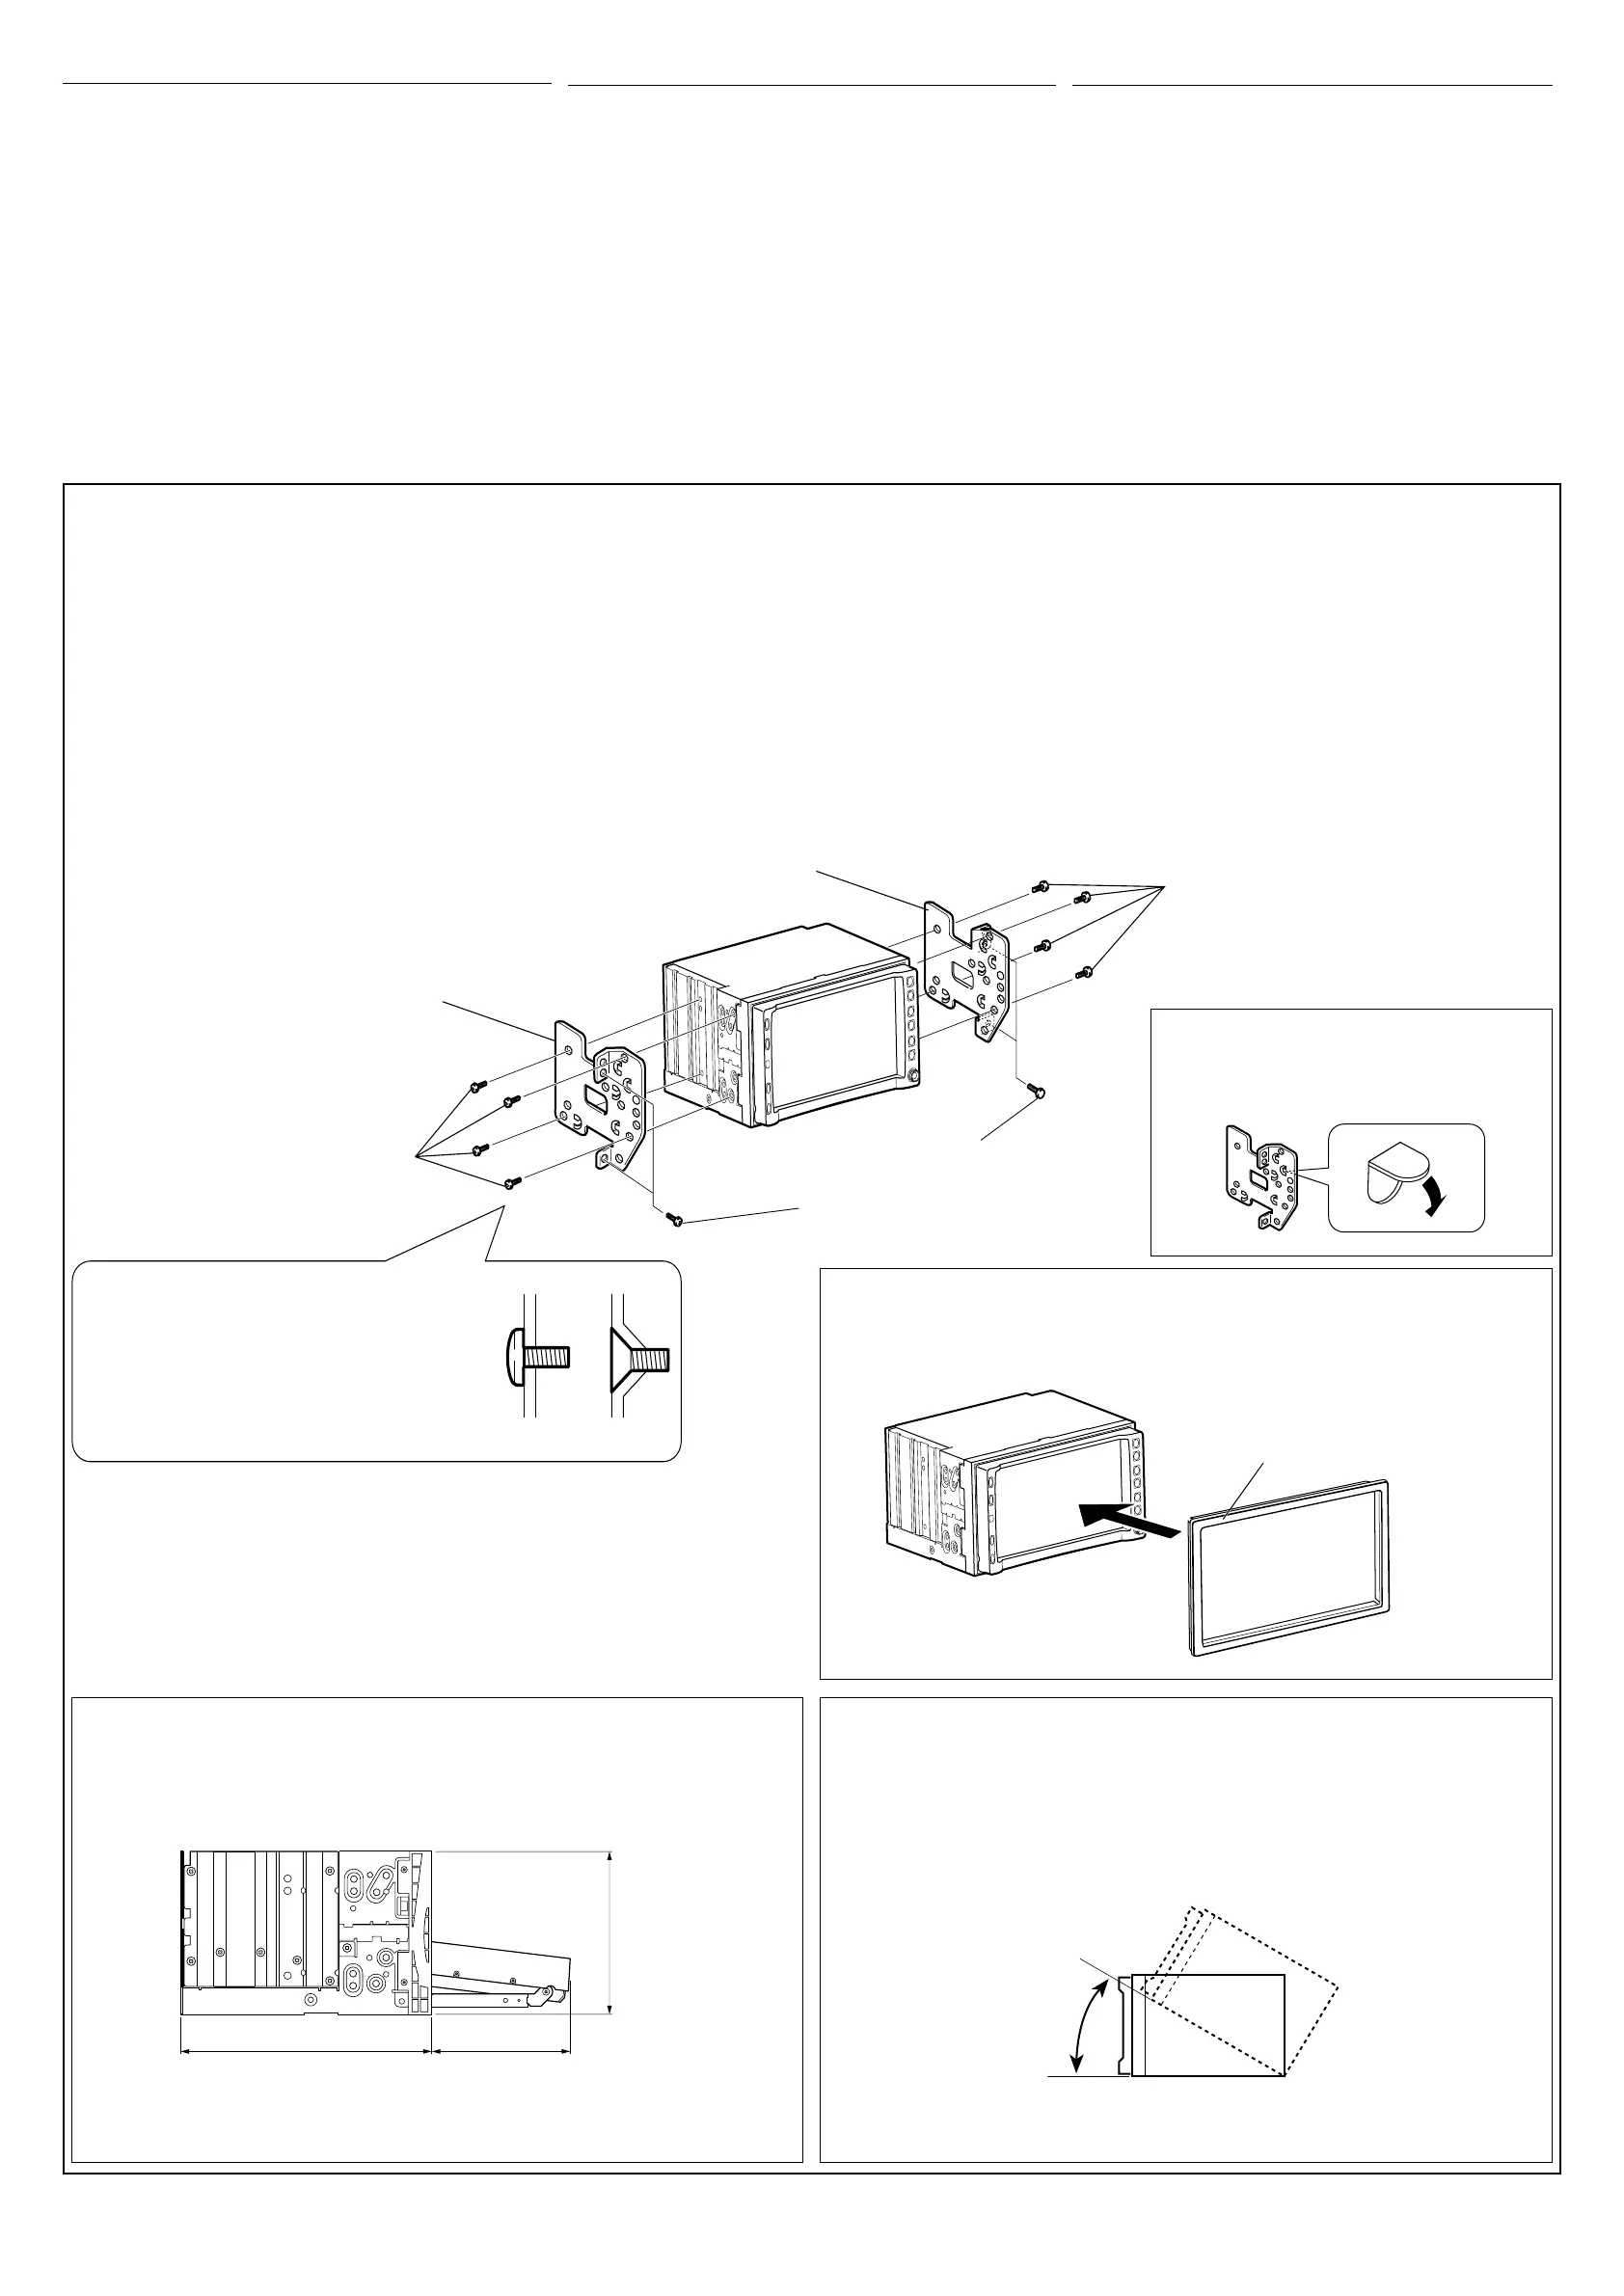
2
Attach the mounting brackets (removed from the car), to
this unit (see below).
3
Connect the power cord and AV I/O cord
• See pages 3 and 4 for the power cord connection.
• See page 5 for the AV I/O connection.
4
Install this unit using the screws removed in step
1
.
The following example is for installation in a Toyota car. For
more details, consult your JVC car audio dealer.
Mounting bracket removed from the car
!"#$%&
·∑Ëπ√Õß∑’Ë∂Õ¥ÕÕ°®“°√∂¬πµÏ
Supplied screws
!
°√Ÿ∑’Ë„ÀÈ¡“æ√ÈÕ¡‡§√◊ËÕß
Note : When installing the unit on the mounting bracket, make sure to
use the supplied screws (M5 x 8 mm). If longer screws are used,
they could damage the unit.
: !"#$%&'()*+#,-./0M5 x 8 mm
!"#$%&'()%&*+,-./01
À¡“¬‡Àµÿ :¢≥–µ‘¥µ—È߇§√◊ËÕß∫π·∑Ëπ√Õß ¢Õ„ÀÈ¥Ÿ„ÀÈ·πË„®«Ë“„™È°√Ÿ∑’Ë„ÀÈ¡“æ√ÈÕ¡‡§√◊ËÕß (M5 x 8 ¡¡)
À“°„™È°√Ÿ¬“«°«Ë“∑’Ë√–∫ÿÕ“®∑”„Àȇ§√◊ËÕ߇’¬‰¥È
30˚
Supplied screws
!
°√Ÿ∑’Ë„ÀÈ¡“æ√ÈÕ¡‡§√◊ËÕß
Select the appropriate type fitting to your
audio system space.
!"#$%&'()*+#,-.
‡≈◊Õ°·∫∫∑’ˇÀ¡“–¡°—∫æ◊Èπ∑’Ë√–∫∫‡§√◊ËÕ߇’¬ß
If necessary, restore the protruding tabs.
!"#$%&'()*
À“°®”‡ªìπ „ÀÈßÕ·ºËπ¬÷¥
160
88.5
100
Unit: mm
ãã !
ÀπË«¬: ¡¡
°“√µ‘¥µ—Èß (°“√ª√–°Õ∫·ºßÀπÈ“ª—∑¡Ï‡¢È“)
¿“æµ—«Õ¬Ë“ßµËÕ‰ªπ’È·¥ß∂÷ß°“√µ‘¥µ—Èß·∫∫∑—Ë«‰ª À“°§ÿ≥¡’ªô
≠À“À√◊ÕµÈÕß°“√¢ÈÕ¡Ÿ≈‡°’ˬ«°—∫™ÿ¥µ‘¥µ—Èß °√ÿ≥“ª√÷°…“°—∫ºŸÈ¢“¬‡§√◊ËÕ߇’¬ß√∂¬πµÏ
JVC ¢Õß∑Ë“πÀ√◊Õ∫√‘…—
• À“°§ÿ≥‰¡Ë¡—Ëπ„®„π«‘∏’°“√µ‘¥µ—È߇§√◊ËÕ߇’¬ßլ˓ß∂Ÿ°«‘∏’
‚ª√¥„Àș˓ߺŸÈ™”π“≠∑”°“√µ‘¥µ—È߇∑Ë“π—¡
°ËÕπ°“√µ‘¥µ—Èßµ—«‡§√◊ËÕß
• ‡¡◊ËÕ®–∑”°“√µ‘¥µ—Èßµ—«‡§√◊ËÕß ‚ª√¥„™È°√Ÿ∑’Ë·π∫¡“µ“¡∑’Ë·π–π”
À“°§ÿ≥¬÷¥‡§√◊ËÕߥȫ¬°√Ÿ·∫∫Õ◊Ëπ Õ“®∑”„ÀÈ™‘ÈπË«πÀ≈«¡À√◊Õ ‡°‘¥§«“¡‡’¬À“¬‰¥È
• ‡¡◊ËÕ®–¢—π·πËπ°√ŸÀ√◊Õ≈—°‡°≈’¬« µÈÕß√–«—߉¡Ë„ÀÈÀπ’∫“¬‡™◊ËÕ¡µËÕ
• °√ÿ≥“µ√«®Õ∫„ÀÈ·πË„®«Ë“¡‘‰¥Èª‘¥°—Èπæ—¥≈¡µ√ß·ºßÀπÈ“°“°¥È“πÀ≈—ß
‡æ◊ËÕ„ÀÈ°“√√–∫“¬Õ“°“»‡ªÁπ‰ªÕ¬Ë“߇À¡“–¡‡¡◊ËÕµ‘¥µ—Èß
!"#$%&'()*
!"#$%&' ()*+,-./01()234567
!"#$% &'()*+,-./01+23456
!"=JVC= !"#$%&'()*+,-./0
• !"#$%&#'()*+,-./0123456
!"#
• !"#$%&'()*+,-./012345+,6
!"#$%&'()*+,-./0
• !"#$!%&'()*+,-./012345
• !"#$%&'()*"+,-./0123-4
Install the unit at an angle of less than 30˚, taking it into account that the monitor would eject
when in use (see below).
!"#$%=30˚ !"#$%&'()*+,-./0123456
µ‘¥µ—Èß™ÿ¥ª√–°Õ∫∑’Ë¡ÿ¡µË”°«Ë“ 30˚ ‚¥¬§”π÷ß∂÷߇«≈“®Õ¡Õ𑇵Õ√Ï¥’¥ÕÕ°„π√–À«Ë“ß°“√„™È (¥Ÿ∑’˥ȓπ≈Ë“ß)
Required space for the monitor ejection
!"#$%&
æ◊ÈÈπ∑’Ë«Ë“ßÀ’˵ÈÕß°“√”À√—∫¥—π®Õ¿“æÕÕ°
1
!"#$%&'()*+,-./0#123
!"#$%&'()*+,-./01234
===
2
!"#$%&'()*+,-./01&2
3
!"#$%&%'(') *+
• !34 !"#$%&
• !5 !"#"$%$&'()
4
!"
1
!"#$%&'
!"Toyota !"#$%&'()*JVC !
!"#$%&'
1
∂Õ¥√–∫∫‡§√◊ËÕ߇’¬ß∑’˵‘¥µ—Èß„π√∂‰«Èµ—Èß·µË·√° æ√ÈÕ¡∑—Èß·∑Ëπ√Õß
À¡“¬‡Àµÿ: ¥Ÿ„ÀÈ·πË„®«Ë“‡°Á∫°√Ÿ·≈–
™‘ÈπË«π∑âÈßÀ¡¥∑’Ë∂Õ¥ÕÕ°®“°√∂¬πµÏ¢Õß∑Ë“π‰«È„™ÈµËÕ‰ª
2
µ‘¥·∑Ëπ√Õß (∑’Ë∂Õ¥ÕÕ°®“°√∂¬πµÏ) ‡¢È“°—∫™ÿ¥ª√–°Õ∫π’È (¥Ÿ∑’˥ȓπ≈Ë“ß)
3
µËÕ“¬‰ø·≈–“¬ AV I/O
•
‚¥¬¥Ÿ«‘∏’°“√µËÕ“¬‰ø„πÀπÈ“ 3 ·≈– 4
•
¥Ÿ«‘∏’°“√µËÕ“¬ AV I/O „πÀπÈ“ 5
4
µ‘¥µ—Èß™ÿ¥ª√–°Õ∫π’È‚¥¬„™È°√Ÿ∑’Ë∂Õ¥ÕÕ°„π¢—ÈπµÕπ∑
1
µ—«Õ¬Ë“ßµËÕ‰ªπ’ȇªÁπ°“√µ‘¥µ—Èß„π√∂¬πµÏ‚µ‚¬µÈ“ ”À√—∫√“¬≈–‡Õ’¬¥‡æ‘Ë¡‡µ‘¡
°√ÿ≥“ª√÷°…“µ—«·∑π®”ÀπË“¬‡§√◊ËÕ߇’¬ß√∂¬πµÏ
JVC
When installating the unit in a Nissan car
!"#$%&'(
‡¡◊ËÕµ‘¥µ—È߇§√◊ËÕß„π√∂π‘—π
Plate for use with a Nissan car
!"#$%
·ºËπ”À√—∫„™È°—∫√∂π‘—π
006_1-3 17/2/06, 9:20 AM2
 Loading...