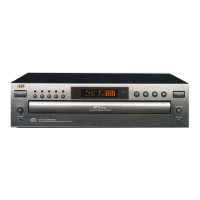
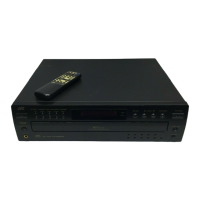
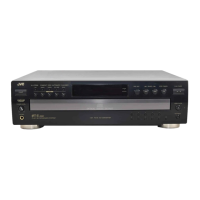
This document describes the JVC Compact Disc Automatic Changer models XL-F115TN, XL-F116BK, XL-F215TN, and XL-F216BK. It serves as an instruction manual, covering precautions, basic operations, various playback patterns, and general information about the COMPU LINK remote control system.
Function Description
The JVC Compact Disc Automatic Changer is designed to play compact discs automatically. It features a multi-disc tray, allowing users to load and play multiple CDs without manual intervention for each disc change. The device supports continuous playback of all loaded discs, starting from any desired track on any disc. It also offers programmed playback, enabling users to select and play their favorite tracks in a specific order, and random playback, which plays tracks in a random sequence from all loaded discs. Additionally, the changer supports repeated playback, allowing users to repeat all discs or a single track.
The unit is equipped with a COMPU LINK Remote Control System, which provides unified control over connected JVC audio components. This system facilitates automatic control of relative operations between components and simplifies various operations, including synchronized recording with a cassette deck. When connected to an amplifier or receiver via COMPU LINK, the changer can be operated using the amplifier's or receiver's remote control unit. The automatic power on/off function ensures that the changer turns on when entering playback mode or when the source selector of the receiver/amplifier is set to CD function mode, and turns off automatically when the amplifier/receiver is switched off.
Usage Features
Loading Discs: Discs are loaded into the disc tray by pressing the OPEN/CLOSE button. Users should place discs label side up, according to the grooves, to prevent damage. The disc tray closes by pressing the OPEN/CLOSE button again.
Power Control: The unit is turned on or off using the POWER (ON/STANDBY) switch. The STANDBY indicator lights up when the unit is in standby mode. The power can also be turned on by pressing the OPEN/CLOSE button or the PLAY/PAUSE button.
Playback Control:
- Starting Playback: Pressing the PLAY/PAUSE button initiates playback. The indicator lights on the display, and playback begins.
- Stopping/Pausing Playback: Pressing the PLAY/PAUSE button temporarily stops playback, and pressing it again resumes playback. The STOP/CANCEL button stops playback completely.
- Skipping Discs: The DISC SKIP button allows users to switch between loaded discs (1 to 5).
- Skipping Tracks: The track buttons (◄◄/►►) enable users to skip to the beginning of the current track, the previous track, or the next track. For XL-F215TN, specific track numbers can be selected using the numbered track buttons (1-10, +10).
- Searching Sections: Holding down the ◄◄/►► buttons during playback allows for fast forward or backward searching within a track.
- Changing Discs During Playback: The EXCHANGE button opens the disc tray, allowing users to change other discs without stopping playback. The DISC SKIP button can be used to rotate the disc tray to access discs at the far end.
Playback Modes:
- Continuous Playback: To play all loaded discs continuously, ensure both PROGRAM and RANDOM indicators are off. Playback can start from any selected disc or track.
- Programmed Playback: In stop mode, press the PLAY MODE or PROGRAM button. Select discs and tracks in the desired order using the DISC and track buttons. Up to 32 steps can be programmed. Playback starts by pressing the PLAY/PAUSE button. Program contents can be checked, modified, or deleted using the CALL and STOP/CANCEL buttons.
- Random Playback: In stop mode, press the RANDOM button. The RANDOM indicator lights up, and tracks are played in a random order.
- Repeated Playback: Pressing the REPEAT button once repeats all loaded discs or programmed contents. Pressing it again repeats the current track. The REPEAT and REPEAT 1 indicators show the active repeat mode.
Headphones: Headphones can be connected to the PHONES jack, and the volume adjusted using the PHONES LEVEL control.
Remote Control (XL-F215TN only): The remote control unit RM-SX215U allows for convenient operation from a distance of up to 7 meters and within a 30-degree angle. It mirrors most of the main unit's controls, including power, playback, track/disc selection, and mode changes.
Maintenance Features
General Precautions:
- Loading: Only compact discs should be inserted into the player.
- Problem Resolution: If a problem persists, turn off the power and consult a JVC dealer.
- Power Cord: Always pull the plug body, not the cable, when unplugging from the wall socket.
- Volume Settings: Due to the CD player's near-zero background noise, users should be cautious not to set the volume too high, as this could damage speakers.
- Condensation: If the unit is moved from a cold to a warm environment, or used in high humidity, condensation may form on optical components, causing noise or malfunctions. If this occurs, leave the unit on for one to two hours to allow it to dry. If the problem persists, consult a JVC dealer.
- Transporting: When moving the unit, avoid tilting it or turning it upside down. If unavoidable, remove discs first.
- Disc Care: Compact discs are made of plastic and can be easily damaged. Dirty, scratched, warped, or damaged discs may prevent correct digital information pickup. Only discs bearing the "COMPACT disc DIGITAL AUDIO" mark should be used.
Installation:
- Location: The unit should be placed on a level, dry surface, within a temperature range of 5°C to 35°C (41°F to 95°F), away from dust and vibrations.
- Interference: If interference occurs with AM radio frequencies, move the unit away from the tuner/receiver or briefly turn off its power.
Connections:
- Audio Connections: Connect the OUTPUT jacks of the changer to the line input jacks of an amplifier or receiver using the supplied audio cord. Ensure correct channel connections (LEFT to LEFT, RIGHT to RIGHT). Never connect to PHONO jacks.
- Power Connection: Plug the AC power cord into the AC POWER CORD inlet of the unit and then into a wall outlet. Do not connect the power cord to a SWITCHED AC OUTLET of an amplifier or receiver when using the COMPU LINK system.
- COMPU LINK Connection: Use the supplied COMPU LINK cord to connect the COMPU LINK-3 SYNCHRO jacks of the changer to other COMPU LINK-compatible JVC components. This enables unified control and synchronized recording.
Remote Control Battery Installation (XL-F215TN only):
- Installation: Remove the rear cover, install two AA (UM-3D, 1.5V) batteries, observing correct polarity, and reattach the cover.
- Battery Life: Battery life is approximately one year. Replace batteries when the operating distance shortens.
- Precautions: Do not mix new and old batteries, use incorrect battery types, or expose batteries to heat/flame. Remove batteries if the remote control unit will not be used for a long time.