This document provides an operating manual for a Metal Brake with Stand, available in two models: MB-36 (36") and MB-40 (40"). The device is designed for bending sheet metal.
I. SAFETY WARNING & CAUTIONS
The manual emphasizes several safety precautions to ensure safe operation and prevent injury or damage. These include:
- KEEP WORK AREA CLEAN: Cluttered and poorly lit work areas can lead to accidents.
- OBSERVE WORK AREA CONDITIONS: Avoid using the machine in damp, wet, or poorly lit locations, and keep the work area well lit.
- KEEP CHILDREN AWAY: Children should not be allowed in the work area or handle the machine, tools, or extension cords.
- STORE IDLE EQUIPMENT: Tools should be locked up in a dry location, out of reach of children, to prevent rust.
- DO NOT FORCE THE TOOLS: The tool performs best and safest at its intended rate. Avoid using inappropriate attachments.
- USE THE RIGHT TOOL FOR THE JOB: Do not use a small tool for a large industrial task, or for purposes other than its intended use.
- DRESS PROPERLY: Avoid loose clothing or jewelry that can get caught in moving parts. Wear protective, electrically non-conductive clothing, non-skid footwear, and restrictive hair covering for long hair.
- USE EYE AND EAR PROTECTION: Always wear ANSI approved chemical splash goggles when working with chemicals, and ANSI approved impact safety goggles at other times. A full-face shield is recommended when producing metal filings or wood chips. An ANSI approved dust mask or respirator should be worn around metal and chemical dusts/mists.
- DO NOT OVERREACH: Maintain proper footing and balance, and avoid reaching over or across running machines.
- MAINTAIN TOOLS WITH CARE: Keep tools sharp and clean, lubricate as instructed, and keep handles clean, dry, and free from oil and grease.
- STAY ALERT: Pay attention and use common sense. Do not operate the tool when tired.
- CHECK DAMAGED PARTS: Before use, inspect for damaged parts (alignment, binding, broken parts, mounting fixtures) and ensure proper operation. Damaged parts should be repaired or replaced by a qualified technician. Do not use the tool if any switch malfunctions.
- REPLACEMENT PARTS AND ACCESSORIES: Use only identical replacement parts and approved accessories from the distributor to avoid voiding the warranty and ensure safety.
- DO NOT OPERATE TOOL IF UNDER THE INFLUENCE OF ALCOHOL OR DRUGS: Read warning labels on prescriptions and avoid operating the tool if judgment or reflexes are impaired.
- SAFETY GLASSES AND EAR PROTECTION must be worn during operation.
The manual also notes that common sense and caution are crucial for safe operation, as not all possible conditions can be covered in the instructions.
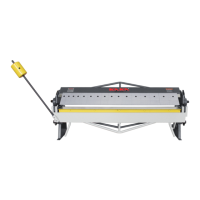
II. GENERAL FEATURES & SPECIFICATIONS
The Metal Brake is designed for bending sheet metal and includes a stand for stability.
Key Specifications:
- Size: Available in 36-inch (MB-36) and 40-inch (MB-40) models.
- Material Capacity:
- Bends Mild Steel up to 12 Gauge thick.
- Bends Stainless Steel up to 16 Gauge thick.
- Bending Angle Range: 0-120°.
- Mounting: Easily bolts to a workbench for secure operation.
- Includes Stand: The device comes with a dedicated stand.
III. PACKAGE CONTENTS
The Metal Brake is shipped in a ply-wooden case and includes the metal brake unit and its stand.
Components (as illustrated in the diagram):
- Upper Handles
- Body
- Press Plate Assembly
- Lower Handles
- Mounting Foot
- Mounting Holes
- Stand
IV. ASSEMBLY
WARNING: The brake is very heavy and requires two people for assembly and installation.
Assembly Steps:
- Place the brake on the floor with the mounting feet facing forward.
- Align the left brake stand mounting pad against the left mounting foot. Secure with a bolt, washer, and nut, then tighten.
- Align the right brake stand mounting pad against the right mounting foot. Secure with a bolt, washer, and nut, then tighten.
- With two people, lift the Brake and Stand upright.
- Position the Brake and Stand where it will be mounted to the floor and mark the locations for drilling through the holes on the left and right sides.
- WARNING: Ensure no electrical conduit or water pipes are present before drilling.
- Drill holes into the floor. Secure the brake with bolts, lock washers, and nuts (not included).
V. OPERATION
CAUTION: Do not bend stock thicker than 12 gauge to avoid damaging the rake. Always measure thickness before use. Keep both hands on the lower handles during bending.
Operating Steps:
- Lift the Upper Handles to open the Press Plate Assembly.
- Insert the sheet metal to be bent over the Body and under the upper Press Plate Assembly.
- Slide the sheet metal and align the bend marks on the metal to the inner lip of the Body.
- Press down on both Handles to the locked position. This clamps the upper Press Plate Assembly onto the stock. If the handle doesn't lock, either the stock is too thick (over 12 gauge), or the brake needs adjustment for thicker stock.
- Using both hands, lift the Body via its Lower Handles until the desired bending angle is achieved.
- Once the bend is complete, return the Lower Handles to the down position.
- Lift the upper Eccentric Handles all the way up and remove the bent sheet metal.
VI. MAKING ADJUSTMENTS
Adjustments may be needed for the Press Plate Assembly to accommodate different sheet metal thicknesses or to align it with the Body.
Adjust for Thickness of Sheet Metal:
- Lift the upper handles and loosen the nuts to allow the bolt to move up or down.
- Use an open-end wrench to turn the bolt clockwise to move the Press Plate Assembly down, or counterclockwise to move it up (for thicker stock).
- Determine the number of turns, then tighten the nuts to secure the bolt. Repeat on the opposite side, ensuring both sides are adjusted with the same number of turns.
- The Press Plate Assembly must be flush with the body when closed. If one side is not flush, readjust it.
Align the Press Plate Assembly In or Out:
- Lift both upper Handles.
- Loosen the bolts on each side.
- Nudge each side of the press plate assembly in or out. This adjustment affects the roundness of the bend; moving it farther back creates a rounder bend.
- A typical setting is 1/16 to 1/8 inch behind the inner edge of the Body.
VII. MAINTENANCE and SERVICE
WARNING: Always use caution when moving or handling the metal brake.
Maintenance Guidelines:
- Lubrication: Lubricate all moving parts periodically with a light oil.
- Service: Tool service must be performed only by qualified repair personnel to prevent injury.
- Replacement Parts: When servicing, use only identical replacement parts and follow the instructions in the manual. Unauthorized parts or failure to follow instructions can lead to shock or injury.
- SAVE THESE INSTRUCTIONS FOR FUTURE REFERENCE: This manual contains important information regarding safety, operation, maintenance, and storage. Read and understand all warnings, cautions, instructions, and labels before use to prevent serious personal injury, property damage, or death.
VIII. PARTS DRAWING & IX. PARTS LIST
The manual includes an exploded view diagram (Parts Drawing) and a comprehensive list of all components (Parts List) with their respective part numbers, descriptions, and quantities. This allows for easy identification and ordering of replacement parts.
Note: The manual states that it is for reference only, and due to continuous improvements, changes to the machines may occur without prior notice.