Quick Setup Guide
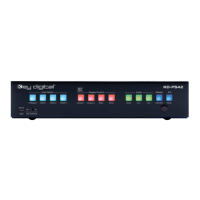
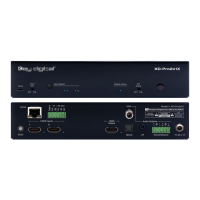
Begin with the KD-PS42 unit, KD-X40MRx, Key Digital wall-plate transmitter (sold separately), all
input/output devices, and audio system powered off.
Connect
1. Connect HDMI sources to the input ports of KD-PS42 unit
2. (Optional) Connect HDMI and Display Port / VGA sources to wall-plate transmitter (sold separately)
3. Connect HDMI displays / projectors to KD-PS42’s HDMI output and the HDMI output port of the
KD-X40MRx unit
4. Connect CAT wire from KD-PS42’s HDBaseT outputs to KD-X40MRx HDBaseT input and (optional)
from KD-PS42’s HDBaseT input to wall-plate transmitter (sold separately)
5. Connect analog or digital audio to audio system
6. (Optional) Connect RS-232 wiring for Integrated System. If utilizing KD-AMP220 or KD-CAMUSB
integration control mode, connect RS-232 wiring from KD-UFS42 Unit Control TxD and Ground pins into
KD-AMP220 and KD-CAMUSB RxD and Ground. Using a stripped mono or stereo audio cable is
recommended, but other cables will work as well. See below diagram
7. Connect Control System. For KD-App control and/or IP control from a control system or PC, connect
TCP/IP port to network. For unit control, connect control system and/or PC to TCP/IP, RS-232, or place
IR emitter over IR sensor.
8. Connected monitors are controlled by CEC Manager™ on the HDMI connection.
a. Alternately, connect IR/RS-232 wiring from control system into pass-thru ports of KD-PS42 and
IR/RS-232 ports of the KD-X40MRx
9. Connect power. Screw-in power supply to the KD-PS42 unit, and then connect power to outlets.
10. Power on HDMI sources and displays