Do you have a question about the Keysight MSOX3014T and is the answer not in the manual?
Instructions for connecting oscilloscope probes to analog channel BNC connectors.
Automatically configures oscilloscope settings to best display the input signals.
Procedure to match probe compensation to the oscilloscope channel for accurate measurements.
Describes adjusting the time/division setting using the horizontal scale knob.
Explains how to adjust the horizontal delay (position) using the delay knob.
How to enable and use the horizontally expanded Zoom display mode for detailed analysis.
Using the search key to find specific events like edge, pulse width, or serial data.
How to set the vertical scale (volts/division) using the channel key and knob.
Guides on setting input impedance to 50 Ohm or 1 MOhm for accurate measurements.
Procedure to search for frequency peaks within FFT math functions using threshold and excursion settings.
How to re-size and re-position math waveforms using multiplexed knobs.
Details on using transform functions like differentiate, integrate, FFT, and square root.
Instructions for connecting digital probe cables to MSO models and the device under test.
Procedure to set logic threshold voltage levels for digital channel groups.
Overview of available hardware-accelerated serial decode options and their licenses.
How to use the search capability to find and mark specific data within the Lister.
Steps to adjust waveform intensity to account for signal characteristics and improve visibility.
How to adjust the trigger level for analog and digital channels using knobs or menus.
Setting up a trigger based on a specified edge (slope) and voltage level on a waveform.
How to trigger on positive or negative pulses of a specified width or timeout value.
Setting up a trigger condition based on a specified pattern of channel states and edges.
Using rectangular zones to trigger acquisitions based on waveform intersection or non-intersection.
Explains the difference between Auto and Normal trigger modes for acquiring data.
Procedure to set the time delay after a trigger before re-arming the trigger circuitry.
Explains the use of Run/Stop and Single keys for controlling data acquisition.
Guides on choosing acquisition modes like Normal, Peak Detect, Averaging, and High Resolution.
Procedure to divide memory into segments for capturing multiple infrequent trigger events.
Steps to place and adjust cursors for custom voltage, time, phase, or ratio measurements.
Guides on using the Meas key to display the Measurement Menu and add automatic measurements.
Explains voltage measurement points and how to set measurement units for channels.
Details time measurement points like Rise Time, Fall Time, Period, and Frequency.
Lists measurements related to FFT analysis such as Channel Power and Occupied Bandwidth.
Procedure to configure the oscilloscope and use Automask to create a compliance mask.
Explains the Run Until and On Error settings for terminating mask tests.
Using the DVM analysis feature for 3-digit voltage measurements on analog channels.
How to use the counter analysis feature for frequency, period, or edge event measurements.
Guides on setting up swept frequency response analysis parameters and running the test.
Accessing the Waveform Generator Menu to enable output and select waveform types.
Using the Edit Waveform Menu to define or modify arbitrary waveform shapes.
Enabling and setting up AM, FM, or FSK modulation for the carrier signal.
Steps to save setups, screen images (BMP/PNG), and waveform data (CSV, ASCII XY, BIN).
Procedure to load setup, mask, or arbitrary waveform files into the oscilloscope.
Instructions for connecting a printer and printing the complete oscilloscope display.
Configuring remote access via USB device port and LAN interface.
Steps to connect the oscilloscope to a network using DHCP or manual configuration.
Setting up triggers for CAN version 2.0A, 2.0B, and CAN FD signals based on various conditions.
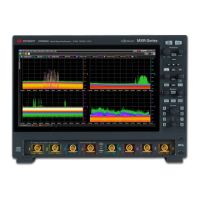
| Bandwidth | 100 MHz |
|---|---|
| Form Factor | Benchtop |
| Waveform Update Rate | 1, 000, 000 wfms/s |
| Vertical Resolution | 8 bits |
| Memory Depth | 4 Mpts |
| Connectivity | USB, LAN |
| Input Impedance | 1 MΩ |
| Maximum Input Voltage | 300 Vrms |
| Trigger Types | Edge, Pulse Width, Pattern, I2C, SPI, CAN, LIN, USB |
| Operating Temperature | 0 °C to 50 °C |
| Channels | 4 analog + 16 digital |