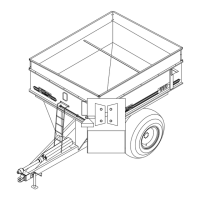
A. Only use a completely shielded drive sys-
tem:
PTO drive systems with complete shielding,
include the tractor master shield and imple-
ment shielding installed all the time. If any
component of the shield system has been
removed for any reason it, or an identical
replacement part, must be installed before
operation.
B. Maximum Joint Angles:
1. Joint (Standard Type)
Continuous operation - 25 degrees
Short duration - 45 degrees
Stationary - 90 degrees
Check shaft articulation and clearance zone!
Joint articulations of more than 45 degrees
lead to damage. Contact between PTO drive
shaft and tractor or implement (e.g. three point
hitch, drawbar) lead to damage.
C. Coupling the PTO drive shaft (Fig. C1)
Twist Lock
1. Twist locking collar and simultaneously
push PTO drive shaft onto PTO shaft until
the locking device engages.
Check to insure all the locks are se-
cure before engaging the PTO drive shaft.
D. Lubrication (Fig. D1-D3)
Lubricate with quality grease before starting
work every 8 operating hours. Clean and
grease PTO drive shaft before each prolonged
period of non-use.
Molded nipples on the shield near each shield
bearing are intended as grease fittings and
should be lubricated every 8 hours of opera-
tion. Telescoping members must be lubricated
to operate successfully regardless of whether
a grease fitting is provided for that purpose.
Telescoping members without fittings should
be pulled apart and grease should be applied
manually. Check and grease guard tubes in
winter to prevent freezing.
E. Chains (Fig. F1-F3)
NOTE: The chain is intended to prevent the
shield from rotating against non-moving parts,
thereby preventing shield damage. A properly
installed chain will increase the service life of
the shield.
C1
D1
D2
D3
B1